
Configuring External Cassandra
Contents
Genesys recommends using an external Cassandra cluster in your deployment architecture, because it gives you dedicated management of memory and other hardware resources. This means that both your Web Engagement Server processes and your Cassandra processes can better handle demand as your traffic increases.
To set up your own external Cassandra cluster, follow these steps:
- Create and configure Cassandra access points in Genesys Administrator for each node of the external Cassandra cluster.
- Deploy Cassandra.
Note: Genesys recommends that you use Linux when deploying an external Cassandra cluster.
Note: You must synchronize the time on all hosts that contain Cassandra nodes. Failure to do this may lead to problems with removing data by TTL.
Note: If you plan to establish secure communications with your Cassandra cluster, Genesys recommends that you carefully evaluate the related security considerations.
Importing the Cassandra Resource Access Point Template
Note: For more information on how to work with templates in Genesys Administrator, consult Generic Configuration Procedures.
Start
- Open Genesys Administrator and navigate to Provisioning > Environment > Application Templates.
- In the Tasks panel, click Upload Template.
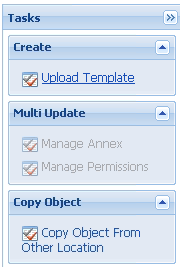 Upload Template link in the Tasks panel
 - In the Click 'Add' and choose application template (APD) file to import window, click Add.
- Browse to the Cassandra_Resource_Access_Point_850.apd file. The New Application Template panel opens.
- Click Save & Close.

End
Creating the Cassandra Resource Access Point Application
Note: For more information on how to work with application objects in Genesys Administrator, consult Generic Configuration Procedures.
Prerequisites
- You completed Importing the Cassandra Resource Access Point Template.
Start
- Open Genesys Administrator and navigate to Provisioning > Environment > Applications.
- In the Tasks panel, click Create New Application.
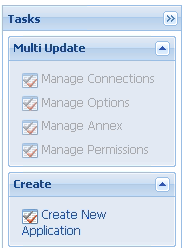 Create New Application link.
 - In the Select Application Template panel, click Browse for Template and select the Cassandra Resource Access Point template that you imported in Importing the Cassandra Resource Access Point Template. Click OK.
- The template is added to the Select Application Template panel. Click Next.
- In the Select Metadata file panel, click Browse and select the Cassandra_Resource_Access_Point_850.xml file. Click Open.
- The metadata file is added to the Select Metadata file panel. Click Next.
- In Specify Application parameters:
- Enter a name for your application. For instance, GWE_Cassandra_Access_Point.
- Make sure that State is enabled.
- Select the Host on which the Access Point will reside.
- Click Create.
- The Results panel opens.
- Enable Opens the Application details form after clicking 'Finish' and click Finish. The Cassandra Resource Access Point application form opens and you can start configuring the Web Engagement Cluster application.

End
Configuring the Cassandra Resource Access Point Application
Note: For more information on how to work with application objects in Genesys Administrator, consult Generic Configuration Procedures.
Prerequisites
- You completed Creating the Cassandra Resource Access Point Application.
Start
- If your Cassandra Resource Access Point application form is not open in Genesys Administrator, navigate to Provisioning > Environment > Applications. Select the application defined for the Cassandra Resource Access Point and click Edit....
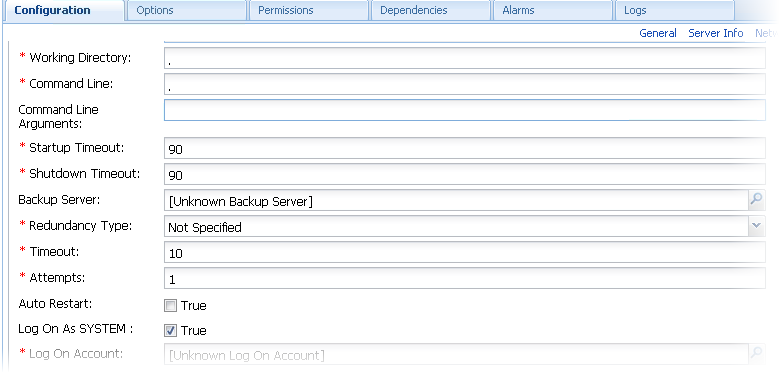
- Expand the Server Info pane.
- In the Tenant section, click Add and select your tenant. For instance, Environment. Click OK.
- If your Host is not defined, click the lookup icon to browse to the hostname of your application, which should point to the host where you plan to locate your Cassandra node.
- In the Listening Ports section, create the default port by clicking Add. The Port Info dialog opens.
- Enter the Port. For instance, 9160.
- Click OK. The default port appears in the list of Listening ports.
- Click Add again. The Port Info dialog opens.
- In the ID field, enter native.
- Enter the Port. For instance, 9042.
- Click OK. The native port appears in the list of Listening ports.
 Cassandra port settings
- Ensure the Working Directory and Command Line fields contain "." (period).
 Commands
 - Click Save.
- The Confirmation dialog for changing the application's port opens. Click Yes.
- To configure External Cassandra, select the Options tab.
- In the [resource] section, make sure type is set to cassandra.
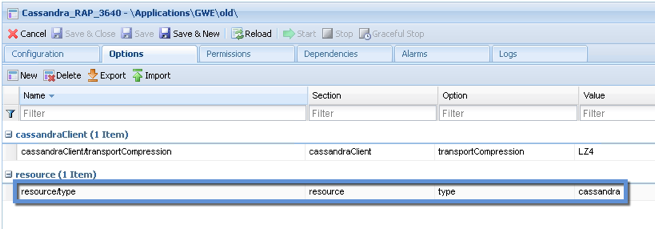 Cassandra resource setting
- In the [resource] section, make sure type is set to cassandra.
- Click Save & Close. If the Confirmation dialog opens, click Yes.


End
Note that you must execute this procedure and the previous one for each Cassandra node in your cluster.
Configuring the Web Engagement Cluster for Use with External Cassandra
Prerequisites
- You completed Configuring the Cassandra Resource Access Point Application.
Start
- Navigate to Provisioning > Environment > Applications. Select the application defined for the Web Engagement Cluster and click Edit....
- In the Connections section of the Configuration tab, click Add. The Browse for applications panel opens. Select a Genesys application defined as a Cassandra Resource Access Point, then select the native connection port, then click OK.
- Repeat the previous step for all Cassandra Resource Access Point applications configured for external Cassandra nodes belonging to the same data center.
Note: You must not connect Cassandra Resource Access Point applications belonging to different data centers to the same Web Engagement Cluster. - Select the Options tab.
- In the [cassandraEmbedded] section, set enabled to false.
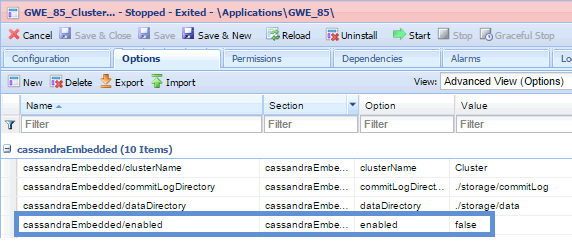 Cassandra resource setting
 - If you plan to use Web Engagement Reporting Server:
- Make sure that the replicationStrategy option in the [cassandraKeyspace] section is set to NetworkTopologyStrategy.
- Make sure that the replicationStrategyParams option in the [cassandraKeyspace] section is specified in accordance with the configuration of your Cassandra cluster.
- In the [kibana] section, add the elasticsearch_url option. This option should point to the load balancer, which will balance requests to the Cassandra nodes using port 9200 (or, alternatively, the port specified in the -Des.http.port option, as explained later in this paragraph). For example, http://external_cassandra_host:9200.
Note: The Elasticsearch port is not specified in the default settings for external Cassandra. Because of this, you should use the default value of 9200. If you need to use a different port for Elasticsearch, use the -Des.http.port option.
- In the [cassandraEmbedded] section, set enabled to false.
- Click Save & Close. If the Confirmation dialog opens, click Yes.

End
Deploy a Cassandra Cluster Node
Installation
- Download version 2.2.9 or higher from the Cassandra 2.2 stream.
- Unpack the archive into the installation directory, for example:
cd /genesys
tar xzf apache-cassandra-2.2.x-bin.tar.gzConfiguration
- Go to the directory where you installed your Cassandra node.
- Edit conf/cassandra.yaml, using the following custom values:
- cluster_name: cluster name without spaces, for example WebMe_Cassandra_Cluster
- seeds: <comma-separated list of fully qualified domain names (FQDN) or IP addresses of one or more Cassandra nodes> See the description of the seedNodes option for details. Note: This value must be the same for all nodes. Here are two examples:
- 192.168.0.1,192.168.3
- host1.mydomain.com, host2.mydomain.com
- storage_port: 7000 (default value)
- ssl_storage_port: 7001 (default value)
- listen_address: <current node host name> Note: This address is used for inter-node communication, so it must be available for use by other Cassandra nodes in your cluster.
- native_transport_port: 9042 (default value)
- rpc_address: <current node host name> Note: This address is used by Web Engagement to connect to Cassandra, so it must be available to all Web Engagement hosts.
- rpc_port: 9160 (default value)
- endpoint_snitch: GossipingPropertyFileSnitch
- Note: Make sure that each Cassandra node has access to the ports specified for the other nodes.
- Edit conf/cassandra-rackdc.properties.
- In order to set up indexing for Elasticsearch:
- Copy all jar files from Web Engagement installation directory/tools/pulse/lib/es-index to Cassandra installation directory/lib.
- Copy the es-index.properties file from Web Engagement installation directory/server/resources to Cassandra installation directory/conf.
- Edit the es-index.properties file.
- Verify that the required communication ports are opened.
Setting Up a Cassandra Service
The sample script described in the following procedure should give you an idea of how to set up Cassandra as a service process.
- Create the /etc/init.d/cassandra startup script.
- Edit the contents of the file:
#!/bin/sh
#
# chkconfig: - 80 45
# description: Starts and stops Cassandra
# update daemon path to point to the cassandra executable
DAEMON=<Cassandra_installation_dir>/bin/cassandra
start() {
        echo -n "Starting Cassandra... "
        $DAEMON -p /var/run/cassandra.pid
        echo "OK"
        return 0
}
stop() {
        echo -n "Stopping Cassandra... "
        kill $(cat /var/run/cassandra.pid)
        echo "OK"
        return 0
}
case "$1" in
  start)
        start
        ;;
  stop)
        stop
        ;;
  restart)
        stop
        start
        ;;
  *)
        echo $"Usage: $0 {start|stop|restart}"
        exit 1
esac
exit $?- Make the file executable: sudo chmod +x /etc/init.d/cassandra
- Add the new service to the list: sudo chkconfig --add cassandra
- Now you can manage the service from the command line:
- sudo /etc/init.d/cassandra start
- sudo /etc/init.d/cassandra stop
- Configure the service to be started automatically together with the VM: sudo chkconfig --level 2345 cassandra on
Installation
- Download version 2.2.9 or higher from the Cassandra 2.2 stream.
- Unpack the archive into a path without spaces.
Configuration
- Go to the directory where you installed your Cassandra node.
- Edit cassandra.yaml, using the following custom values:
- cluster_name: cluster name without spaces, for example WebMe_Cassandra_Cluster
- seeds: <comma-separated list of fully qualified domain names (FQDN) or IP addresses of one or more Cassandra nodes> See the description of the seedNodes option for details. Note: This value must be the same for all nodes. Here are two examples:
- 192.168.0.1,192.168.3
- host1.mydomain.com, host2.mydomain.com
- storage_port: 7000 (default value)
- ssl_storage_port: 7001 (default value)
- listen_address: <current node host name> Note: This address is used for inter-node communication, so it must be available for use by other Cassandra nodes in your cluster.
- native_transport_port: 9042 (default value)
- rpc_address: <current node host name> Note: This address is used by Web Engagement to connect to Cassandra, so it must be available to all Web Engagement hosts.
- rpc_port: 9160 (default value)
- endpoint_snitch: GossipingPropertyFileSnitch
- Note: Make sure that each Cassandra node has access to the ports specified for the other nodes.
- Edit conf/cassandra-rackdc.properties.
- In order to set up indexing for Elasticsearch:
- Copy all jar files from Web Engagement installation directory/tools/pulse/lib/es-index to Cassandra installation directory/lib.
- Copy the es-index.properties file from Web Engagement installation directory/server/resources to Cassandra installation directory/conf.
- Edit the es-index.properties file.
- Verify that the required communication ports are opened.
- Start Cassandra.
Configuring cassandra-rackdc.properties
For a single data center, use the following as a guide:
dc=<Data Center name>
rack=<RACK ID>
For example,
dc=OperationalDC
rack=RAC1
Note: Genesys recommends that you use the same rack ID if you do not have a clear understanding of your servers' rack usage. For more information about cassandra-rackdc.properties, refer to
http://docs.datastax.com/en/cassandra/2.2/cassandra/architecture/archsnitchGossipPF.html.
Configuring es-index.properties
- For every node in a given data center, set the discovery.zen.ping.unicast.hosts property in the es-index.properties file for that node to a comma-separated list of the servers that host the Cassandra nodes contained in that data center.
If you have n data centers in your Cassandra cluster, then you should have n different versions of the es-index.properties file (one for each data center). The primary difference between these lists will be the values of the discovery.zen.ping.unicast.hosts property.
For example:- The Cassandra nodes located on host_DC1_A, host_DC1_B, and host_DC1_C belong to data center DC1. Because of this, the discovery.zen.ping.unicast.hosts property in the es-index.properties files for nodes host_DC1_A, host_DC1_B, and host_DC1_C will be defined as host_DC1_A,host_DC1_B,host_DC1_C.
- The Cassandra nodes located on host_DC2_X, host_DC2_Y, and host_DC2_Z belong to data center DC2. Because of this, the discovery.zen.ping.unicast.hosts property in the es-index.properties files for nodes host_DC2_X, host_DC2_Y, and host_DC2_Z will be defined as host_DC2_X,host_DC2_Y,host_DC2_Z.
- Set the index.number_of_shards property to three times the number of Cassandra nodes in the current data center. For example, if you have 3 Cassandra nodes in the current data center, then the number of shards for each index should be 9.
- If you prefer not to store your Elasticsearch data in the default directory, you can use the path.data property to specify another location. This property is commented out by default.
Important! You must make sure that the user on whose behalf Cassandra was started has write permissions to the path directory, whether this directory was explicitly specified or selected by default.
Communication Ports
Cassandra and Elasticsearch use the following ports for external and internode communication. Note: Either or both of them may not work as expected unless you ensure that these ports are opened for communication between all servers that host Cassandra nodes.
| Port | Default | Where to Change the Value |
|---|---|---|
| Cassandra Storage port | 7000 | storagePort in the [cassandraEmbedded] section of the Web Engagement Cluster Application (for embedded Cassandra) or storage_port in cassandra.yaml (for external Cassandra) |
| Cassandra SSL Storage port | 7001 | sslStoragePort in the [cassandraEmbedded] section of the Web Engagement Cluster Application (for embedded Cassandra) or ssl_storage_port in cassandra.yaml (for external Cassandra) |
| Cassandra Thrift port | 9160 | rpcPort in the [cassandraEmbedded] section of the Web Engagement Cluster Application (for embedded Cassandra) or rpc_port in cassandra.yaml (for external Cassandra) |
| Cassandra CQL port | 9042 | nativeTransportPort in the [cassandraEmbedded] section of the Web Engagement Cluster Application (for embedded Cassandra) or native_transport_port in cassandra.yaml (for external Cassandra) |
| Elasticsearch REST request service port | 9200 | http.port property in the es-index.properties file |
| Elasticsearch transport port | 9300 | transport.tcp.port property in the es-index.properties file |
Starting the Cassandra Cluster Nodes
Your Cassandra nodes must be started in a certain order:
- Start the seed nodes.
- Start the other non-seed nodes.
The seed node is one of the nodes specified in the seeds option.
Verifying Your Cassandra Cluster
After you have deployed your Cassandra Cluster, you may want to verify that all of the nodes can communicate with each other. To do this, execute the following command on any Database VM:
Linux
cd <Cassandra_installation_dir>/bin
./nodetool -h <hostname> status
Windows
cd <Cassandra_installation_dir >/bin
nodetool -h <hostname> status
Sample Output
This command should produce output that looks something like this:
Datacenter: DC1
==========================
Status=Up/Down
|/ State=Normal/Leaving/Joining/Moving
--        Address                  Load                Tokens       Owns    Host ID                                                                        Rack
UN     10.51.XX.XXX       106,36 KB       256               ?             380d02fb-da6c-4f6a-820e-14538bd24a39     RAC1
UN     10.51.XX.XXX       108,22 KB       256               ?             601f05ac-aa1d-417b-911f-22340ae62c38       RAC1
UN     10.51.XX.XXX       107,61 KB       256               ?             171a15cd-fa4d-410e-431b-51297af13e96      RAC1

Datacenter: DC2
==========================
Status=Up/Down
|/ State=Normal/Leaving/Joining/Moving
--        Address                  Load                Tokens       Owns    Host ID                                                                        Rack
UN     10.51.XX.XXX       104,06 KB       256               ?             48ad4d08-555b-4526-8fab-d7ad021b14af     RAC1
UN     10.51.XX.XXX       109,56 KB       256               ?             8ca0fb45-aef7-4f0a-ac4e-a324ceea90c9        RAC1
UN     10.51.XX.XXX       105,18 KB       256               ?             1c45e1fa-9f82-4bc4-a896-5575bad53808       RAC1
Verifying Your Elasticsearch Cluster
Each of your Cassandra data centers must have a dedicated Elasticsearch cluster. To verify the status of your Elasticsearch clusters, execute the following request. (You can use your browser for this.)
Prerequisites
- Your Cassandra cluster was initialized
- Your Cassandra cluster was started
- At least one Web Engagement Server instance is running in each of your Web Engagement Clusters
Start
http://<cassandra_node_host>:9200/_cluster/state?prettyEnd
Note: This example uses port 9200, which is the default Elasticsearch HTTP port. If you are not using the default Elasticsearch HTTP port, substitute the port number that you are using.
Output
The output from this request will describe your nodes, as shown here:
"nodes": {
    "xxx-xxxxxx-xxxxxxxxxxx": {
        "name": <node name>,
        "transport_address": <address for inter-node Elasticsearch communication>,
        "attributes": {}
    }
}
If your Elasticsearch clusters are correctly configured:
- Any requests executed on Cassandra nodes belonging to the same data center should result in identical lists of Elasticsearch nodes.
- Any requests executed on Cassandra nodes belonging to different data centers should result in different lists of Elasticsearch nodes.
Upgrading Cassandra Nodes
You can upgrade your Cassandra version without interrupting service if:
- The version you are upgrading to is in the same stream (for example, from one 2.2.x version to another)
- You are not changing your database schema
Use the following steps for this task:
- Stop the first Cassandra seed node.
- Preserve your database storage.
- Upgrade your Cassandra version, following the instructions in the Release Notes for the new version.
- Be sure that your database storage is in the preserved state (the same set of files).
- Start the first Cassandra seed node.
- Execute steps 1 through 5 for the other seed nodes.
- Execute steps 1 through 5 for the other non‐seed nodes.
- Verify that the Cassandra cluster is working, as shown above in Verifying Your Cassandra Cluster.
If your upgrade plans include changing your database schema or changing Cassandra versions between streams (for example, from 2.0 to 2.2), then you will have to interrupt service. Use the following steps for this task:
- Stop all of your Cassandra nodes.
- If your database schema has been changed since you installed the previous version, update the Cassandra database, following the instructions in the Release Notes for the new version.
- Configure each node, following the instructions in the Release Notes for the new version.
- Start the Cassandra seed nodes.
- Start the other nodes.
- Verify that the Cassandra cluster is working, as shown above in Verifying Your Cassandra Cluster.
Maintenance
Because Cassandra is a critical component of Web Engagement, it is essential to keep track of its health. The Datastax documentation provides some really good information about how to do this at http://docs.datastax.com/en/cassandra/2.0/cassandra/tools/toolsNodetool_r.html.
Genesys recommends that you use the nodetool utility that is bundled with your Cassandra installation package and that you make a habit of using the following nodetool commands to monitor the state of your Cassandra cluster.
ring
Displays node status and information about the cluster, as determined by the node being queried. This can give you an idea of the load balance and whether any nodes are down. If your cluster is not properly configured, different nodes may show a different cluster; this is a good way to check that every node views the cluster the same way.
nodetool -h <HOST_NAME> -p <JMX_PORT> ringstatus
Displays cluster information.
nodetool -h <HOST_NAME> -p <JMX_PORT> statuscompactionstats
Displays compaction statistics.
nodetool -h <HOST_NAME> -p <JMX_PORT> compactionstatsgetcompactionthroughput \ setcompactionthhroughput
Displays the compaction throughput on the selected Cassandra instance. By default it is 32 MB/s.
You can increase this parameter if you observe permanent growth of database size after the TTL and grace periods are passed. Note that increasing compaction throughput will affect memory and CPU consumption. Because of this, you need make sure to have sufficient hardware to support the rate that you have selected.
nodetool -h <HOST_NAME> -p <JMX_PORT> getcompactionthroughputTo increase compaction throughput to 64 MB/s, for example, use the following command:
nodetool -h <HOST_NAME> -p <JMX_PORT> setcompactionthroughput 64Recovery
Depending on the replication factor and consistency levels of a Cassandra cluster configuration, the Web Engagement Cluster can handle the failure of one or more Cassandra nodes in the data center without any special recovery procedures and without interrupting service or losing functionality. When the failed node is back up, the Web Engagement Cluster automatically reconnects to it.
- Therefore, if an eligible number of nodes have failed, you should just restart them.
However, if too many of the Cassandra nodes in your cluster have failed or stopped, you will lose functionality. To ensure a successful recover from failure of multiple nodes, Genesys recommends that you:
- Stop every node, one at a time, with at least two minutes between operations.
- Then restart the nodes one at a time, with at least two minutes between operations.