Contents
- 1 Security Procedures
- 1.1 Generating the Client Certificate
- 1.2 Generating the Server Certificate Using Skype for Business Management Shell
- 1.3 Generating the Server Certificate using Microsoft Management Console or CA Web Access
- 1.4 Generating the Front End Server Certificate
- 1.5 Modifying Command Line Arguments for MTLS
- 1.6 Enabling Kerberos Security Between UCC and Lync Skype for Business
- 1.7 Configuring Kerberos Security in Active Directory
- 1.8 Creating a Password for Kerberos Security
- 1.9 Exporting the Trusted Certificate from the Lync Skype for Business Host
- 1.10 Adding the Certificate to the UC Connector Installation
- 1.11 Creating the Configuration File for Kerberos security
- 1.12 Configuring a Secure SIP Port
- 1.13 Modifying Command Line Parameters for TLS
Security Procedures
The procedures below apply to integrations with Lync and Skype for Business relevant for all use cases of UC Connector - whether it is used to exchange presence in Smart Link integrations, or for voice integrations in the Contact Center. For background information see the UC Connector Deployment Guide, Enable Secure Communications.
Generating the Client Certificate
Purpose: To generate a regular client/user certificate used to trust servers in the domain, such as the Lync / Skype for Business Front End server(s). This is the same type of certificate that is installed on a user’s workstation to start a Lync / Skype for Business client and to connect to the Front End server using TLS connectivity. It is not necessary to export private keys for this certificate or have private keys exportable.
1. Request the certificate through Certification Authority (CA) Web Access
https://[server_name]/certsrv
2. Select Download a CA certificate, certificate chain, or CRL.
3. Select Download CA certificate\.
4. Save the certificate as "DER encoded binary X.509 (.CER)". For example, CompanyA_Certificate.cer
Next Steps:
- On the host computer where Genesys is installed, open the Microsoft Management Console (MMC) or Internet Explorer to retrieve the certificate.
- Continue to one of the following:
- Generating the Server Certificate using Skype for Business Management Shell
- Generating the Server Certificate using Microsoft Management Console or CA Web Access.
Generating the Server Certificate Using Skype for Business Management Shell
Purpose: To generate a server certificate. This is the same type of certificate required by any server belonging to a Lync or Skype infrastructure (A/V MCU, Edge Server, Mediation Server).
1. On the host computer where the Front End Server is installed, open Microsoft Shell and type;
Request-CsCertificate -New -Type Default -FriendlyName
"GenesysServerCertificate" -CA
"labdc01.companya.com\companya-LABDC01-CA" -ComputerFQDN
[server_name]-Verbose
![]() The [server_name] must match the FQDN of the host where UC Connector is running.
The [server_name] must match the FQDN of the host where UC Connector is running.
This will request the certificate through Skype for Business. If
authorized/granted, it will be installed on the Certificate Store
(Personal) of the host where the request was issued.
2. Open the Microsoft Management Console (MMC):
- Click Start > Run.
- Type MMC and click OK.
3. Add the certificates snap-in:
- Go to File > Add/Remove Snap-In.
- Click Add.
- Select the Certificates Snap-In and click Add.
- Select Local Computer and click Finish.
4. Find the Genesys Server certificate that you want to export:
- Under the Certificates tree, locate your domain certificate; for example this could be in the Personal folder.
- Click Certificates.
- Right-click the certificate you want to export, select All Tasks > Advanced Operations > Export.
5. Follow the wizard to export the certificate to a .pfx file (“Personal Information Exchange - PKCS #12 (.PFX)”).
- Choose ‘Yes, export the private key’.
- Choose ‘Include all certificates in certificate path if possible’.
![]() Do not select 'Delete Private key'.
Do not select 'Delete Private key'.
- Enter a password (take note of it). (Example: mnopqr)
- Select a location to save the file, then click Finish (Example: GenesysServer_Certficate.pfx)
6. When you get the message "The export was successful", click OK.
Next Steps:
- Place the exported file in a logical location on the UC Connector host machine.
- After the certificate is moved to the UCC host, continue at Configuring a secure SIP port.
Generating the Server Certificate using Microsoft Management Console or CA Web Access
Purpose: To generate a certificate for the host running UC Connector with the Microsoft Management Console or Certification Authority (CA) Web Access.
1. On the host computer where Genesys is installed, request the certificate through CA Web Access:
https://[server_name]/certsrv
2. Select Request a certificate.
3. Select Advanced certificate request.
4. Select Create and submit a request to this CA:
- Type - Select a Server Template with Private Keys exportable.
- (NDLR: custom Server template with Private Keys exportable)
- Name: demosrv.genesyslab.com (Subject)
- New keyset: Microsoft RSA, Key Size 2048, Mark Keys as exportable
- Friendly Name: (Example: GenesysServerCertificate)
5. Export the certificate and save it into a .pfx file (Example: GenesysServer_Certficate.pfx). [password - Example: mnopqr]
Next Steps:
- Place the exported file in a logical location on the UC Connector host machine.
- After the certificate is moved to the UCC host, continue at Configuring a Secure SIP Port.
Generating the Front End Server Certificate
Purpose: To generate a server certificate for use in a lab environment.
1. On the host computer where Front End Server is installed, open the Microsoft Management Console (MMC):
- Click Start > Run.
- Type MMC and click OK.
2. Add the certificates snap-in:
- Go to File > Add/Remove Snap-In.
- Click Add.
- Select the Certificates Snap-In and click Add.
- Select Computer Account and click Finish.
- Select Local Computer and click Finish.
3. Find the Domain certificate that you want to export.
- Under the Certificates tree, locate your domain certificate, for example in the Personal folder.
- Click Certificates.
- Right-click the certificate you want to export, select All Tasks > Advanced Operations > Request New Certificate with the Same Key.
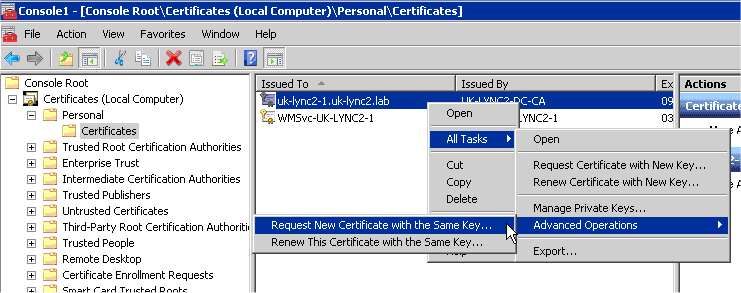
4. Follow the wizard to export the certificate to a .pfx file.
- Choose ‘Yes, export the private key’.
- Choose ‘Include all certificates in certificate path if possible’.
![]() Do not select 'Delete Private key'.
Do not select 'Delete Private key'.
- Enter a password (take note of it).
- Select a location to save the file, then click Finish.
5. When you get the message "The export was successful", click OK.
Next Steps:
- Place the exported file in a logical location on the UC Connector host machine.
- After the certificate is moved to the UCC host, continue at Configuring a Secure SIP Port.
Modifying Command Line Arguments for MTLS
Prerequisites
- You noted the password that you created in Generating the Front End Server Certificate.
- You noted the file location where you placed the .pfx file.
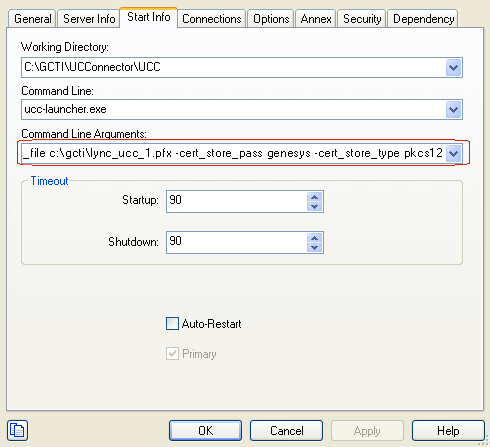
1. Go to Start Info tab > Command Line Arguments in the UC Connector application.
2. Add the following parameters to the existing command line argument:
-cert_store_<path to .pfx file on UCC host>
-cert_store_pass <password generated in Generating the Front End Server Certificate.
-cert_store_type pkcs12
-key_store_file <path to the Java keystore file>—This file contains
the collection of CA certificates trusted by the application process (trust
store). If a trust store location is not specified, the SunJSSE
implementation uses a keystore file in the following locations (in order):
- $JAVA_HOME/lib/security/jssecacerts
- $JAVA_HOME/lib/security/cacerts
-key_store_pass <password to unlock the keystore file>
-ket_store_type jks
3. Click OK to save.
4. If you are planning on starting UC Connector from the batch file, you must
also modify the startup.bat file with the certificate parameters.
For example, the following startup.bat is appended with these sample
certificate values:
-cert_store_file c:\gcti\lync_ucc_1.pfx
-cert_store_pass genesys

Next Steps:
- If you came to this task from the Lync / Skype for Business procedures, you might still need to integrate with Genesys Routing. If so, see the Genesys UC Connector Deployment Guide, Integrating with Genesys Routing .
- Otherwise, configure the routing strategies used to deliver interactions to the Knowledge Worker. See the Genesys UC Connector Deployment Guide, Configuring the Routing Strategies.
Enabling Kerberos Security Between UCC and Lync Skype for Business
See the Genesys UCC Connector Deployment Guide, Enable TLS/Keberos in Enable Secure Communications
Configuring Kerberos Security in Active Directory
Purpose: To configure Kerberos security for the user that represents the UC Connector environment in the Microsoft Lnyc / Skype for Business deployment.
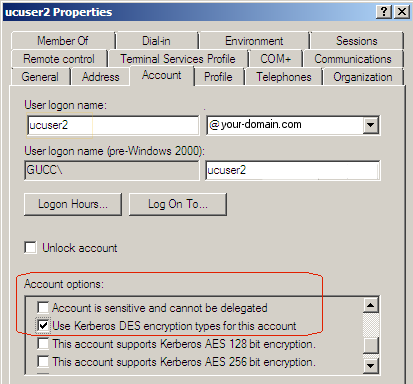
1. Access the user properties in Active Directory.
2. Locate the OCS user that represents your UC Connector environment,
right-click this user, and then select Properties.
3. On the Account tab, under the Account options field, select Use Kerberos
DES encryption for this account.
Creating a Password for Kerberos Security
Prerequisites
- You are logged in to Configuration Manager.
- A UC Connector Application object, which as been configured according to Creating the UC Connector Application Object.
- An account/user that represents the UC Connector has been created in Microsoft OCS. For example, ocs-ucc.
- You will need the password configured for this user in Active Directory. If you do not know the password, you might have to reset it. Right-click the user in Active Directory and select reset password.
1. Go to Environment > Applications and double-click the UC Connector
Application object.
2. Go to the Options tab.
3. In the Microsoft-OCS section, set the password option to String. Set this option to the password
configured for the OCS user in Active
Directory This is your Kerberos
password, required for Kerberos
authentication between the
components.
Next Steps:
- Exporting the trusted certificate from the Lync / Skype for Business host.
Exporting the Trusted Certificate from the Lync Skype for Business Host
Prerequisites
- A valid certificate to authenticate the OCS server has been installed as part of the domain configuration. This can be obtained using internal Certificate Authorities (CA), a domain configuration utility, or from a third party (for example, Verisign), according to your security policy.
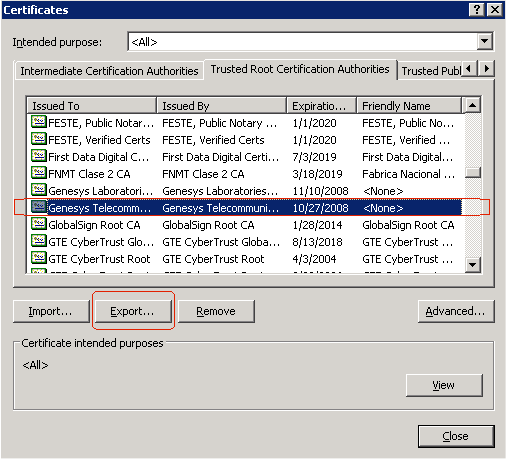
1. On the host computer for Microsoft OCS, open Internet Explorer.
2. Go to Tools > Internet Options > Content > Certificates and select the
Trusted Root Certification Authorities tab.
3. Highlight the certificate that has been issued to this host computer, then
click Export.
4. When you are prompted to do so during the export operation, under Export
format, select DER Encoded Binary x.509(*.cer).
5. When asked to enter a name for the certificate, enter any useful name.
There are no mandatory formats. For example, if you enter
UCC_certificate, the export operation will create a file called
UCC_certficate.cer.
Next Step:
- Adding the certificate to the UC Connector installation.
Adding the Certificate to the UC Connector Installation
Prerequisites
- The trusted certificate has been exported from the Microsoft OCS host computer.
1. Copy the certificate that you created in Exporting the trusted certificate from the Lync / Skype for Business host.
2. Place this certificate in the JDK\bin directory of your prerequisite JDK
installation.
3. From the JDK\bin directory, run the following command:
keytool -import -alias "certificate_name" -file <certifcatefile.cer> -keystore <output_file.jks>
For example,
keytool -import -alias "ucc-cert" -file UCC_Certificate.cer -keystore UCC_store.jks
![]() Take note of the password that was generated during the keytool process. You will add this later to the Command Line Parameters of the UC Connector application.
Take note of the password that was generated during the keytool process. You will add this later to the Command Line Parameters of the UC Connector application.
- -alias—Enter an alias for the certificate. It can be anything; there are no restrictions.
- -file—Enter a file name of the exported certificate.
- -keystore—Enter the name of the file that will be created as a result of running this keytool command.
4. Place this file in a logical location. For example:
<ucc_root>\etc\MYSTORE.jks.
![]() Take note of the location where you save this file. You will need
to add a parameter for this path to the Command Line Arguments of
the UC Connector application.
Take note of the location where you save this file. You will need
to add a parameter for this path to the Command Line Arguments of
the UC Connector application.
Next Step: Creating the Configuration File for Kerberos Security
Creating the Configuration File for Kerberos security
1. If Kerberos is not already configured for your environment, on the UC
Connector host computer, navigate to the etc folder in the installation
directory and open the sample krb5.conf file.
For example, the default path to the etc folder would be:
C:\GCTI\UCConnector\<your_UC_Connector>\etc
2. Modify the krb5.conf file with the following information:
[libdefaults]
    default_realm = YOUR-OCS-DOMAIN.COM
 #     default_checksum = rsa-md5
 [realms]
       YOUR-OCS-DOMAIN.COM = {
        kdc = SERVER1.YOUR-OCS-DOMAIN.COM
    }
 [domain_realm]
   .your-ocs-domain.com = YOUR-OCS-DOMAIN.COM
The following table provides more information about the parameters used in this file.
| Parameter | Description |
| default_realm |
Set this option to the OCS domain as per the UCC setup. |
| [realms] |
This is a list of all the domain names included in the OCS environment. |
| kdc= |
Set this option to the FQDN or IP address for the Key Distribution Center (KDC), typically the same computer hosting the domain or domain controller. |
| [domain_realm] |
Use this to map domains to realms in which Kerberos
authentication is running (typically used in multi-domain
environments). |
3. Save the krb5.conf file.
![]() Take note of the location where you save this file. You will need
to add a parameter for this path to the Command Line Arguments of
the UC Connector application.
Take note of the location where you save this file. You will need
to add a parameter for this path to the Command Line Arguments of
the UC Connector application.
Configuring a Secure SIP Port
Purpose: To configure the UC Connector Application object to connect to
Lync / Skype for Business using a secure port.
Lync / Skype for Business requires a secure connection for communication with UC Connector.
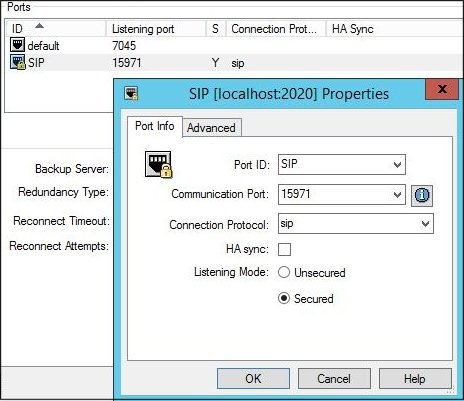
1. In the UC Connector Application object, on the Server Info tab, add a new port for SIP communication with Lync / Skype for Business.
- Port ID—Enter a useful name for this port.
- Communication Port—Enter the SIP communication port to be used. Any free port on the UC Connector host may be used.
- Connection Protocol—Select sip from the drop-down list.
- Listening Mode—Select the Secured option.
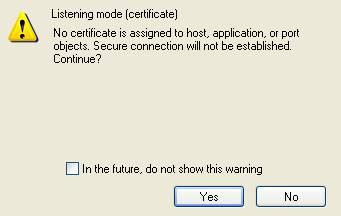
2. On adding this port, you may see the following Warning. For this
configuration, you can ignore this warning. Click Yes to continue.
Next Steps:
- For TLS/Kerberos, continue at Modifying Command Line Parameters for TLS.
- For Mutual Transport Layer Security (MTLS), continue at Modifying Command Line Arguments for MTLS. Or go back to Modify Command Line Arguments for MTLS.
Modifying Command Line Parameters for TLS
Prerequisites
- You noted the password that you created in Adding the certificate to the UC Connector installation.
- You noted the file location where you placed the keystore file in Adding the certificate to the UC Connector installation
1. Go to Start Info tab > Command Line Arguments in the UC Connector
application.
2. Add the following parameters to the existing command line argument:
- -krb_conf_file <path to krb5.conf file>
- -cert_store_pass <password generated in Add certificate file to the UC Connector Installation>
- -cert_store_file <path to keystore file moved in Add Certificate File to the UC Connector Installation>

