Installing and Using the Administrator Plugin
Installing the Knowledge Center Plugin for Administrator
Prerequisites
- Genesys Administrator must have been installed, but should be stopped before installing the plugin
- If the Administrator Plugin was previously installed on the current host, manually remove the previous version from the /plug-ins folder in the Genesys Administrator installation directory
Windows Installation Procedure
Start
- In your installation package, locate and double-click the setup.exe file. Install Shield opens its welcome screen.
- Click Next. The Choose Destination Location screen appears.
- Under Destination Folder, keep the default value or browse to the desired installation location. Click Next.
- Click Install. The Genesys Installation Wizard indicates it is performing the requested operation. When it has finished, the Installation Complete screen appears.
- Click Finish to complete your installation.
- Inspect the directory tree of your system to make sure that the files have been installed in the location that you intended.
- gax-plugin-knowledge.jar should be added as a Genesys Administrator plugin.
- Restart Genesys Administrator.
End
Linux Installation Procedure
Start
- Open a terminal in the Genesys Knowledge Center Plugin for Administrator IP, and run the install.sh file. The Genesys Installation starts.
- Enter full path to the GAX installation directory.
- Enter full path to your installation directory for the plugin and confirm it.
- If the installation is successful, the console displays the following message: Installation of Genesys Knowledge Center Plugin for Administrator, version 8.5.x has completed successfully.
- gax-plugin-knowledge.jar should be added as a Genesys Administrator plugin.
- Restart Genesys Administrator.
End
A Knowledge Center item should appear under the Administration menu.
Providing access to Knowledge Center Plugin for Administrator
Important
Users must have the next privilege in order to use the Administrator plugin.- Knowledge. ADMINISTER — Enables access to the Knowledge Center Plugin for Administrator tab in Genesys Administrator
- To save a created configuration the user should at least belong to the Administrators Access Group
To configure the appropriate role for an agent:
Start
- Go to Provisioning > Environment > Application Templates.
- In the Tasks panel, click Upload Template.
- In the Click 'Add' and choose application template (APD) file to import window, click Add.
- Choose the application template (APD) file from the import window and click Add.
- Browse to the Knowledge_Center_GAX_Plugin_852.apd file available in the templates directory of your installation CD. The New Application Template panel opens.
- Click Import Metadata.
- Click Add and select the Knowledge_Center_GAX_Plugin_852.xml file.
- Click Open.
- Information from the metadata file will be added to the template and the appropriate privilege will be added into the framework.
- Save and Close.
- Go to Provisioning > Accounts > Roles.
- In the taskbar click New to create a new object.
- Set the name of the role in the General section.
- Go to the Role Privileges tab, and select the set of roles for Genesys Knowledge Center.
- Open the Genesys Administrator privileges list and select the Genesys Knowledge Center Plug-In Privileges section.
- Set the appropriate privileges as allowed.
- Go back to the Configuration tab.
- Add the appropriate Agent to the Members section by clicking the Add button.
- Save and Close.
End
Managing Knowledge Bases
In order to use Knowledge Center Server you need to create at least one knowledge base in the Knowledge Center Cluster application, using the Knowledge Center Plugin for Administrator. This section describes the structure and specific options you need in order to create an index for this knowledge base in Knowledge Center Server.
Selecting the Knowledge Center Cluster Application
Start
- Log in to Genesys Administrator and navigate to the Administration > Knowledge Center menu item.
- Using the
 button, open the menu for Select Knowledge Cluster. Select the appropriate cluster from the drop-down and click the Ok button. A list of the knowledge bases that have been defined for this cluster will be displayed.
End
Creating a Knowledge Base
Start
- Click the + button. A panel with the main knowledge base parameters will be displayed. Fill in the following fields:
- ID—The ID should only contain numbers, lower-case Latin letters, and underscores, with a maximum length of 50 characters. The limitation to lower-case letters is because ElasticSearch is case-insensitive and will therefore render all names as lower-case.
- Name—Maximum length is characters
- Description—optional
- Select the default knowledge base language.
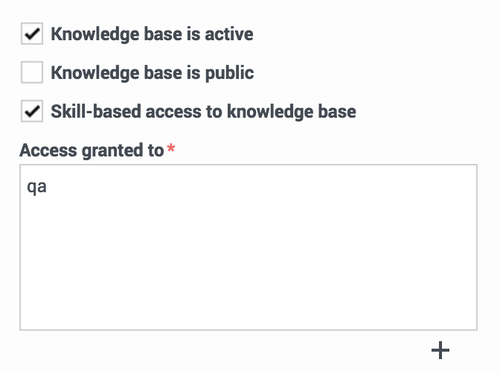
- Make the knowledge base public or private. (If the knowledge base is made public, it will be visible to all users, whether or not they are authorized.)
ImportantFor private knowledge bases you can specify whether the knowledge base should be available to all of your agents or only to the agents that have one of the specified skills. In the case where you have specified several skills for the knowledge base, the agent needs to have at least one of them to access the knowledge base. Skill level does not influence ability to access the knowledge base.
- Make the knowledge base active or inactive. If you un-check Knowledge Base is active neither your customers nor your agents will be able to search for information in that knowledge base. Authors, agents with the privilege Knowledge.Author and administrators with the privilege Knowledge.Admin, can still use the base to prepare content stored in it.
- If you mark the knowledge base as public it will be accessible to both your agents and customers. A knowledge base that is not marked public will be treated as a private one and will only be accessible by your agents.
- You can make your private knowledge bases (when Knowledge base is public is not check-marked) available to only a subset of your agents by selecting Skill-based access to knowledge base. If you choose to make the knowledge base accessible to an agent with specific skills, you will need to select the skills that will grant an agent access to the knowledge base.
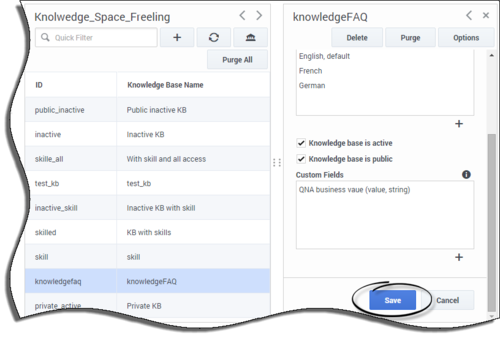
- Click Save. The knowledge base will be created.
End
Creating Custom Fields
Start
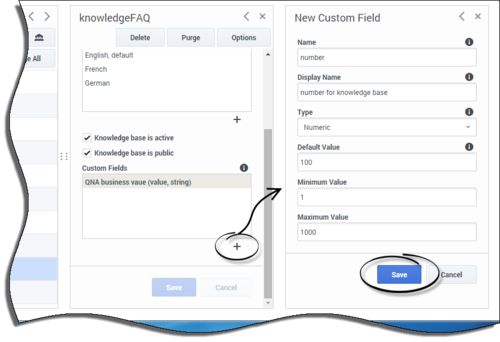
- Click the + sign under the Custom Fields section. The New Custom Field panel will be displayed.
- To define a custom field, fill in the following information:
- Name—Should consist only of numbers, Latin letters and underscores, with a maximum length of 50 characters.
- Display name
- Select the type of field
- For String fields define:
- Default value (optional)
- If the field can be left empty, set the check box to Allow empty
- For Numeric fields define:
- Default value (optional)
- Minimum value (optional)
- Maximum value (optional)
- For DateTime fields define:
- Default value (optional; format should be yyyy-MM-dd HH:mm:ss)
End
Adding Language-specific Information
Start
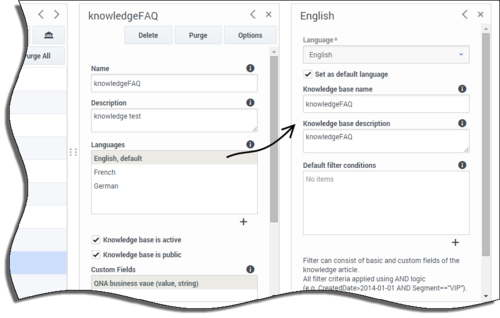
- Click the English, default row in the Languages section. A panel with language-specific settings will be displayed.
- You can define the following parameters in this section:
- A localized knowledge base name
- A localized knowledge base description
- Whether or not the selected language is the default
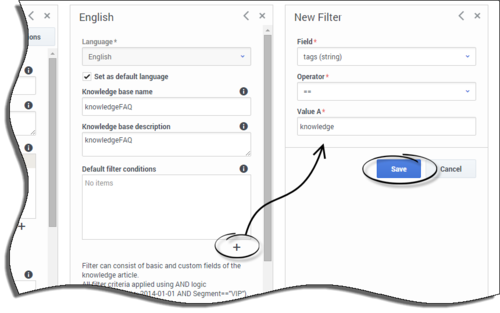
- Default filter conditions
- Select the appropriate field (custom or basic)
- Select a filter operator
- Fill in the values for the filter criteria
Important
All filter criteria are applied using AND logic. For example, CreatedDate>2014-01-01 AND Segment=="VIP".- Click the Save button
End
Editing Knowledge Base Options
Start
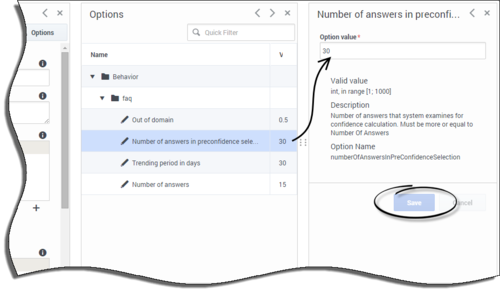
- To edit the options for a particular knowledge base, click the Options button and then click the appropriate option to edit its value. The options are initialized with their default values.
- Enter the new option value and click the Save button.
End
Important
It is not recommended to set the out-of-domain value higher than 0.75 as it represents an exact match of the question with no feedback accumulated for the query. The optional setting is 0.5 (default value).Editing a Knowledge Base Definition
Start
- Select a knowledge base from the list.
- Edit the knowledge base definition and click the Save button.
End
Deleting a Knowledge Base Definition
Start
- Select a knowledge base from the list.
- Press the Delete button and confirm the action.
End
Purging Knowledge Bases
Prerequisites
- The Administrator user must have Knowledge.ADMINISTER privileges
- You must create and select a Knowledge Center Cluster application
Start
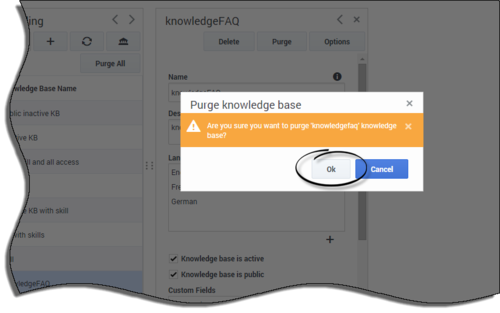
- To purge a particular knowledge base, select it from the list, press the Purge button, and confirm the action.
- To purge all knowledge bases, use the Purge All button.
End
This page was last edited on March 11, 2016, at 23:04.
Comments or questions about this documentation? Contact us for support!


