Levels of a Business Structure for a Tenant:
Filters and Constraints
Configuration Server respects tenancy permission settings. You can access only those objects that you have been granted permissions and privileges to access.
You can filter the contents of this list in two ways:
- Type the name or partial name of an object in the Quick Filter field.
- Click the cube icon to open the Tenant Directory filter panel. In this panel, click the Tenant that you want to select. Use the Quick Filter field in this panel to filter the Tenant list.
You can sort the items in the list by clicking the Name column. Clicking a second time reverses the sort order. You can add or remove columns by clicking Select Columns.
To select or de-select multiple objects at once, click Select.
Data Fields
Each entry is shown with the following data fields:
- Name—The element's name.
- Type—Solution, Department or Process
- ID—The runtime ID of this element.
- Contact Name—Contact name for queries about this element.
- Description—Free-format text description of the element.
To create a new Solution
To create a new Solution, do one of the following:
- If one or more Solution is already present, select one Solution and click More, then click Clone, then edit the Solution data fields.
- If one or more Solution is already present, Display the details of an existing Solution and click Clone, then edit the new Solution data fields.
- If no Solution is present, click the the New button (+), choose Solution, then edit the Solution data fields.
Other Actions
From this context you can Delete this Solution.
2. if you delete a Solution, all related rules packages in GRS will be lost, and you and will not be able to recreate new rules packages with the same name.
Solution Details
- Solution Name—The Solution name. Mandatory when you add a new Solution.
- ID—The ID of the Solution. Mandatory when you add a new Solution. The system will propose a default new Runtime ID.
- Timezone—Solution timezone. Use the drop-down list to change this.
- First Day of Week—The first day of the working week for this Solution. Use the drop-down list to change this.
- Description—Free-format text description of the Solution.
The following options allow customization of interaction queues used by iWD in the current Solution. Non-standard queue names must be defined when there are multiple iWD business processes configured in the same Tenant. Queue names can be selected from drop-down lists. If a value is missing, a default name is displayed for this queue.
- Queue for new tasks—Interaction queue recognized by iWD as an entry to the business process in this solution. Default values:
- IRD—iWD_New
- Composer—iwd_bp_comp.Main.iWD_New
- Queue for captured tasks—Interaction queue for tasks successfully processed by the Classification strategy. Default values:
- IRD—iWD_Captured.
- Composer—iwd_bp_comp.Main.iWD_Captured
- Queue for queued tasks—Interaction queue for tasks successfully processed by the Prioritization strategy. Default vlaues:
- IRD—iWD_Queued
- Composer—iwd_bp_comp.Main.iWD_Queued
- Queue for completed tasks—Interaction queue for tasks marked as completed by agents. Default values:
- IRD—iWD_Completed
- Composer—iwd_bp_comp.Main.iWD_Completed
- Queue for rejected tasks—Interaction queue for tasks rejected by the Classification strategy. Default values:
- IRD—iWD_Rejected
- Composer—iwd_bp_comp.Main.iWD_Rejected
- Queue for canceled tasks—Interaction queue for tasks canceled by a Global Task List user or by a capture point. Default values:
- IRD—iWD_Canceled
- Composer—iwd_bp_comp.Main.iWD_Canceled
- Queue for error-held tasks—Interaction queue for tasks that failed to be processed by the Classification or Prioritization strategies. Default values:
- IRD—iWD_ErrorHeld
- Composer—iwd_bp_comp.Main.iWD_ErrorHeld
Interaction Server Settings
- Interaction Server—The Interaction Server for this Solution. Use the drop-down list to change this. This drop-down list contains those Interaction Servers which contain the Solution's parent Tenant on their Tenants list.
- Port—The connection port of the Interaction Server. Use the drop-down list to change this. This drop-down list contains the Interaction Server chosen above ports from the ports list.
Every configuration object or parameter that references the Port ID (and therefore can be either secure or non-secure) will work in the same way—the setting of the one configured second (where two Solutions are configured) is the one that the Interaction Server will use. This affects connection protocol, local timeout, remote timeout, trace mode and transport protocol parameters.
- Connection Protocol—The connection protocol of the Interaction Server. Use the drop-down list to change this. This parameter is set as the connection attribute of the Interaction Server connection in the iWD Manager application.
- Protocol Timeout—The timeout configured for the connection protocol.
- Local Timeout—The timeout configured on the local server. This parameter is set as the connection attribute of the Interaction Server connection in the iWD Manager application.
- Event Buffer Size—The maximum size in bytes of the event buffer.
- Remote Timeout—The timeout configured on the remote server. This parameter is set as the connection attribute of the Interaction Server connection in the iWD Manager application.
- Threads—The number of threads available.
- EventLog JDBC URL—The URL of the JDBC event log. Mandatory for all database engines set in the Eventlog DAP (connected to Interaction Server set above), apart from MSSQL.
- Attribute Filter Include—Attributes included here will appear in the Custom Attributes displayed in the Global Task List in iWD Manager.
- Attribute Filter Exclude—Attributes excluded here will not appear in the Custom Attributes displayed in the Global Task List in iWD Manager.
Permissions Settings (new in 8.5.105)
Business Structure details include a Permissions tab on which users with the relevant permissions can view and edit permissions settings for all users of the selected node.
Permissions Table
| Permission | Description |
|---|---|
| Read | Permission to read information and receive updates about the object. |
| Create | Permission to create objects in this folder. |
| Change | Permission to change the properties of the object. The Change permission is the
same as allowing “Write” access. |
| Execute | Permission to perform a predefined action or set of actions with respect to the object. |
| Delete | Permission to delete the object. |
| Read Permissions | Permission to read the access control settings for the object. |
| Change Permissions | Permission to change the access control settings for the object. |
| Execute |
Permission to perform a predefined action or set of actions with respect to this object. |
| Propagate | For container objects (such as Tenants). The Propagate check box controls whether to propagate this set of elementary permissions to the child objects. By default, the check box is selected). |
Actions
- Add Access Group—Displays the Select Access Group panel from which you can select one of the available Access Groups to add to this node and for whom you can then configure permissions.
- Add Person—Displays the Select Person panel from which you can select one of the available Persons to add to this node and for whom you can then configure permissions.
- Replace Recursively—Enables you, upon confirmation, to remove permissions for all child objects of this container and replace them with the permissions defined in this container.
To create a new Department
To create a new Department, first choose the Solution to work with, then do do one of the following:
- If one or more Department is already present, select one Department and click More, then click Clone, then edit the Department data fields.
- If one or more Department is already present, display the details of an existing Department and click Clone, then edit the new Department data fields.
- If no Department is present, click the the New button (+), choose Department, then edit the Department data fields.
Other Actions
From here you can Clone, Delete or Move this Department. You can move the Department only to a Solution. Any Processes configured under it will also be moved. Runtime IDs are not moved in the Move function—you must create a new one for the Department and all its child Processes in its new Solution.
2. If you delete a Department or Process, any rules assigned to those objects will be inactivated and moved to the Solution level. This happens if you delete and re-create a Solution/Department/Process with the same name.
Department Details
- Department Name—The department name. Mandatory when you add a new Department.
- ID—The department's Runtime ID. Mandatory when you add a new Department. The system will propose a default new Runtime ID.
- Contact Name—The contact name for the department, for informational purposes.
- Contact Email—The contact email for the department, for informational purposes.
- Contact Phone—The contact phone number for the department, for informational purposes.
- Start Date—The date on which the department becomes active. If left empty, the period start date is unconstrained.
- End Date—The last day that the department is active. If left empty, the period end date is unconstrained (that is, the department will be active infinitely).
- Description—Free-format text description of the Department.
Department Attributes
Click Add to create new attributes.
- Name—The attribute name
- Type—Select from the drop-down list. Valid values are:
- Text
- Percentage
- Number
- Date
- Lookup Table
- Value—The attribute value. If the type is a lookup table, then the value is set from the drop-down list.
- Description—Free-format text description of the attribute.
Department Metrics
Click Add to create a set of user-defined metrics, for reporting purposes.
[+] MORE- Name—The metric name
- Type—Select from the drop-down list. Valid values are:
- Text
- Percentage
- Number
- Date
- Lookup Table
- Value—The attribute value. If the type is a lookup table, then the value is set from the drop-down list.
- Description—Free-format text description of the attribute.
Permissions Settings (new in 8.5.105)
Business Structure details include a Permissions tab on which users with the relevant permissions can view and edit permissions settings for all users of the selected node.
Permissions Table
| Permission | Description |
|---|---|
| Read | Permission to read information and receive updates about the object. |
| Create | Permission to create objects in this folder. |
| Change | Permission to change the properties of the object. The Change permission is the
same as allowing “Write” access. |
| Execute | Permission to perform a predefined action or set of actions with respect to the object. |
| Delete | Permission to delete the object. |
| Read Permissions | Permission to read the access control settings for the object. |
| Change Permissions | Permission to change the access control settings for the object. |
| Execute |
Permission to perform a predefined action or set of actions with respect to this object. |
| Propagate | For container objects (such as Tenants). The Propagate check box controls whether to propagate this set of elementary permissions to the child objects. By default, the check box is selected). |
Actions
- Add Access Group—Displays the Select Access Group panel from which you can select one of the available Access Groups to add to this node and for whom you can then configure permissions.
- Add Person—Displays the Select Person panel from which you can select one of the available Persons to add to this node and for whom you can then configure permissions.
- Replace Recursively—Enables you, upon confirmation, to remove permissions for all child objects of this container and replace them with the permissions defined in this container.
To create a new Process
To create a new Process, first choose the Solution and Department to work with, then do one of the following:
- If one or more Process is already present, select one Process and click More, then click Clone, then edit the Process data fields.
- If one or more Process is already present, display the details of an existing Process and click Clone, then edit the new Process data fields.
- If no Process is present, click the the New button (+), choose Process, then edit the Process data fields.
Other Actions
From here you can Clone, Delete or Move this Process. You can move the Process only to a Department. Runtime IDs are not moved in the Move function—you must create a new one for the Process in its new Department.
2. If you delete a Department or Process, any rules assigned to those objects will be inactivated and moved to the Solution level. This happens if you delete and re-create a Solution/Department/Process with the same name.
Process Details
- Process Name—The Process name. Mandatory when you add a new Process.
- ID—The Runtime ID of the Process. Mandatory when you add a new Process. The system will propose a default new Runtime ID.
- Contact Name—The contact name for the process, for informational purposes.
- Contact Email—The contact email for the process, for informational purposes.
- Contact Phone—The contact phone number for the process, for informational purposes.
- Start Date—The date the process becomes active. The start date of the process cannot be earlier than the start date of the parent department.
- End Date—The last day that the process is active. If left empty, the period end date inherits the end date value of the parent department.
- Description—Free-format text description of the Process.
Process Attributes
Click Add to create new attributes.
- Name—The attribute name
- Type—Select from the drop-down list. Valid values are:
- Text
- Percentage
- Number
- Date
- Lookup Table
- Value—The attribute value. If the type is a lookup table, then the value is set from the drop-down list.
- Description—Free-format text description of the attribute.
Process Metrics
Click Add to create new metrics.
[+] MORE- Name—The attribute name
- Type—Select from the drop-down list. Valid values are:
- Text
- Percentage
- Number
- Date
- Lookup Table
- Value—The attribute value.
- Description—Free-format text description of the attribute.
Permissions Settings (new in 8.5.105)
Business Structure details include a Permissions tab on which users with the relevant permissions can view and edit permissions settings for all users of the selected node.
Permissions Table
| Permission | Description |
|---|---|
| Read | Permission to read information and receive updates about the object. |
| Create | Permission to create objects in this folder. |
| Change | Permission to change the properties of the object. The Change permission is the
same as allowing “Write” access. |
| Execute | Permission to perform a predefined action or set of actions with respect to the object. |
| Delete | Permission to delete the object. |
| Read Permissions | Permission to read the access control settings for the object. |
| Change Permissions | Permission to change the access control settings for the object. |
| Execute |
Permission to perform a predefined action or set of actions with respect to this object. |
| Propagate | For container objects (such as Tenants). The Propagate check box controls whether to propagate this set of elementary permissions to the child objects. By default, the check box is selected). |
Actions
- Add Access Group—Displays the Select Access Group panel from which you can select one of the available Access Groups to add to this node and for whom you can then configure permissions.
- Add Person—Displays the Select Person panel from which you can select one of the available Persons to add to this node and for whom you can then configure permissions.
- Replace Recursively—Enables you, upon confirmation, to remove permissions for all child objects of this container and replace them with the permissions defined in this container.
Adapting the IWD Business Process for the Genesys E-mail Channel
These pages describe how to adapt the iWD Business Process (IWDBP) to work with the e-mail channel, though any standard Genesys non-voice channels, such as social media, chat, SMS, Gplus Adapters, or custom integrations built with Open Media, can be adapted using this approach.
<tabber>
Adding Required Properties to Interactions=
Adding Required Properties to Interactions
Key-Value Pairs
In order to keep Data Mart functionality intact and to make Genesys standard channel interactions visible in iWD Manager, some key-value pairs need to be added to the user data of these interactions. The interactions should only be placed into the input queue for the default iWD business process (iWD_New only after these key-value pairs have been added. The key-value pairs are:
- IWD_tenantId
- IWD_solutionId
- IWD_capturePointId
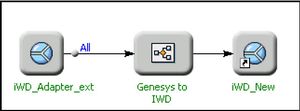
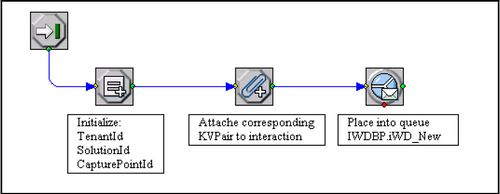
To make the process easier, the iWD Setup Utility includes an additional business process, Standard Genesys to IWD adapter . This business process attaches the required key-value pairs to an interaction and places it into the input queue of the default business process IWDBP.
Standard Genesys to IWD Adapter Process
Standard Genesys to IWD Strategy
Assign Variables
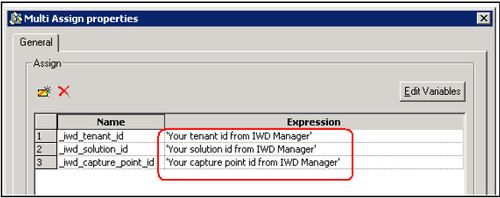
In the Multi Assign object, you have to initialize all variables, as shown below.
Assign Variables The IDs are taken from iWD Manager.
Tenant ID
Solution ID
To get an ID for a capture point, you have to configure a Generic Capture Point service. The ID of the Generic Capture Point service must be populated in the iWD_CapturePointId user data key in the Genesys to iWD routing strategy that was described earlier. It will represent a Genesys standard server (in our example, the Genesys E-mail Server).
|-| Adding E-mail Server=
Adding E-mail Server
A Genesys E-mail Server must be added to the Standard Genesys to IWD Adapter business process. You can add the E-Mail Server in two ways:
In Configuration Manager or Genesys Administrator, you can update the E-Mail Server application options to specify iWD_Adapter_ext as an output queue.
- Add a section called endpoint:[YourTenantDBID].
- In this section, add a new option default.
- Set the value of default to iWD_Adapter_ext, as shown below.
- Refresh in IRD and E-mail Server will be added to the business process with the iWD_Adapter_ext queue.
Updating E-mail Server for Standard Genesys to iWD Adapter BP
The second way to add E-mail Server is to do so explicitly in IRD.
- Add E-mail server from Media Servers to the Standard Genesys to IWD Adapter business process.
- Make a connection to the iWD_Adapter_ext queue. In this method, IRD will update the corresponding option and section in the E-Mail Server application. The screenshot below shows how the Standard Genesys to IWD Adapter business process will look after these modifications.

Standard Genesys to iWD Adapter Business Process After Modifications
|-| Modify the Distribution Strategy=
Modify the Distribution Strategy
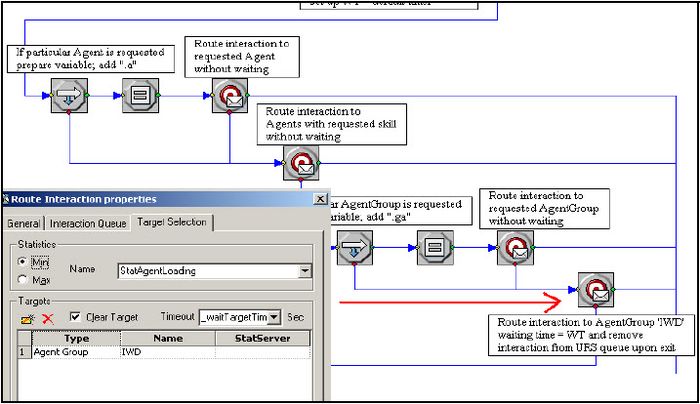
In IRD, open the IWDBP business process. Open the Distribution strategy. Since there are business actions Request Agent, Request Agent Group, and Request Skill, the default business process has to take three into consideration. That is why there are four objects of type Route Interaction.
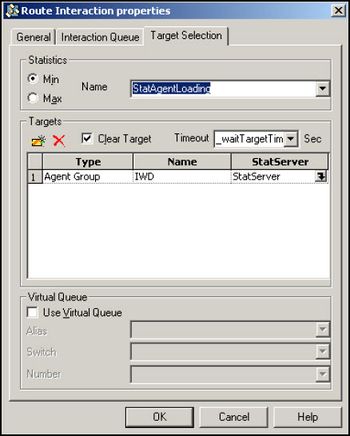
If you have only one Stat Server listed in the Connections tab of Interaction Server, you can skip this step. If not, for the object Route interaction to AgentGroup IWD in the Target Selection tab, change the Genesys Stat Server application name and target according to your configuration. If you want to change the length of time URS has to wait for the next available agent (by default it is set to 60 seconds), you can do so by changing the initial value of the variable _default_target_timeout in the first MultiSelect block in the routing strategy.
Update Route Interaction to Agent Group IWD
You might want to check all of the provided Route Interaction objects (by double-clicking on them) to see if they satisfy your business logic. Pay attention only to what statistics are used for Skill and AgentGroup routing.
Allowing Agents to Send Replies to Inbound E-mails
There are two ways to allow agents to send replies to inbound e-mails:
- Create a new queue and a new strategy in the IWDBP.
- Use a business process that already exists.
In this example an existing business process will be used to illustrate how other business processes can be used from the iWD business process.
- Choose a business process to handle agent’s replies and outbound e-mails.
- Specify the queue into which the agent’s reply will be placed.
- Specify the business process and queue for single outbound e-mails from agents.
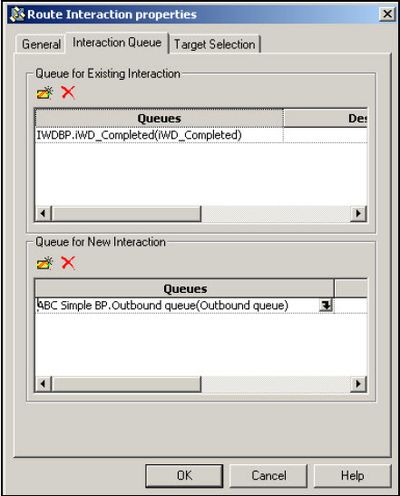
In this example the ABC Simple business process will process agent’s replies (with the Outbound queue). Also, agents will be given the ability to place interactions into theiWD_Completed queue. All of this will be done in the Distribution strategy. The properties on the Interaction Queue tabs of all the Route Interaction blocks in the strategy must be as shown below.
Route Interaction Object for Distribution Strategy
|-| Examples Preamble=
Examples Preamble
In these examples we assume that the default iWD Business Process (IWDBP) provides all necessary steps for e-mail processing—namely classification, prioritization, and distribution. The purpose of these examples is to show what needs to be done in order to use IWDBP and standard iWD and Genesys Rules System functionality (such as classification and prioritization rules) for e-mail processing.
Requirements
- A Genesys E-mail solution must be installed
- An iWD solution must be installed, which includes the Genesys Rules System
Assumptions
Only one iWD solution will be served by IWDBP. The default iWD business process will process interactions with any media type (the interaction will pass through the business process and be delivered to an agent), but business rules created in these examples will be applicable to e-mails only. We have only one Agent Group to which the interactions will be assigned.
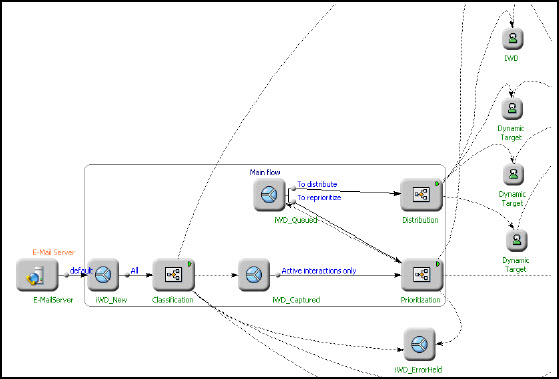
For all examples, the main flow of IWDBP is as shown here:
IWDBP Main Process
|-| Example 1 - Using Business Rules=
Example 1—Using Business Rules
This is a simple example of how business rules can be used. In this example, the default iWD business process will be used for processing Genesys e-mails.
Use Case
In this example, the following scenario/use case is used:
- For all interactions with MediaType = email, the property ServiceType will be set to ChangeAddress.
- The property priority will be set to 100 for all e-mail interactions.
- Interactions of any MediaType should be delivered to the Agent Group IWD (interactions with the highest priority have to be delivered first).
- E-mail interactions have to be reprioritized every 2 hours.
- After each reprioritization the priority must be increased by 5.
Genesys Configuration
To prepare the Genesys configuration:
- Add Agents into the IWD Agent Group.
- If it has not already been done, set up a connection between Interaction Server and both the Business Context Management Service Application, and the Genesys Rules System Application.
- Set the proper outbound queue for E-mail Server. Interactions that are submitted by E-mail Server have to reach the iWD business process in some way. In order to do that we need to change the outbound queue for the E-mail Server application to iWD_New
in the endpoints section (refer to the first method of adding E-mail Server to the business process on See In Configuration Manager or Genesys Administrator, you can update the E-Mail Server application options to specify iWD_New as an output queue.
- Add a section called endpoint:[YourTenantDBID].
- In this section, add a new option default.
- Set the value of default to iWD_New.
- Refresh in IRD, and E-mail Server will be added to the business process with the iWD_New queue. for details). Now your E-mail Server will submit interactions into the iWD_New queue, which is the entry point for the default iWD business process.
iWD Configuration
<iWDTenantName><iWDSolutionName><ServiceTypeServiceName> or
<iWDTenantName><iWDSolutionName><ParentObjectNameObjectName>.To prepare the iWD configuration:
- Login into iWD Manger by using the default person account.
- Create a new iWD tenant. From the drop-down list choose the corresponding Genesys Tenant. It is recommended to give the new iWD tenant the same name as the Genesys tenant. In this example the iWD tenant name will be MCR (with ID also set to MCR).
- On the MCR tenant's Profile page, configure the URL for the Genesys Rules Authoring Tool.
- Under iWD tenant MCR create a new solution and name it MCR Solution with ID = MCR_SLT.
- Under iWD tenant MCR create a new Role under Security Policy and give some permissions.
- Under the new solution create the following iWD configuration objects:
- iWD Runtime Node. For Context URL use the directory name iwd_node provided during installation (by default it should be http://localhost:8080/iwd_node/). For the Application property, use the iWD Runtime Node application as configured in Configuration Manager or Genesys Administrator.
- iWD Logging service
- iWD Configuration Server Connector service
- iWD Interaction Server Connector service
- iWD Business Context Management service. For the Application property, use the iWD Business Context Management Service application as configured in Configuration Manager or Genesys Administrator.
- Once your services are all created, you will need to do two more things:
- Push the business structure changes to the Genesys Rules System.
- Deploy your iWD Solution to your application server.
You should see two notifications on the top of the iWD Manager screen informing you of these two tasks. You can select each of the hyperlinks to take you to the screen where the task needs to be performed.
IWDBP Preparation
To prepare the iWD business process:
- In IRD open IWDBP.
- Open the Distribution strategy.
- Double-click on the fourth RouteInteraction block (the one that is used to route to the IWD agent group). In the Target Selection tab, change the Genesys Stat Server application name and target according to your configuration.
Create Rules
1. Modify the Standard Rules Template
For simplicity, in this example conditions will be added to the Standard Rules Template, which is used for all iWD tenants.
- Launch the Genesys Rules Development Tool (GRDT) and import the iWD Standard Rules Template project if it is not already there. If the template has not already been imported into GRDT, you can find the iWD Standard Rules Template in the directory where iWD Manager supporting files were installed.
- Expand Conditions and add four new rule conditions, entering the Language Expression and Rule Language Mapping according to the information in Conditions.
- Click Save.
- Right-click the iWD Standard Rules Template and select Publish. It will be published to the Genesys Rules System rules repository.
|
Language Expression |
Rule Language Mapping |
|---|---|
|
Reprioritization was not set up |
eval(!$data.containsKey("IWD_reprioritizeDateTime")) Note: The Standard Rules Template contains a standard rule condition called “Is first prioritization” that does the same thing as “Reprioritization was not set up”, but “Reprioritization was not set up” is included in this example to give you another working example of how to achieve the same result in a business rule. |
|
Reprioritization was set up and in the past |
eval( $data.containsKey("IWD_reprioritizeDateTime") && (getDTValue("IWD_reprioritizeDateTime", $data) < (getCurrentDT()) )) |
|
KVPair “{k}” is “{v}” |
eval( getStringValue('{k}', $data).equals('{v}')) Note: The Standard Rules Template contains a standard rule condition called “String “{attribute}” equals “{stringValue}” that does the same thing as KVPair “{k}” is “{v}”. KVPair “{k}” is “{v}” is included in this example to give you another working example of how to achieve the same result in business rules. |
|
KVPair “{k}” is not “{v}” |
eval( !getStringValue('{k}', $data).equals('{v}')) Note: You will also need to add two new parameters to the Standard Rules Template —"k" and "v", which should both be of type Input Value with Value Type=String. |
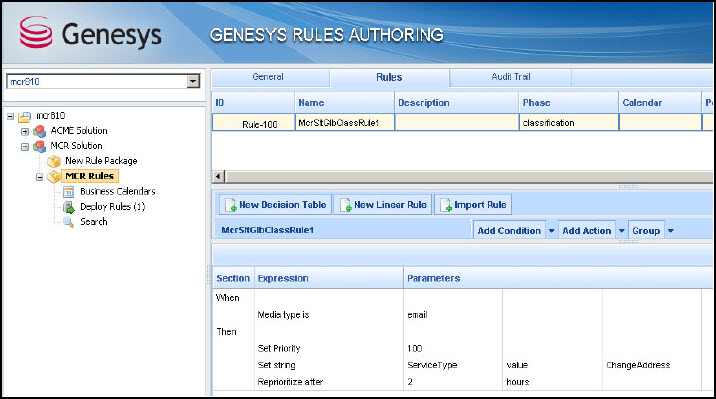
2. Create a Classification Rule
Create a classification rule. For simplicity Global Rules (at the rule package level) are used in this example.
- Log into iWD Manager and launch the Genesys Rules Authoring Tool.
- Select your iWD tenant.
- Expand your Solution (MCR Solution) and select New Package.
- Give the rule package a Package Name (mcr) and a Business Name (for example, MCR Rules).
- Select Package Type iWD.
- Under Templates, select the iWD Standard Rules Template and click Save.
- From the navigation tree, select your rule package (MCR Rules).
- Click the Rules tab.
- Select New Linear Rule.
- Give the rule a Name and, as the rule phase, select classification.
- Click Add Condition.
- Select the Media type is rule condition.
- In the condition, from the drop-down list of media types, select email.
- Click Add Action
- Select Set Priority and set the priority value to 100.
- Click Add Action.
- Select Set String and set the ServiceType string equal to the value ChangeAddress.
- Click Add Action.
- Select Reprioritize and, for the reprioritization interval, enter 2 hours.
- Click Save.
3. Create a Prioritization Rule
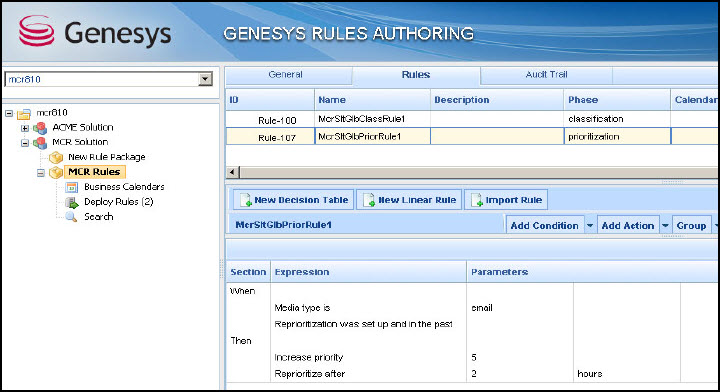
Create a prioritization rule. For simplicity, Global Rules (at the rules package level) are used in this example, but these prioritization rules could also be created at the Department or Process level. In this case, you would first need to add a rule back at the Global Rules or level with the rule action Assign iWD process, to assign the interaction to an iWD Process.
- Click New Linear Rule.
- Select prioritization as the Phase.
- Click Add Condition and select Media type is.
- From the media-types drop-down list, select email.
- Select Add Condition and select Reprioritization was set up and in the past.
- Click Add Action, and select Increase priority.
- For the amount the priority should be increased by, enter 5.
- Click Add Action, and select Reprioritize after.
- For the time at which to reprioritize the interaction, enter 2 hours .
- Click Save.
4. Deploy Modifications
After new rules are created the rule package has to be deployed before the rules will have an affect on your business process.
- Click on the Deploy Rules node in the Genesys Rules Authoring Tool (GRAT) navigation tree.
- Select Deploy Now.
- You will receive a notification if the deployment was successful.
Notes on the iWD Business Process
The following are some important things to note about the iWD business process:
- Behavior of the iWD_Captured queue and Active interactions only view—If the interaction does not have a key-value pair with the key IWD_activationDateTime it will be processed immediately; otherwise the interaction will be delayed according to the time stamp in the key-value pair.
- Behavior of iWD_Queued queue and To reprioritize view—Interactions will only be taken through this view with the key IWD_reprioritizeDateTime is in the past. This key-value pair is set up by a prioritization business rule.
Path of E-mail Interactions in IWDBP
- All business rules will only affect interactions with a MediaType equal to email. The following are the steps which the interaction will pass through:
- The interaction is submitted by E-mail Server and is placed into the iWD_New queue.
- The interaction is processed by the Classification strategy. As a result, the classification business rules will be applied to interaction. In this example, ServiceType will be set to ChangeAddress. Also, the initial Priority will be set to 100 and the initial Reprioritization time will be set to in 2 hours.
- The interaction is placed into the iWD_Captured queue.
- The interaction is processed by the Prioritization strategy. As a result, the prioritization business rules will be applied to interaction. In this example we have set the initial priority in classification rules, so prioritization rules will be used on the reprioritization step.
- The interaction is placed into the iWD_Queued queue.
In this example, if no available agents are found, the e-mail interaction will be reprioritized every 2 hours. Its priority will be increased by 5 each time.
|-| Example 2 - Departments and Processes=
Example 2 - Departments and Processes
In this example more iWD business objects will be added. This example will show how one flow of interactions can be divided into three streams, and how different business rules can be applied to each stream. In this example the default iWD business process is used for processing Genesys e-mails.
Use Case
In this example the following scenario is used:
- All interactions with MediaType = email should be divided into three groups based on Subject: NewAccount, Support, and all others.
- All interactions will be delivered to one Agent Group (IWD), but interactions with Subject = NewAccount will have highest priority and will be reprioritized the most frequently. Interactions with Subject = Support will have lower priority and all other interactions will have the lowest priority and will be reprioritized less frequently.
Creating Rules
1. Create a Department and Processes in iWD
- Create the Department and Processes in the iWD GAX Plug-in.
Click here for the detailed procedure. - Create the following three new Processes under the Customer Service Department: Sales, Support, and Other.
- Save your changes.
2. Create Global Classification Rules
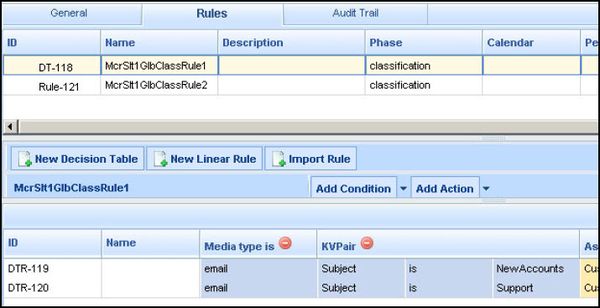
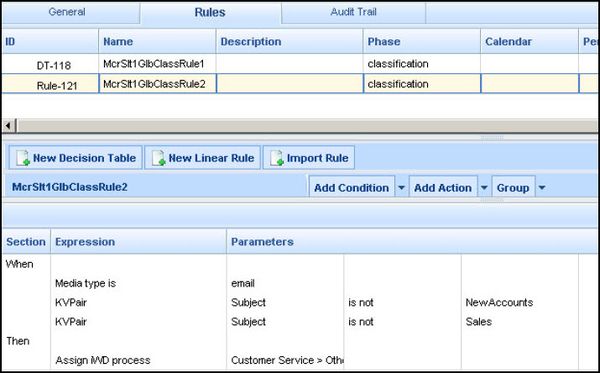
Create new Global classification rules as shown below. Remember to save each rule. The first example below shows a Decision Table rule.
Decision Table Rule
Linear Rule
3. Create Classification Rules for each Process
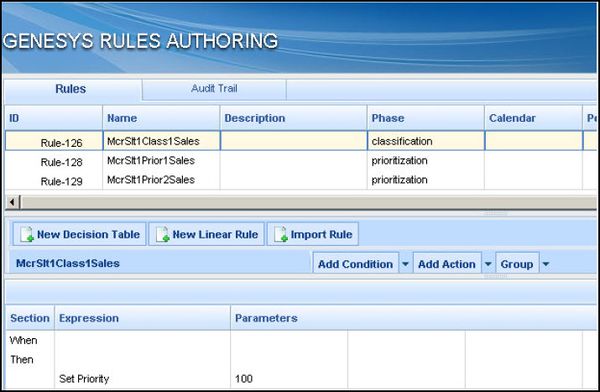
Create a new classification rule for each process (see the screenshot below for an example).
- For the Sales process: Action Set Priority 100
- For the Support process: Action Set Priority 50
- For the Others process: Action Set Priority 10
Classification Rule
4. Create Prioritization Rules for the Processes
Create prioritization rules for your processes.
For the Sales process, create the rules outlined in the table below:
|
Rule Name |
Conditions |
Actions |
|---|---|---|
|
McrSlt1Prior1Sales |
If Reprioritization was not set up |
Reprioritize after 1 hour |
|
McrSlt1Prior2Sales |
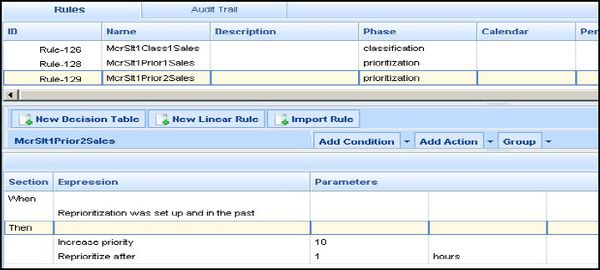
If Reprioritization was set up and in the past |
Reprioritize after 1 hour Increase priority 10 |
For the Support process, create the rules outlined in the table below.
|
Rule Name |
Conditions |
Actions |
|---|---|---|
|
McrSlt1Prior1Support |
If Reprioritization was not set up |
Reprioritize after 2 hours |
|
McrSlt1Prior2Support |
If Reprioritization was set up and in the past |
Reprioritize after 2 hours Increase priority 5 |
For the Others process, create the rules outlined in the table below.
|
Rule Name |
Conditions |
Actions |
|---|---|---|
|
McrSlt1Prior1Others |
If Reprioritization was not set up |
Reprioritize after 3 hours |
|
McrSlt1Prior2Others |
If Reprioritization was set up and in the past |
Reprioritize after 3 hours Increase priority 1 |
Prioritization Rule
5. Deploy Changes
Deploy your rule package.
Path of E-mail Interactions in IWDBP
All business rules will only affect interactions with a MediaType equal to email.
The following are the steps which the interaction will pass through:
- The interaction is submitted by E-mail server and is placed into the iWD_New queue.
- The interaction is processed by the Classification strategy. As a result, the classification business rules will be applied to the interaction. In this example, interaction will be assigned to one of the iWD processes depending on Subject.
- Classification rules from the assigned process will be applied. As a result, the initial Priority will be set—100 for the Sales process, 50 for the Support process, and 10 for the Others process.
- The interaction is placed into the iWD_Captured queue.
- The interaction is processed by the Prioritization strategy. As a result, prioritization business rules from the previously assigned process will be applied to the interaction. In this example it means that the interaction will be scheduled for reprioritization (each hour for the Sales process, every 2 hours for the Support process, and every 3 hours for the Others process).
- The interaction is placed into the iWD_Queued queue.
- In this example, if no available agents are found, the interaction will be passed into the Prioritization strategy based on the schedule that was set up earlier, and the Priority will be increased based on the assigned process.
How to Modify IWDBP to Allow Agents to Reply to Inbound E-mails and Send Single Outbound E-mails
This section describes how to modify the iWD business process to allow agents to send replies to inbound e-mails, and to send single outbound e-mails. There are 2 options:
- Create a new queue and a new strategy in IWDBP
- Use an existing business process.
In this example an existing business process will be used to illustrate how other business processes can be used from the iWD business process.
- Choose a business process to handle agent’s replies and outbound e-mails.
- Specify the queue into which the agent’s reply will be placed.
- Specify the business process and queue for single outbound e-mails from agents.
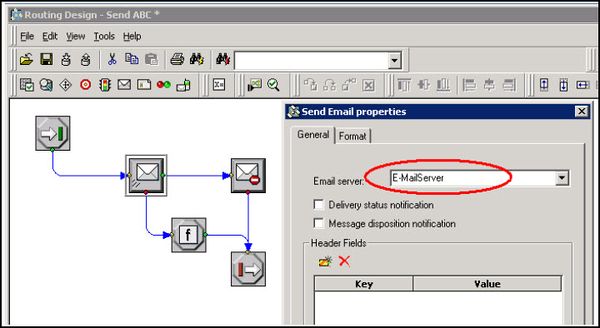
- Assign the E-mail Server that will process the outbound e-mail interactions. To do this in the ABC Simple business process, open the Send ABC strategy.
- In the Send Email property, select the E-mail Server (see below).
- Save all modifications and run all participating strategies.
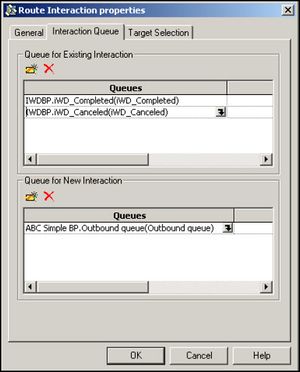
In this example the ABC Simple business process will process agent’s replies (with the Outbound queue). Also agents will be given the ability to place interactions into the following queues in IWDBP: iWD_Completed and iWD_Canceled. All of this will be done in the Distribution strategy. The Route Interaction properties in the strategy must be as shown below.
Route Interaction Properties Dialog
Select E-mail Server
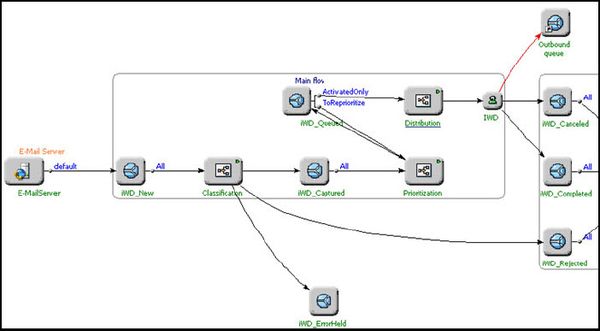
After these modifications the iWD business process should look approximately like this:
Modified Business Process
See the ABC Simple example in the screenshot below.
ABC Simple Business Process

