Contents
Configuring Chat Support
This page details the specific configuration steps required to use the Chat API included with Genesys Mobile Services. For more details about this API, refer to Chat API.
Configuration Overview
Prerequisite: Before beginning the steps described here, you should have completed the basic configuration process. To use the Chat API with your Genesys Mobile Services deployment, you must specify configuration details in the Application objects for the following objects:
- Genesys Mobile Services
- Web API Server
- Chat Server
Note: For Genesys Mobile Services configuration, it is assumed that you already have Web API Server and Chat Server installed and configured. Refer to documentation for those products if you require additional details. The following sections provide details about configuration changes required to use chat with your Genesys Mobile Services deployment. Procedures and illustrations on this page use Genesys Administrator, although the configuration can also take place using Configuration Manager.
Genesys Mobile Services Configuration
The following configuration options must be specified in your Genesys Mobile Services Application object:
Start
- Open Genesys Administrator in a web browser.
- Locate and view the Genesys Mobile Services Application object you previously created and configured.
- Under the General section of the Configuration tab, add a connection to the Web Server API Application object that will be used with your Genesys Mobile Services deployment.
- Under the Options tab, in the Chat section, include the mandatory configuration options described in the table below.
End
| Section: chat | |||
|---|---|---|---|
| Option Name | Required | Option Value | Description |
| chat_load_balancer_url_path | true | WebAPI812/SimpleSamples812/ChatHA/ChatLBServerInfo.jsp | URL to the load balancer (WebAPI) for Chat servers |
| chat_session_request_timeout | true | 30000 | Duration after which the chat interaction gets deleted |
| default_chat_endpoint | false | <tenant_name:chat_endpoint> | This option is used for all chat services in order to define the queue (URS) where the chat session initiated by GMS will enter. The value of this option is the tenant name on which the service(s) will proceed, and the chat endpoint as defined in the ChatServer option. For example, the section endpoints for the tenant Environment in the chat options is written as endpoints:1. This section contains the endpoint options (for example, default=queue). The chat endpoint value to use this default endpoint in the Environment tenant is Environment:default.
Note: You can supersede this option for each chat service using the _chat_endpoint option with the same <tenant_name:chat_endpoint> value. The default value for this option is Environment:default. |
| _client_timeout | false | If the client does not interact with the Chat service (refresh, send message, send event), GMS stops to poll the Chat server, and the Chat session is closed. This option applies only to chat sessions implemented using Cometd connections. For non-Cometd implementation, Chat server timeout parameters apply.
The default value for this option is 15 minutes. | |
Web API Server Configuration
To configure the Web API Server, at least one Chat Server must be added and configured as an active connection. There can be multiple "primary" chat servers added as connections, in which case the Web API Server will balance between them. However, each chat server should have a warm standby backup server configured for reliability.
Use the following procedure to download a required chat-related file, and to update the Web API Server Application object that is being used by your GMS deployment:
Start
- Download the ChatLBServerInfo.jsp file, and then add the file into the Web API Server directory, in the webapps folder.
- Open Genesys Administrator in a web browser.
- Locate and view the Web Server API Application object associated with your Genesys Mobile Services deployment.
- View the Configuration tab.
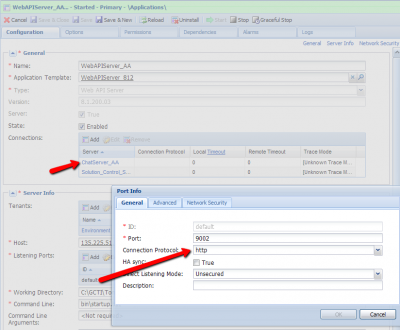
- In the General section, find the Connections table and click Add.
- Locate and select the Chat Server Application object that you want to use.
- Click on the Chat Server connection you plan to use to edit Port Info.
- Ensure the Connection Protocol associated with the Chat Server is http.
- Repeat this procedure to add additional Chat Sever instances, as necessary.
End
Chat Server Configuration
The Chat Server Application object being used by your Genesys Mobile Services deployment should have the following configuration updates:
- Add a connection to Interaction Server.
- Listen for Web API Server traffic on the appropriate port.
- Set a backup server and specify the redundancy type.
The detailed steps are provided below:
Start
- Open Genesys Administrator in a web browser.
- Locate and view the Chat Server Application object associated with your Genesys Mobile Services deployment.
- View the Configuration tab.
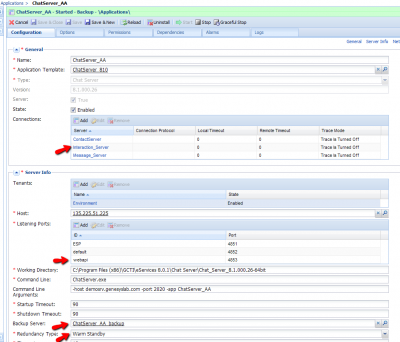
- In the General section, find the Connections table and click Add.
- Locate and select the Interaction Server Application object that you want to use.
- In the Server Info section, find the Listening Ports table and click Add.
- Add the port being used by the Web API Server that you configured previously to work with this Chat Server Application object.
- Repeat this procedure for each Chat Server associated with your Genesys Mobile Services deployment.
End
Setting Chat Server HA-Specific Options
The following procedure should be followed to enable high availability (Requires Chat Server 8.1.000.20 or higher):
Start
- Open Genesys Administrator in a web browser.
- Locate and view the Chat Server Application object associated with your Genesys Mobile Services deployment.
- View the Server Info section on the Configuration tab.
- Specify a Backup Server value.
- Set the Redundancy Type to Warm Standby.
- Under the Options tab, include the mandatory configuration options described in the table below.
- Repeat this procedure for each (primary) Chat Server associated with your Genesys Mobile Services deployment.
End
| Section: endpoints:1 | |
|---|---|
| Option Name | Option Value |
| default | Chat In |
| Section: settings | |
| Option Name | Option Value |
| session-restoration-mode | simple |
| transcript-auto-save | 2 |
Next Steps
With basic configurations now complete, you can start loading and managing your services, using the GMS Service Management User Interface.
You can also configure additional, advanced settings that are outlined in the following section:


