
Create Configuration
To open the Genesys Decisions Administration application, click Configuration on the Decisions main landing page.
A Genesys Decisions routing configuration is the combination of Center, Staff, and Contact Types that will need to be identified and maintained for accurate planning.
This includes:
- What is the level of detail that the current planning documents contain?
- What is the flow of contacts to agents (i.e. which agent groups handle which calls/emails/chats)?
- In what centers are these agent groups located?
- What is the level of detail that hiring plans need to contain?
- Do contacts route to more than one agent group?
Genesys Decisions offers multiple configuration options to fit any contact center organization. The configuration can include any or all the below:
- Inbound Phone
- Outbound Phone
- Chat
- Casework
A configuration can be set up as Multi-Channel for Inbound Phone, Outbound Phone, Chat, Email and Casework. A configuration can be set up as Multi-Skill with Priority for Inbound Phone and Outbound Phone
Setting up a New Configuration
Once you are logged in to the Administration application, click the Configure button to open the Configure/Review Settings window and perform the following tasks in order:
- Add a center.
- Add a staff type.
- Add a staff type to centers.
- Add a contact group.
- Add a contact type.
- Add email/casework buckets.
- Set up routing.
You can also configure the Administration application using the menus above the icons.
Add a Center
A center is typically the physical location for each of the staff types (groups of agents), which can also include virtual or “At Home” agents. The center grouping allows for more detailed historical data that can highlight performance differences in each center (such as AHT, shrinkage, attrition, and hiring plan), as well as more detailed forecasting.
To add a Center:
- Click 1. Add/Edit Centers.
- Click the green Add button.
- A blank cell will be created in the table.
- In the blank cell, add the new center name in the name column.
- Continue performing the previous 3 steps until all desired centers are added.
- Click the Save button and close the window by clicking the X at the top right corner or by clicking the Close button.
Add a Staff Type
A staff type refers to a grouping of agents that handle one or more contact types. Staff types can be in multiple centers and typically there is one hiring plan per staff type and center.
To add a Staff Type:
- Click 2. Add/Edit Staff Types.
- Click the green Add button.
- A blank cell will be created in the table.
- In the blank cell, add the new staff type name in the name column.
- Continue performing the previous 3 steps until all new staff types are added.
- Click the Save button and close the window by clicking the X at the top right corner or by clicking the Close button.
Assign Staff Type to Centers
Now that all centers and staff types have been created, you now need to indicate which staff types are in which centers.
To assign a Staff Type to a Center:
- Click 3. Assign Staff Type to Centers.
- Select a center from the center list.
- Select all staff types that should be assigned to that center and move them to the Associated Staff Types window by selecting the check box next to the staff type.
- Select the next center from the list and perform the same steps.
- Once all the staff types have been assigned to the appropriate centers, close the window by clicking the close icon. You can also click the Save button at any time to save your current changes.
Add a Contact Group
A Contact Group is a combination of one or more contact types that are routed to one or more staff types.
To add a Contact Group:
- Click 4. Add/Edit Contact Groups.
- Click the green Add button.
- A blank line will be created in the table.
- Add the new contact group name.
- If the contact group is a Multi-Skill with Priority configuration (see Set up Routing), then check the Allow Multi-Skill with Priority Configuration box. The Used for Planning box must be checked to either indicate that the contact group name is used in the planning process or is there to identify unplanned work (unmapped contacts).
- Continue performing the previous 3 steps until all new contact groups are added.
- Click the Save button and close the window by clicking the X at the top right corner or by clicking the Close button.
Add a Contact Type
A contact type is a queue or multiple queues that are routed to one or more staff types in one or more centers. Contact types can be inbound phone, email, chat, outbound phone, or casework.
- Click 5. Add/Edit Contact Type.
- Click the green Add button.
- A blank line will be created in the table.
- Perform the following steps:
- Enter the new contact type name in the Name column.
- Select the appropriate contact group from the drop-down list.
- Select the appropriate media type from the drop-down list.
- Enter the SVL, ASA, Abandon Rate, Max Extra Time and Max Under Time goals.
- If the new contact type is Multi-Skill with priority, then enter the Call Priority for that contact type (see Set up Routing).
- Click the Save button and close the window by clicking the X at the top right corner or by clicking the Close button.
Add Email/Casework Buckets
If your configuration consists of either an Email or Casework (or both) contact type(s), you will need to set up the backlog and handled within buckets. There are eight buckets to be configured and each can be in either hours or days. The backlog buckets will allow you to see historically as well as the forecasted amount of Emails or Casework that were backlogged or are forecasted to be backlogged for the set amount of time assigned to each bucket. The same bucket settings will be used to see historically as well as the forecasted amount of Emails and Caseworks that were or will be handled in the set amount of time assigned to each bucket.
To add an Email or Casework Bucket:
- Click 6. Edit Email & Casework Buckets.
- Select the contact group and media types from the appropriate drop-down lists.
- Select either Hours or Days from the Time Unit drop-down list.
- In the Upper Bound column enter in the number of hours or days for each bucket.
- Click the radio button in the Service Level Threshold column to select the service level goal for the contact type.
- Click the Save button and close the window by clicking the X at the top right corner or by clicking the Close button.
Set up Routing
Now that all the centers, staff types, contact groups and contact types have been created, you must indicate which contact types route to which staff types and centers:
- Click 7. Edit Contact Routing.
- The Routing Type will default to Initial Setup.
- Select the Contact Group from the drop-down list.
- Sort by either Center or Staff Type and click OK.
- Depending on the sort method selected, the [center name] – [staff type name] or [staff type name] - [center name] will appear on the left side of the screen for all centers and staff types. All contact types assigned to the contact group selected will appear on the right side of the screen.
- Now you can indicate which contact types are handled by which staff types and in which centers.
- Depending on the configuration, a different value will need to be entered for single skill and multi-skill with priority.
- For a multi-skill equal priority and a multi-channel configuration, select from the following options from the drop-down list for each Center - Staff Type that contact types route to:
- Multi-skill equal priority example:
- Mulit-channel example:

- In a Multi-Skill with priority configuration, select from the following options from the drop-down list for each Center - Staff Type that contact types route to:
- .

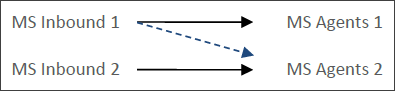
- Multi-skill with priority example: MS Inbound 1 calls route to MS Agents 1 first, then, if there is no capacity, it will route to MS Agents 2. Therefore, MS Agents 1 would be the primary routing and MS Agents 2 would be Secondary1 routing for the MS Inbound 1 calls. Since MS Inbound 2 calls only route to MS Agents 2, that routing should be configured as the primary routing for that call type.
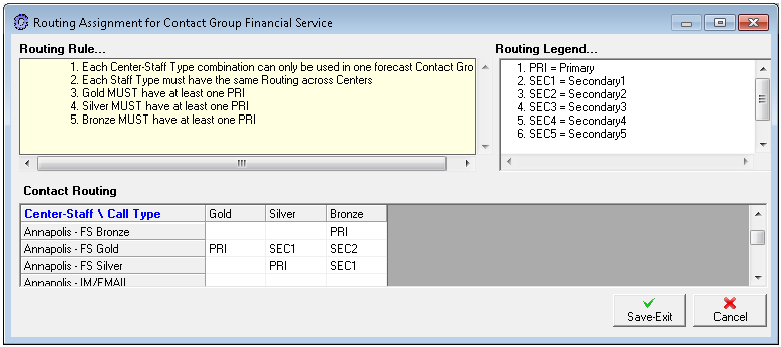
- Multi-skill with priority routing example:
- Once all contact types are routed to the appropriate center and staff types, click the Save-Exit button.
- Select the next contact group and add the routing for all the contact types in that contact group.


