callback_column_alias
Section: callback
Default Value: No default value
Valid Values: JSON-formatted string
Changes Take Effect: Immediately
Introduced: 8.5.111.04
Defines a list of aliases for the custom parameters submitted in Callback queries. If the disable_additional_columns_from_callbacks option is false, the Callback UI will use these aliases as Display Names for the columns that display the custom parameters' values.
The list must match the following format: { "parameter_key1" : "parameter_alias1", "parameter_key2" : "parameter_alias2", ..., "parameter_keyN": "parameter_aliasN" }
returned-keys
Section: callback
Default Value: _desired_time,_callback_state,_callback_state,_callback_reason,_ors_session_id
Valid Values: Comma-separated list of keys
Changes Take Effect: Immediately
Introduced: 8.5.111.04
Specifies a list of keys whose values must be returned when fetching callback records with the Query Callback by Queues or Query by properties queries of the Callback Services API.
Note that the following keys are always returned: _id, _desired_time, _service_name, _callback_state, _expiration_time, _customer_number, _url, _callback_reason (optional), in addition to the keys defined in the _customer_lookup_keys option.
filter-keys
Section: callback
Default Value: _callback_state,_callback_reason,_request_queue_time_stat,_request_ewt_service,_vq
Valid Values: Comma-separated list of keys
Changes Take Effect: Immediately
Introduced: 8.5.111.04
Defines a list of filtering keys that can be passed in the Query Callback by Queues query of the Callback API.
disable-additional-columns-from-callbacks
Section: features
Default Value: false
Valid Values: true, false
Changes Take Effect: Immediately
Introduced: 8.5.114.07
If true, the Callback UI displays only custom columns added through the Advanced Options dialog in the Callback table. If false, the Advanced Options dialog of the Callback UI will not allow the creation of custom columns; however, the Callback table displays any additional callback fields in the current range as additional columns.
disable-bulk-cancel-and-export-callback
Section: features
Default Value: false
Valid Values: true, false
Changes Take Effect: Immediately
Introduced: 8.5.114.09
If true, disables the bulk export of cancelled Callback records in the Callback UI.
_wait_for_user_confirm
Section: General
Default Value: false
Valid Values: Boolean
Changes Take Effect: Immediately
True to wait for confirmation of the customer's availability. If this option is set to true, the service sends a push notification to the customer's device to get confirmation that the customer is ready to have a conversation with the agent. This scenario is possible only if the _wait_for_agent option is set to true.
_request_queue_time_stat
Section: Scheduled Call
Default Value:
Valid Values:
Changes Take Effect: Immediately
Statistic used to define when a request should be submitted to the Callback Orchestration execution service. The request_execution_time_buffer value and request_queue_time_stat statistic options define when a queued request should be submitted to the execution service. For example, you can use the ExpectedWaitTime statistic to set this option:
"ExpectedWaitTime;Queue;8999@SIP_Server;Environment"
_urs_virtual_queue
Section: URS Queueing
Default Value: {Specify virtual queue to be used by strategy}
Valid Values: string
Changes Take Effect: Immediately
Virtual queue (alias) to which the service request will be added.
_customer_number
Section: no category
Default Value:
Valid Values: phone_number
Changes Take Effect: Immediately
Customer's phone number. The parameter is mandatory to match the call with service data when the call direction is set to USERORIGINATED. Also used to establish the connection with the customer when the call direction is USERTERMINATED.
This option is mandatory.
disable-additional-columns-from-callbacks
Section: features
Default Value: false
Valid Values: true, false
Changes Take Effect: Immediately
Introduced: 8.5.114.07
If true, the Callback UI displays only custom columns added through the Advanced Options dialog in the Callback table. If false, the Advanced Options dialog of the Callback UI will not allow the creation of custom columns; however, the Callback table displays any additional callback fields in the current range as additional columns.
_ttl
Section: General
Default Value: 86400
Valid Values: integer
Changes Take Effect: Immediately
Modified: 8.5.107.15, 8.5.109.05
Duration (in seconds) for which the service will be kept in storage after the Desired Time is passed (Time To Live). Once expired, the service is removed from the system. For example, if you want the callbacks to be visible in the Service Management UI for one week past the execution time, then you should set 7 days of Time To Live, which means _ttl=604800.
This option is mandatory.
_desired_time
Section: Scheduled Call
Default Value:
Valid Values: UTCDate
Changes Take Effect: Immediately
Callback desired time. Format is ISO 8601 (in UTC) 'yyyy-MM-ddTHH:mm:ss.SSSZ'. For example: '2013-05-28T15:30:00.000Z'
Manage Callbacks
- Updated in 8.5.207
The Callback UI displays the list of Callbacks that are still alive. After the Callback due date (which is the _desired_time parameter), the service record will appear in the UI for the amount of time configured in the _ttl parameter (in seconds).
Callback records can have the following states:
- SCHEDULED - Request is handled by Callback Management service (there are no sessions started in ORS). While in this state, the request will be handled by Management when the specified desired_time is upcoming.
- QUEUED - Callbacks actively waiting for an agent in ORS/URS; the agent not assigned yet.
- ROUTING - Agent is reserved but the call is not yet routed to the agent.
- PROCESSING - Callback being handled by assigned agents.
- COMPLETED - Callback was completed with _callback_reason, for example, timed-out, cancelled, and so on.
- PAUSED - Callback was paused. See Pausing Callback for details.
Callback UI Overview
The following features are available:
- The drop-down at the top left gives you the option to display Callbacks using a pre-defined range for the past day, week, or month; or for the next day, week, or month.
- Refresh – You can force the interface to refresh the list of Callbacks.
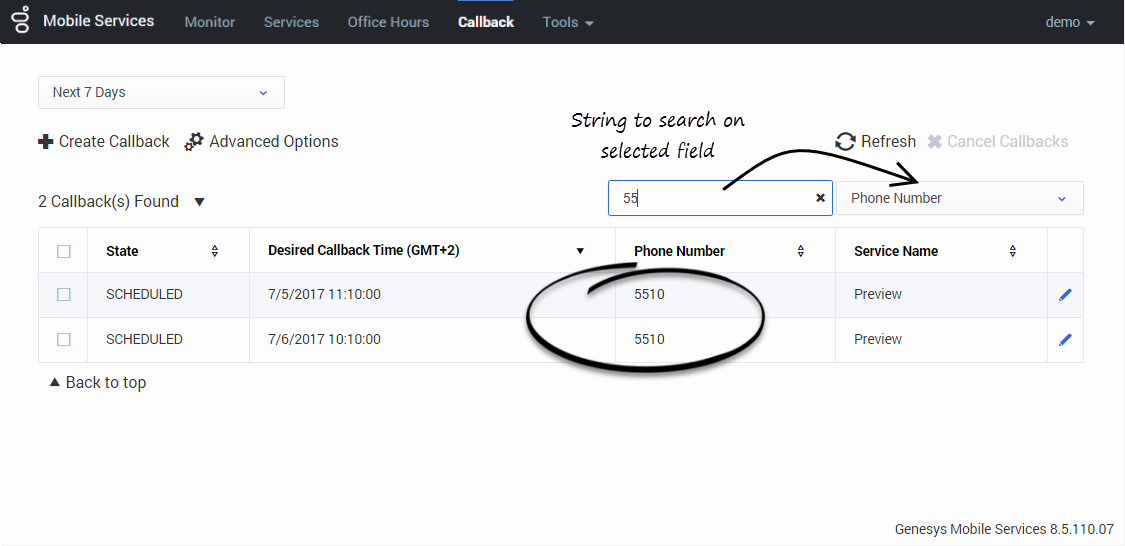
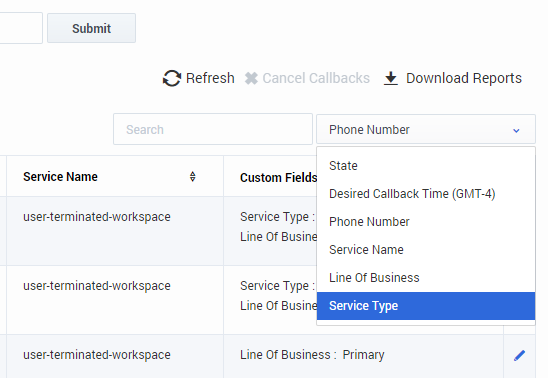
- Search Box – You can select a column field in the drop-down at the right of the Search Box. Then, the interface filters the results dynamically as you type.
Limitations of the Interface
- The total number of callbacks that the table can display is 100000.
- Callbacks are displayed in pages of 100 items for Internet Explorer and 250 for other browsers.
- There is a dropdown which you can select to get pre-defined ranges or set a custom range.
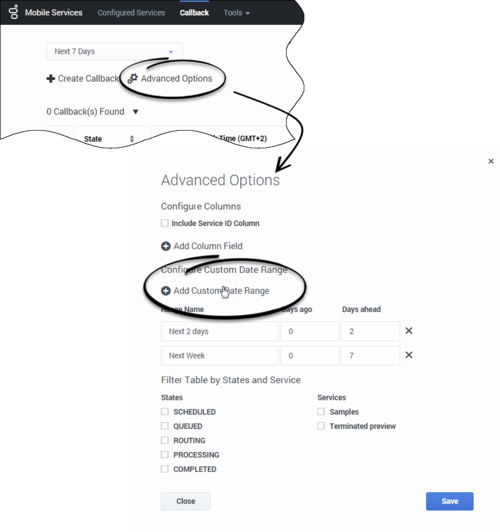
Advanced Options - Opens a new window where you can customize how the Callback Management table displays:
- Add Column Field - You can add your own custom column field to display in the table. This option can be useful when you have created your own properties that you want to display in the table. You can add more than one field, which will display in the same column. In this case, to enhance readability in the single column, you can use the Alias option, and create a short name to display.
- To enable new Column Fields, configure disable-additional-columns-from-callbacks = true in your GMS application.
- Filter Table by States and Service - You can include one or more states to display in the table, and/or you can select a service to display in the table. Note: You can only select one service at a time to display.
- Max # of Callbacks per Service - Default is 500.
Filtering Callbacks by User
- Introduced in 8.5.207
If you configure a list of services in the services option, in the gms section of the Agent's configuration options, the Callback UI filters the callbacks that the administrator can see based on this configured list. See also Adding your Service to Virtual Service Groups.
Create or Schedule a Callback
You can submit or schedule a callback request by clicking Create Callback. A new dialog opens and you can add a new Callback to be displayed. You can select the Callback Type and Service Name, add your own properties to the Callback, and enter the following Callback Parameters:
- _customer_number - Your Callback number.
- _urs_virtual_queue - Queue to use for this Callback if several virtual queues are used for Callback with identical configuration. If you are defining the _urs_virtual_queue here, you must then remove this option from the Callback Service (through Genesys Administrator), because it cannot be defined in both places.
- _request_queue_time_stat - Queue statistics. For example, "ExpectedWaitTime;Queue;8999@SIP_Server;Environment".
Edit a Callback
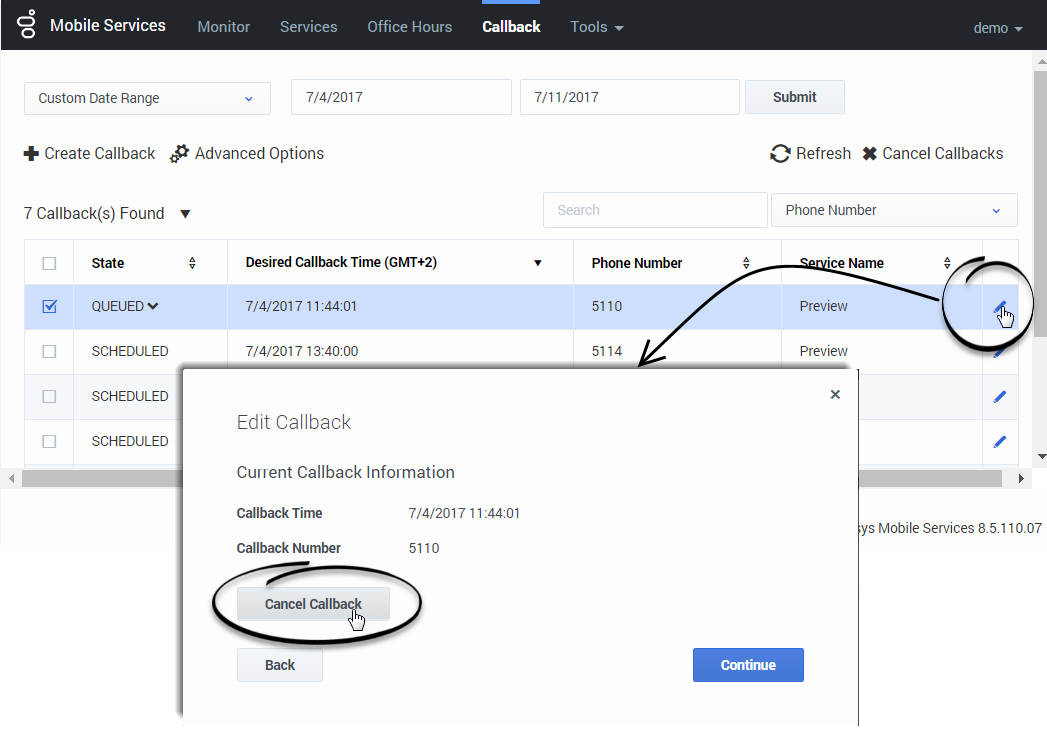
In the Callback table, for Callbacks that can be edited, a blue pencil displays in the last column. Clicking this pencil displays the edit options for that Callback.
- You can choose to reschedule the Callback (only for SCHEDULED Callbacks).
- You can choose to cancel the Callback.
Reschedule a Completed Callback
- Introduced in 8.5.200
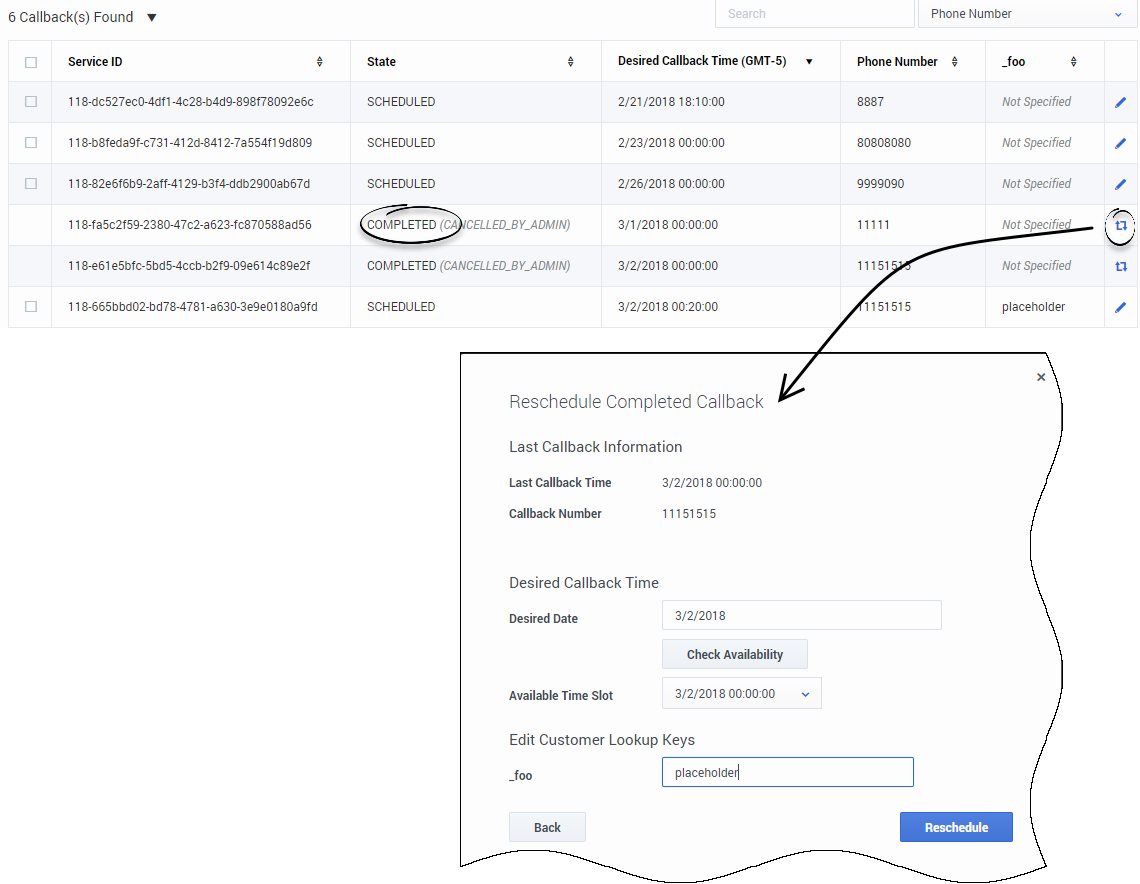
In the Callback table, you can reschedule completed Callbacks that show a blue repeat icon in the last column. Clicking this icon displays the Reschedule options for that Callback.
- The properties and user data of the completed callback are merged with the parameters of the newly scheduled callback.
- You can choose to cancel the operation.
Get Additional Details about the Queued State
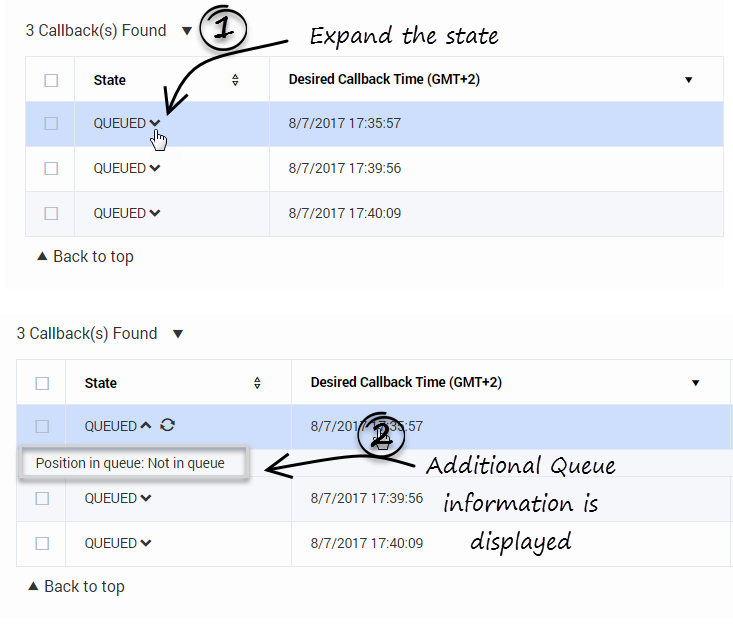
You can expand the QUEUED state to get ORS-level diagnostics about the queued Callback.
The following information can be displayed:
- Estimated wait time: The estimated time that the customer will wait for the callback. For example: 46.5 seconds
- Position in queue: The callback's current position in the queue. For example: 3
- Agents Logged in: The number of agents that have logged in. For example: 3
- Callback type: The type of callback. For example: WAIT_FOR_AGENT
- Callback version: The version of the ORS Callback strategy. For example: v2.39
- Channel: The callback channel. For example: WEB
- Dial attempt number: The number of dials that the agent has attempted. For example: 2
- Dial Result: The result of the callback dial. For example: PUSH_DELIVERY_NOT_CONFIRMED
- EWT at first outbound call: The estimated wait time when the first outbound call happened. For example: 22.5
- EWT at callback offer: The estimated wait time when the callback is offered. For example: 0
- Is snoozed: Shows whether the callback is snoozed or not. For example: false
- ORS session ID: ORS session ID of the callback. For example: 00NEEH6C74C6NAC01G015B5AES000005
- Position at first outbound call: The callback's position in the queue when the first outbound call happened. For example: 3
- Position at callback offer: The callback's position in the queue when the callback is offered. For example: 3
- Current priority: The callback's priority. For example: 0
- Routing target: The callback's target or skill expression. For example: GMSCallbackAgents@stat.GA
- Time of first outbound call: The time when the first outbound call happened. For example: 1/3/2017 11:26:21
- Time callback was accepted: The time when the callback is accepted. For example: 1/3/2017 11:26:02
- Time of next outbound call: The time when the next outbound call happened. For example: 1/3/2017 11:27:24
Bulk Cancel and Export of Callback Records
Added in: 8.5.110
Bulk Cancel
Make sure to select an appropriate Time Range to filter callbacks, then make a callback selection to activate the Cancel Callbacks button. When you click this button, the Cancel Callbacks Confirmation dialog opens, displaying the selected callback cancellations.
You can either:
- Continue with the selections you have made and click confirm to cancel them.
- Check Cancel All Callbacks In Current Time Range, to override your previous callback selections and delete all callbacks in the current time range. In that case, the list of displayed callbacks disappears from the dialog window. Confirm to cancel the records.
The resulting display shows all the callbacks that you have selected to cancel and that are now in COMPLETED(CANCELLED_BY_ADMIN) state.
Download the Reports
Then, Download Reports dialog can provide two files:
- Export Cancelled Callbacks allows you to export a CSV file that includes all of the recently canceled Callbacks. Click the Refresh button beside the label to get an updated report if the one downloaded seems out of date.
- Cancellation Summary Report is available only if you recently canceled some callbacks. This report shows the cancellation status of the recently Cancelled Callbacks.
Configure Custom Date Range in Advanced Options
As detailed previously, the Custom Date Range selection in the drop-down list enables you to specify a start time and end time for the displayed callbacks. If you are often using the same date filters, consider saving these filters in advanced options.
- In the Callback Panel, click Advanced Options, then Add Custom Date Range.
- Add your date filters with appropriate names.
- Once saved, they will appear at the bottom of the drop-down list.
Configure Aliases to Display Custom Fields
Introduced in: 8.5.111
You can configure aliases for additional Column Names that display the custom fields passed in your Callback queries parameters. To do so:
- Make sure that disable-additional-columns-from-callbacks is false in your GMS configuration.
- Allow the list of the parameters that you wish to see displayed by using the filter-keys and returned-keys options.
- Create a list of aliases for the parameters that you wish to see displayed by using the callback_column_alias option.
For example, if you pass the _LOB parameter in your callback queries, enable its alias as follow in the callback section:
filter-keys=_callback_state,_callback_reason,_request_queue_time_stat,
_request_ewt_service,_vq,_LOB

returned-keys=_desired_time,_callback_state,_callback_state,_callback_reason,
_ors_session_id,_LOB

callback_column_alias = {"_LOB": "Line Of Business"}
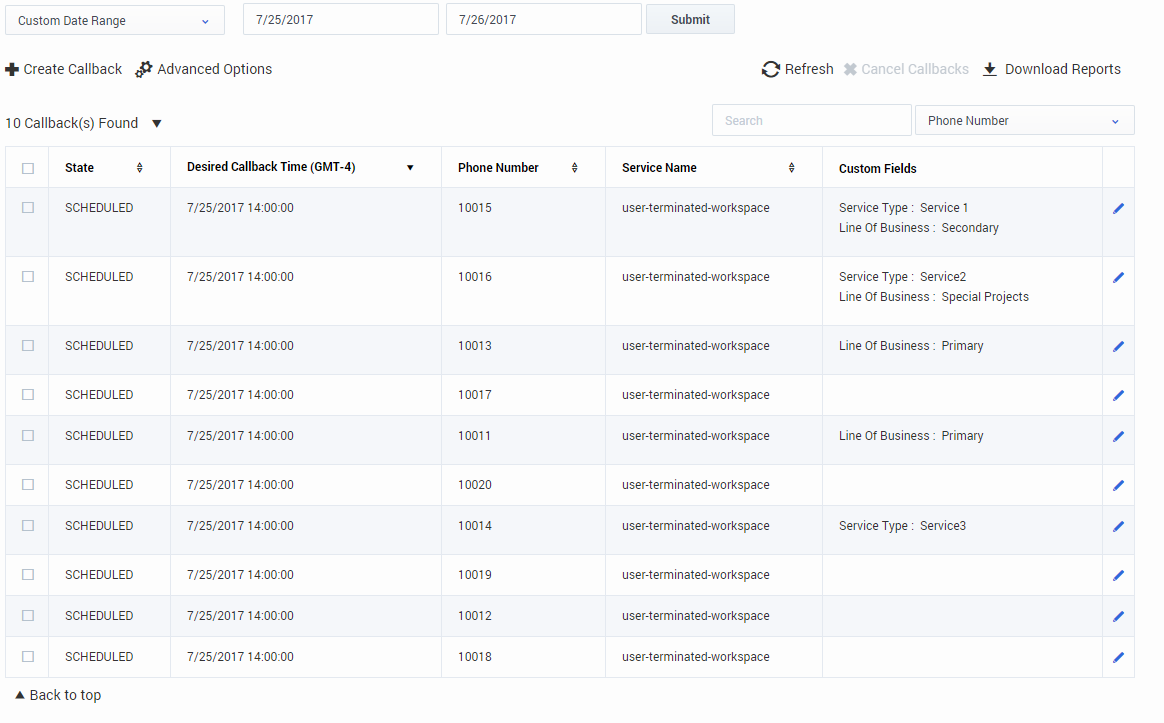
If you wish to display multiple custom values, the UI will group them in the Custom Fields column. For example, if you wish to display the values for the _LOB and _service_type query parameters, configure the alias as follow:
filter-keys=_callback_state,_callback_reason,_request_queue_time_stat,
_request_ewt_service,_vq,_LOB,_service_type

returned-keys=_desired_time,_callback_state,_callback_state,_callback_reason,
_ors_session_id,_LOB,_service_type

callback_column_alias = {"_LOB": "Line Of Business", "_service_type": "Service Type"}
Then, the Callback UI will display the _LOB and _service_type values in the Custom Field column. The aliases will identify each custom field.

