
Using the SMConfig to Configure SpeechMiner
The section describes the SMConfig panels.
1. Update the SMConfig Licenses Panel.
2. Save your changes and exit.
Sites & Machines
The first panel of the SMConfig application, Sites & Machines, is used to configure the layout of the system as well as some other system-wide parameters.
This tool enables you to configure sites, machines and tasks, and system index searches.
For additional information, refer to the following sections:

Configuring Sites
A site is a single geographical location in which SpeechMiner servers are installed. One SpeechMiner system, which has one database, can have a number of sites. All the sites configured in the Site section of the Sites & Machines panel are locations that connect to the SpeechMiner database. If your SpeechMiner is set up in more than one location, configuring each location as a site helps to minimize the bandwidth needed for call processing.
Every SpeechMiner system has at least one site. The first site is created automatically, and is initially called "default." Immediately after SpeechMiner is installed, the "default" site is automatically configured to include all the servers in the local network. You can change the name of the default site, and add sites, as required. If you create new sites, you can move servers that are listed under the default site to other sites.
Required Permissions
Validation of the input, filtered, store, and installation folders can only be performed if the user account used to log into SMConfig has administrator permissions on the machine that is being configured. This is because SMConfig must use the $ share to check that the installation folder exists.
Configuring the Default Site
Some of the settings in the Sites & Machines panel are configured per site, and others are configured for the entire system. This section explains how to configure the default site by configuring the site and system settings defined in the Sites & Machines panel.
After you configure the settings, and click Save to save them, SMConfig automatically validates the key folders you specified by checking that they exist and are configured with the required permissions. Validation is always performed on the items listed under Machines and Tasks. Validation of other settings is optional, as indicated below. For additional information, see Saving Changes.
To configure the default site:
- In the Sites & Machines panel, fill in the fields as follows:
Field Description Site Name The name of the site. Initially, the site is called "default." Modify this field to change the name. Filtered Dir Enter the location of the folder called filtered that you created (see Creating the Required Folders). For example, the required path format is \\computer\data\input. Input Folders Click  to add a line to the list. Then, modify the line to give the location of the input folder you created (see Creating the Required Folders).
If you will be using multiple input folders for this site, repeat this procedure to add additional lines to the list, as necessary. For example, the required path format is \\computer\data\input.
Store Folders Click to add a line to the list. Then, modify the line to give the location of the store folder you created (see Creating the Required Folders).
If you will be using multiple store folders for this site, repeat this procedure to add additional lines to the list, as necessary.
Validate input, filtered, store, and installation folders Select this option if you want SMConfig to validate the input, filtered, store, and installation folders after you click Save (see Saving Changes). Cross site processing allowed If your system will have more than one site, select this option to enable processing of interactions from other sites at this site. When this option is selected, the Recognizers at this site will give priority to processing local files, but no local files need to be processed, they will process calls from remote locations. Selecting this option can improve the overall performance of the system, but it does mean that audio files will be transmitted over the network. Prefer compressed remote audio If cross-site processing is activated, select this option to give priority to compressed audio files if they are available. If this option is selected, when call data is transmitted from a remote site to this site for processing, the system will send the compressed versions of calls if they are available. In this case, the compressed audio will be decompressed before being processed by the Recognizer. Even so, the quality of the audio input may be diminished slightly, and this may impact the recognition quality. Note: This option is only available when Cross site processing allowed is selected.
Machines and Tasks List all the SpeechMiner machines at the site, and configure the tasks that will run on each machine, as explained under Configuring Machines and Tasks. Package Folders Click to add a line to the list. Then, modify the line to give the location of the grammars folder you created (see Creating the Required Folders).
If you will be using multiple grammars folders in your system, repeat this procedure to add additional lines to the list, as necessary. For example, the required path format is \\computer\data\input.
Backup Folders Click to add a line to the list. Then, modify the line to give the location of the backup folder you created (see Creating the Required Folders). If you will be using multiple backup folders in your system, repeat this procedure to add additional lines to the list, as necessary. For example, the required path format is \\computer\data\input.
Email Fill in the fields in this area as follows: - Email Server: The name of the email server SpeechMiner must use to send alerts, notifications, and reports
- Alerts Email: The email address SpeechMiner must use as the sender address when it sends email notifications
Default Workgroup Enter the default work group. If an interaction is not associated with a work group, the system will assign this work group to the specific interaction.
Note: The default work group must include a slash (/) at the beginning of the work group name.
Default Language Select the default language for new Programs that are opened in SMART. (If additional languages are installed in SpeechMiner, the languages of individual Programs can be changed in SMART when the Programs are created.) Note: Only the languages selected under Select Languages appear in the dropdown list.
Select Languages Select all of the languages for which you will want to perform speech recognition. These languages will appear as language options in SpeechMiner and in SMART. Note: In order to create and apply Programs in these languages, their language packs must also be installed. The language packs are installed as part of the SpeechMiner installation process (see Running the Setup Program and Installing SMART). Note:The language selections here do not affect the language of the web-based interface. The interface language is selected in the settings of the Web server, under Machines & Tasks.
Configuration Server If users will use Genesys credentials to log into any of the SpeechMiner components from this site, Click to add a line to the list and modify it so that it points to the location of the Genesys Configuration server (that is, <config_server>:<port>).
- Server Name: The name of the machine on which the Genesys configuration server is installed
- Port: The port SpeechMiner should use to connect to the configuration server
To configure backup configuration servers, add additional lines with their details. After setting or updating the configuration server host and port in SMConfig (either in the Login window, or in the Sites and Machines panel), the IIS should be restarted.
Config Server Settings The following must be configured in the systems Configuration Server: - Configuration Server Username and Password: The Configuration Server user and password that SpeechMiner applications should use when connecting to the Configuration Server. Verify that the specific user was given read and execute permissions for the tenant object in the configuration server and all its objects in the tenant object hierarchy.
- Application Name: The prefix for the SpeechMiner applications. For example, if the prefix is ‘Speechminer’, the Web Server will use the Speechminer_Web and Speechminer_Web_node applications
- User Application Name: The name of the Configuration Manager application object that will be used to validate user credentials. For details, see Configuring Permissions.
- Click Save. The system validates the settings, and then, if the validation is successful, implements them. The Progress window opens and shows information about the implementation process.
Adding a Site
If your system will have servers at more than one site, you can add additional sites to the configuration in SMConfig. A new tab is added to the Sites & Machines panel for each site you create. The settings in the upper half of the panel, under Sites and Machines and Tasks are configured for each site. The settings in the lower half of the panel are configured for each system, and thus are not changed when you add an additional site.
Before you begin adding the site, create filtered, input, and store folders on a machine at the new site (see Creating the Required Folders).
To add a site:
- In the upper-left of the Sites & Machines panel, select . A new tab is added to the site-setting area in the upper part of the panel.
- Under Site Name, modify the name as required. The name of the tab is automatically updated.
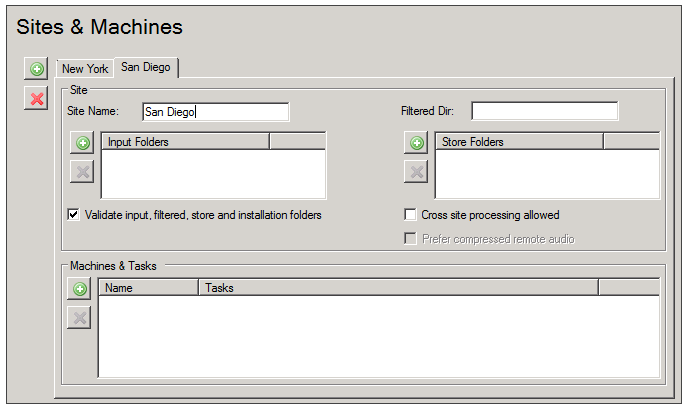
- Under Sites and Machines and Tasks, fill in the fields for the new site.

Configuring Machines and Tasks
The Sites & Machines panel must list all the machines used by SpeechMiner at each site, and the tasks they will run. Before you begin configuring the settings in this panel, map out the machines in your system, their specifications, the sites at which they are located, and the tasks that must be performed at each site. Using this information, you can decide which tasks to run on each machine.
Adding Machines to a Site
You can add machines to sites as required.
To add a machine to a site:
Under Machines and Tasks click
 .
.- In the Properties window, enter one of the following values for <machine name>:
- Machine Name
- Machine IP
- Fully Qualified Domain Name (FQDN)
- Click OK. The machine is added to the list of site machines.
Choosing Which Tasks to Run on Each Machine
Before you can configure the machines and their tasks, you must decide which tasks to assign to each machine. Each machine can have a number of different roles at one site. The entire system must include machines that fill all of the following roles:
- Web server: Runs the SpeechMiner web-based interface.
- Interaction Receiver: Used for the Recording UI and Recording+Analytics modes. It receives interaction data and metadata from the Genesys Interaction Recording system, inserts it into the SpeechMiner database, and places the data files in the Store folder to await processing.
- Fetcher: Takes unprocessed interaction data and metadata from the input folder, inserts it into the SpeechMiner database, prepares the data files for processing by SpeechMiner, and places it in the store folder to await processin.
- Call Recognizer: Processes call audio according to the requirements of the program to which the call belongs by transcribing the text and identifying topics and other events in it.
- Scheduler: Sends data to the Indexer Service, creates Quality Management (QM) Evaluation Sessions and archives QM.
- Report caching: Runs reports that are included in active users' Views pages overnight so that they can be displayed quickly in their widgets when the users open their Views pages; the amount of time to store cached results is configured in the Reports panel.
- Exploration: Performs the data analysis required for the Exploration feature of the web-based interface.
- Recategorizer: Assigns Categories to the processed interactions in accordance with the Category definitions defined in the system.
- Text Recognizer: Processes written interaction input data and identifies Topics and other events in it.
- Monitor: Enables the monitoring of the selected machine.
Normally, each site will have:
- One Web server
- One or more fetchers
- Several Recognizers, Recategorizers, and Monitors
- One or more Indexer tasks.
Optimizing the Number of Fetchers
To optimize the rate at which interaction data is fetched, multiple fetchers can run simultaneously. You can configure SpeechMiner to employ multiple fetchers on one or more machines. However, if too many fetchers run on a single machine simultaneously, the CPU may not be able to run all of its tasks efficiently. The optimal number of fetchers to run on a single machine is a function of how powerful the CPU of the machine is. A general starting point on a new SpeechMiner installation is to assign 0.5 fetcher tasks per core on each fetcher machine. Normally, two fetchers will maximize the CPU usage on a quad-core machine.
Optimizing the Number of Call Recognizers
To maximize the speed of interaction processing, multiple Call Recognizers can run simultaneously. You can configure SpeechMiner to employ multiple Call Recognizers on one or more machines. However, if too many Call Recognizers run on a single machine simultaneously, the CPU may not be able to run all of its tasks efficiently. The optimal number of Call Recognizers to run on a single machine is a function of how powerful the CPU of the machine is and how many Topics must be recognized concurrently. A general starting point on a new SpeechMiner installation is to assign 1.5 Recognizer tasks per core on each Recognition machine. Normally, six Call Recognizers will maximize the CPU usage on a quad-core machine.
The Call Recognizers in your system are run by the recognition manager. You can configure the maximum number of Call Recognizers that should be managed by each Recognition manager. If the number is too low, performance may be impacted; if it is too high, the process may run out of memory. The number of recognition machines and processes should be defined by the sizing guide.
Optimizing Exploration Tasks
Optimizing exploration tasks speeds up the data analysis required for the web-based interface Trending. The Exploration task and all its sub-tasks are run simultaneously according to a scheduler mechanism and scheduling parameters (for example, continuously, once every 24 hours, and so on). A general starting point is to define one machine with Exploration. However, when working with a very large data set, having all the sub-tasks on the same machine as the Exploration task can impact performance due to the large CPU/Memory load required. To reduce the negative impact on performance and to avoid a single point of failure and a loss of redundancy, it is recommended that you define the Exploration task on more than one machine. Since the Exploration scheduler supports load balancing the tasks between several machines, there are more hardware resources available for each task and subsequently each task runs faster.
Configuring the Properties of a Machine
You configure the properties of a machine by selecting the tasks it should perform.
To configure the properties of a machine:
- Under Machines & Tasks, double-click the machine. A Properties window opens and displays the properties of the machine.

- Select all of the tasks the machine should perform.
- If you selected Web Server, select the protocol, specify the port and virtual folder, and select the language of the web-based interface.
Important- It is recommended that in systems with Analytics the language selected here should be one of the languages selected in the Sites & Machines panel.
- For the language change to take effect you must update the configuration files in the web machines using the Service panel.
- If you selected Interaction Receiver, click the Parameters button to its right. In the dialog box, select the protocol and specify the port. If you are working with an Analytics deployment, enter the location of the Interaction Receiver Input folder in which the audio files received from the Genesys Interaction Recording solution will be placed, and then click OK.
Note that the Interaction Receiver Input folder is not the same folder as the Input folder used by the fetchers. - If you selected Fetcher, configure the Fetcher settings as explained below.
- If you selected Call Recognizer, configure the Call Recognizer settings as explained below.
- Click OK. The machine is added to the list of machines at the site.
Configuring the Settings of the Fetchers
To configure the settings of the fetchers:
- To the right of the Fetcher checkbox, select the number of fetchers that should run on the machine.
- Click the Parameters button. The Fetcher Parameters window opens and displays a list of all the input folders that are configured for the site.
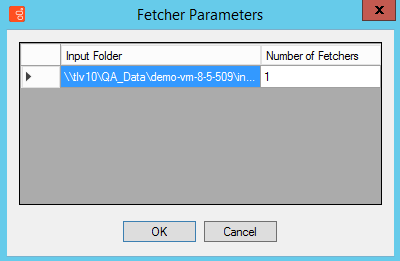
- Under Number of Fetchers, specify how many fetchers should retrieve interaction data from each input folder. Modify the values so that the sum of all the fetchers defined matches the number of fetchers that you specified should run on the machine.
- Click OK.

Configuring the Settings of the Call Recognizers
To configure the settings of the Call Recognizers:
- To the right of the Fetcher checkbox, select the number of Call Recognizers that should run on the machine.
- Click the Parameters button. The Recognizer Parameters window opens and displays a list of all the input folders that are configured for the site.
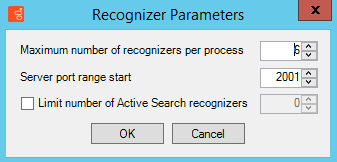
- Fill in the fields as follows:
Field Description Maximum number of recognizers per process How many Call Recognizers can be handled by each process. Server port range start The ports that will be used by the Call Recognizers; the system will use multiple ports, as necessary, beginning with the port entered in this field. By default, this is port 2001. You can change this number if it conflicts with other port settings in your system. - Click OK.


Reports
If you want to use any of the SpeechMiner reports, you must deploy both the MRS Library, which is a DLL that provides support for various report features and all the required reports, on the report server. You can do this from the Reports panel of SMConfig. The DLL and the reports will be deployed on the machine that is identified in the Sites & Machines panel, specified as the Server Name parameter under the Report Server panel.

Required Permissions
To check if the MRS Library has been deployed on the report server, and to deploy the MRS LIbrary, SMConfig reads the report server's Registry to locate the report server’s bin folder and then accesses the folder using the $ share. Therefore, to deploy the MRS Library and any or all of the reports, the user account used to log into SMConfig must have administrator permissions on the report server.
Deploying the Reports
To deploy reports on the report server, you must first deploy the MRS Library on the server, and then deploy the required report templates. You can perform both actions simultaneously by selecting both options in the Reports panel. Once the MRS Library is deployed on the server, you can deploy additional reports without redeploying the library.
To deploy reports on the report server:
- In the Reports panel, fill in the fields as follows:
Field Description Validate Report Server Select this option if you are configuring SpeechMiner to use a report server. SMConfig will check that the parameters are correct. Note: If you select this option, SMConfig will try to validate that the user who is running SMConfig has access to the report web service and can call methods using this web service. Therefore, the user account that was used to run SMConfig must have the Content Manager role on the report server (see Configuring Permissions for UPlatform).
Report Server Fill in the fields in this area as follows: - Server Name: The name of the machine on which the report server is installed
- Protocol: The protocol SpeechMiner must use to connect to the report server
- Port: The port SpeechMiner must use to connect to the report server
- Virtual Folder: The folder of the reports on the report server—usually named ReportServer. If the database is a named instance, enter both the folder name and the instance name, in the format <virtual report folder name>_<instance_name>.
Note: If you plan to use the report server, select Validate Report Server.
Set reports caching time If you chose to use report caching in the Sites & Machines panel, specify how long report results should be cached, in minutes. The results of reports that are included in active users' Views pages will be saved for the specified period of time. Users who open their Views pages during that time period will see the cached results. The recommended time period is 24 hours (i.e., 24*60=1440 minutes), because the report caching runs once every 24 hours.
Note: For QM reports it is recommended that the cache setting be set to the minimum amount of 1 minute.
Deploy MRSLibrary If the MRS Library has not yet been deployed on the report server, select this option. Note: If this option is not selected, but the checkboxes in the Report/Resource list below are active, this means that the MRS Library is already deployed on the machine. In this case, it is not necessary to select this option.
Deploy reports Enter the location of the reports folder. This folder is called reports, and is located in the SpeechMiner installation folder. For example, if SpeechMiner was installed in c:\Program Files (x86)\Genesys\Software, the path to enter would be c:\Program Files (x86)\Genesys\Software\reports. Select\Unselect All Select the checkbox to select all of the reports in the Report/Resource list below for installation. Clear it to clear all of the selections in the list. Note: If this option is not available, this means that the MRS Library has not yet been deployed on the machine. In this case, select Deploy MRSLibrary, and this option will become available.
Report/Resource Select the reports you want to deploy on the report server Note: If this option is not available, this means that the MRS Library has not yet been deployed on the machine. In this case, select Deploy MRSLibrary, and this option will become available.
- Click Save. The system begins to deploy the reports on the report server, and the Progress window opens and shows information about the deployment process.
- Access the http://<server name>/reports in the web browser and open the SpeechMiner database folder (that is, the folder with the relevant database name).
- Open the SME data source and change/add the connection string to the following: data source=<SERVER_NAME>;initial catalog=<DB_NAME>;applicationIntent=ReadOnly;
- Click Apply.
- Restart the Report Server.
Configuring Reports on the Secondary Database
Running reports on the secondary database enables you to decrease the load on the main database.
To run reports on the secondary database:
Licenses
For the system to process calls, enter the licenses you received from Genesys must be entered in the Licenses panel. The licenses are not included in the SpeechMiner installation folder.

To update the licenses:
- Copy the text of the SpeechMiner license that was supplied.
- In SMConfig, in the Licenses panel, paste the license text into the SpeechMiner License field.
- Click Save.
Services
The Services panel is used to manage the SpeechMiner services. You can use it to:
- Register all the SpeechMiner services on each machine in the system. See: Initial Configuration
- Update the SpeechMiner configuration files on each machine. See: Required Permissions
- Start, restart, and stop services. See: Starting and Stopping the System
You must perform these actions at the end of the installation process, and also whenever you add, change, or remove services or machines to or from the system. You can also use the Services panel to restart or stop services whenever necessary.

Initial Configuration
After you install SpeechMiner and configure its components in SMConfig, you must register all of the SpeechMiner services, update the SpeechMiner configuration files on each machine, and start all Uplatform servers. In addition, whenever you make changes to the system, you should follow the same procedures, as explained below.
To configure the services in your system:
- In the Services panel, fill in the fields as follows:
Field Description Create performance counters Select this option to configure the performance counters on each of the selected machines. Note: Performance counters should normally be configured only once for each machine. Select this option for all machines when you first install SpeechMiner. Then, if you add new machines to the system, select this option for the new machines.
Register services Select this option to register the relevant services on each of the selected machines. When you select this option, the Credentials area becomes active. Enter the credentials of the Windows user that will run the services (typically, SMUSER).
Notes:
Service registration should be performed once for each machine when SpeechMiner is first installed. It should be performed again if the credentials of the Windows user account running the services are changed. Select this option for all machines when you first install SpeechMiner. Then, if you add new machines to the system, select this option for the new machines. If the credentials given are for a local user on each machine rather than a domain user, under Domain, enter a "." (dot). The Uplatform service will be registered but the user will not have the "Run as Service" role. You will have to manually go to the Windows services management tool on each machine, enter the password, and click Apply.Update IIS application pools Select this option to configure the Application Pools identity for SpeechMiner Web and Interaction Receiver. When you select this option, the Credentials area becomes active. Enter the credentials of the Windows user that will run the services.
Update config files Select this option to update the SpeechMiner configuration files on each of the selected machines. When you select this option, the Credentials area becomes active. Enter the Windows user that will run the services(typically, SMUSER). In addition, the encryption options become active. Select the required options.
- Encrypt config files - This option will encrypt the SpeechMiner configuration files in the local system and remote system.
- Use encrypted SQL connections - This option will start connecting the SpeechMiner database in encrypted mode (SSL). You should use this option only when you use SQL encryption.
Note: Updating of configuration files should be performed once for each machine when SpeechMiner is first installed. It should be performed again if the credentials of the Windows user account running the services are changed. Select this option for all machines when you first install SpeechMiner. Then, if you add new machines to the system, select this option for the new machines.
Restart Services / Stop Services All the Uplatform services must be restarted after the installation and configuration processes are completed. To do this, under Restart Services and, select change status to run. Then, under Machine, make sure all servers on which Uplatform is installed are selected.
Note: The restart and stop options in this panel should also be used whenever you need to restart or stop any of the SpeechMiner servers (see Starting and Stopping the System).
Select/Deselect all Select the checkbox to select all of the machines in the list below for updating. Clear it to clear all of the selections in the list. Machine Select the machines for which you want to implement the options you selected on the left side of the panel. Set master password 1. Select a machine from the list provided.
2. Select Set master password and enter the Master password used in the Media panel, so that the platform/web for the selected machine can decrypt audio files.
- Click Save. The system begins to implement the settings you selected, and the Progress window opens and shows information about the implementation process.
Required Permissions
The user account used to log into SMConfig must have the required permissions in order for SMConfig to perform the actions selected in the Services panel. Some of the requirements are for permissions on the local machine (the machine on which SMConfig is currently running); others are for permissions on the selected remote machines. The various options in the panel have different permission requirements, as explained in the following table:
| Option | Required Permissions | Additional Details |
|---|---|---|
| Create Performance Counters |
|
Power User privileges should only be used when SpeechMiner services are registered on selected machines. Power User privileges should only be given by an Administrator user. |
| Register Services | Administrator privileges on the selected machines. | Administrator privileges on the selected machines are required in order to register the Uplatform service. These privileges are required for running remote commands on the selected machines and for registering the services using the Windows Services API. |
| Update Config Files | Administrator privileges on the local machine and on all selected machines. | Administrator privileges on the selected machines are required in order to update the configuration files on the local machine and on the remote machines. These privileges are required for accessing the files using the $ share and for encryption and decryption (if Encrypt config files is selected). |
| Restart/Stop Services |
|
|
Starting and Stopping the System
You can start, restart, or stop SpeechMiner services in SMConfig in the Services panel. One case in which you must use this feature to start the Uplatform services is after the initial installation and configuration of the system (see Initial Configuration). You can also use these features to change the status of a service from run to idle, or vice versa, or to completely stop a service.
To start, restart, or stop SpeechMiner services:
- In the Services panel, clear the Create Performance Counters, Register Services, and Update Config Files checkboxes.
- Select one of the following options:
- Restart Services and leave status as is: Restarts the selected services, and leaves them in the mode they were in previously
- Restart Services and change status to run: Restarts the selected services, and puts them into "run" mode
- Restart Services and change status to idle: Restarts the selected services, and puts them into "idle" mode
- Stop Services: Stops the selected services
- In the list of machines, select the servers you want to restart or stop.
- Click Save. The system begins to implement the options you selected, and the Progress window opens and shows information about the implementation process.
Media
The Media panel of SMConfig is used to configure the call-audio recognition and playback formats, retention periods for each format and site, and playback rates. Below is a summary of the audio formats that are supported for each audio function.

Configuring the Media Settings
The Media panel contains the basic audio setting options for the system.
To configure call-audio settings:
- In the Media panel, fill in the fields as follows:
Field Description Select the audio format for recognition Select the format of the call audio that must be used by SpeechMiner during the recognition process. If the audio received from the recording system is not in the format selected here, the fetchers will automatically convert it to this format (after they retrieve it from the input folders) before they save it in the store folders to await processing by SpeechMiner. If the system is used in the Recording UI mode or Recording and Analytics mode, the format must be set to WAV_PCM. Create compressed audio file Select the format of the call audio that must be used by SpeechMiner for playback in the web-based interface. After the audio of a call is processed, an additional compressed copy is made in this format and saved in a file in the store folders.
If the system is used in the Recording UI mode, or Recording and Analytics mode, this must be set to Do Not Generate.
If compress format not available Select one of the SpeechMiner actions to be performed if a user initiates playback of a call for which no compressed audio file is available. If compressed audio is available, it is automatically used for playback: - Play recognition file: The player plays the recognition audio file directly without any format conversion.
- Convert the recognition file on-the-fly to: The player first converts the recognition audio file to the format selected here, and then plays it for the user.
For Internet Explorer users, select the Convert the recognition file on-the-fly to MP3 option.
Retention Policies Specify the retention policy, per site, for each of the audio/text formats selected above. Call data is deleted from the store folder automatically when it has been in the folder as long as the specified retention period. The values chosen should be based mainly on the disk space available for storing the interaction file. Bear in mind that 1 MB of disk space can contain roughly one minute of uncompressed audio data or 15 minutes of compressed audio data. Default values are automatically entered for each site in the system, with separate retention periods for each of the formats selected under Recognition Audio Format and Playback Audio Format, in hours. You can manually adjust the retention period for each item, as required. To do so, double-click the item, or select it and then select
 . The Retention Period dialog box opens. Modify the value in the text field, and then click OK.
If the system is used in the Recording UI mode or Recording and Analytics mode, set the retention policy of WAV_PCM to 0.
Notes:
- Selecting these options prevents the creation of unnecessary audio files and the storage of files for longer than is necessary.
- The recognition audio files of calls that have not been processed yet, and of calls that are included in Static Call Lists, are not deleted even when the retention period is over.
- If you do not want audio data to be deleted from the store folder automatically, enter the value -1. This value should only be used in static systems where the number of calls is limited and does not grow continuously.
Encrypt audio files Select this option to encrypt the audio/text files. Note:
- If you do not have a key, Generate new password is automatically selected to generate a key. In this case, you must enter a Master password and confirm it.
- If you want to generate a new key, select Generate new password, enter the Master password and confirm it. The Master password must be the same as the original Master password. The Master password is always the same.
- The new Master password is not saved in the database. For that reason, you must save the Master password in a location of your choice.
- The Master password is required for the machines selected in the SMConfig > Services panel. For additional information, refer to the Set master password description in the Services panel page.
- Click Save. The system implements the settings, and the Progress window opens and shows information about the process.
Summary
The Media panel summary lists the preferred formats that SpeechMiner supports:
| Item | Function | Description |
|---|---|---|
| Input folder expects | Fetcher | Audio formats supported by fetchers; call audio that is retrieved from the external recording system by UConnector must be saved in the input folder in one of these formats. |
| Recognition priorities | Recognition | Preferred audio formats for the recognition process, in order of preference; call audio that is processed by the Recognizers should ideally be in one of these formats. |
| Playback priorities | Playback | Preferred audio formats for the SpeechMiner media player, in order of preference; call audio that is played back should ideally be in one of these formats. |
Index
The Index panel enables you to configure the Indexer authentication and service location.

Indexer Service
Enter the Indexer Service with the location at which it was installed (for example, http://<IndexerHost>/indexer/). For additional information see Installing SpeechMiner using the Wizard.
Indexer Authorization
Enter the username and password defined in the Authentication tab during the Installing SpeechMiner using the Wizard procedure.
Recording
When working with a Recording mode, the following configurations are required in the Recording panel. The Recording panel only appears when you are working in a Recording + Analytics environment or a Recording Only environment:
- Configuration
- Tenant: The name of the tenant in the Configuration Server that contains the system configuration.
- Update Agents Every # Hours: Indicates how often agents are updated with new recordings.
- Interaction Receiver
- For Call Recording and Analytics Mode licenses, in SMART, create a Program with the name you want to use for the default Program, and apply it.
Finally, in the SMConfig Recording panel, set Default Program to the Program's external ID. - For Call Recording Mode set Default Program to the desired value.
- RP Authorization
- MCP Authorization
- Playback
- Set the internal RWS URI value (when working with tagging), using the format: http://rws_host:port.
The following must be configured in the systems Configuration Server:
In systems with Call Recording mode or Call Recording and Analytics mode licenses, the Program ID is normally assigned to calls by the recording processor.
The recording processor adds the Program ID to the call’s metadata.
If the call arrives in the SpeechMiner system without a Program ID, SpeechMiner assigns it the default Program ID.
By default, this value is default.
If you want to change this default value to a different value, perform the following:
Set Extension Speaker Type and Trunk Speaker Type as configured in the GIR system.
Set the User and Password to the values configured for the RP.
Set the User and Password to the values configured for the MCP.
The MCP authorization option is only available when working in an environment with SpeechMiner Analytics.

Logging
The Logging panel enables you to configure the logging output for the following components:
- Platform: manages all the SpeechMiner processing tasks. For example, fetching, recognition, categorization, exploration, compression and indexing.
- Web: runs the SpeechMiner web-based interface that enables users to view and work with the interaction data
after it has been processed. - Client Applications: SpeechMiner applications such as SMART and SMConfig.
For details see the Log Options and Log Output option descriptions below.

Log Options
| Log Options | Description |
|---|---|
| check-point | Specifies (in hours) how often the application generates a check point log event, to divide the log into sections of equal time. By default, the application generates this log event every hour. Setting the option to 0 prevents the generation of check-point events. Default Value: 1 |
| compatible-output-priority | Specifies whether the application uses 6.x output logic. Default Value: false
Changes take effect: after restart |
| expire | Determines whether log files expire. If they do, Expire sets the measurement for determining when they expire, along with the maximum number of files (segments) or days before the files are removed. This option is ignored if log output is not configured to be sent to a log file. Note: If an option’s value is set incorrectly (out of the range of valid values) it will be automatically reset to 10.
Changes take effect: after restart |
| keep-startup-file | Specifies whether a log startup segment, containing the initial configuration options, is to be kept. If it is, this option can be set to true or to a specific size. If set to true, the size of the initial segment will be equal to the size of the regular log segment defined by the segment option. The value of this option will be ignored if segmentation is turned off (that is, if the segment option is set to false). Default Value: false
Changes take effect: after restart |
| message_format | Specifies the log record headers format used by the application when writing logs in the log file. Using compressed log record headers improves application performance and reduces the log file’s size. With the value set to short:
A log record in the full format appears as follows:
A log record in the short format appears as follows:
Note: Whether the full or short format is used, time is printed in the format specified by the time_format option.
Changes take effect: after restart |
| print-attributes | Specifies whether the application attaches extended attributes (if any exist), to a log event that it sends to the log output. Typically, log events at the Interaction log level and Audit-related log events contain extended attributes. Setting this option to true enables audit capabilities, but negatively affects performance. Genesys recommends enabling this option for Solution Control Server and Configuration Server when using audit tracking. For other applications, refer to Genesys Combined Log Events Help to find out whether an application generates Interaction-level and Audit-related log events. If such log events are generated enable the option only when testing new interaction scenarios. Default Value: false
Changes take effect: after restart |
| segment | Specifies whether there is a segmentation limit for a log file. If there is, it sets the mode of measurement along with the maximum size. If the current log segment exceeds the size set by this option the file is closed and a new one is created. This option is ignored if the log output is not configured to be sent to a log file. Default Value: false
Changes take effect: after restart |
| time_convert | Specifies the system in which an application calculates the log record time when generating a log file. The time is converted from the time in seconds since the Epoch (00:00:00 UTC, January 1, 1970). Default Value: Local
Changes take effect: after restart |
| time_format | Specifies how to represent (in a log file) the time when an application generates log records. A log record’s time field in the ISO 8601 format appears as follows: 2001-07-24T04:58:10.123
Changes take effect: after restart |
| verbose | Determines whether a log output is created. If the log output is created, Verbose specifies the minimum level of log events generated. The log events levels, starting with the highest priority level, are Standard, Interaction, Trace, and Debug.
Note: For definitions of the Standard, Interaction, Trace, and Debug log levels, refer to the Framework Management Layer User’s Guide, Framework Genesys Administrator Help, or to Framework Solution
Changes take effect: after restart |
Log Output Options
To configure log outputs, set log level options (all, standard, interaction, trace, and/or debug) to the desired types of log output (stdout, stderr, network, memory, and/or [filename], for log file output).
You can use:
- One log level option to specify different log outputs.
- One log output type for different log levels.
- Several log output types simultaneously, to log events of the same or different log levels.
You must separate the log output types by a comma when you are configuring more than one output for the same log level.
The log output options are activated according to the setting of the verbose configuration option.
- If you direct log output to a file on the network drive, an application does not create a snapshot log file (with the extension *.snapshot.log) in case it terminates abnormally.
- Directing log output to the console (by using the stdout or stderr settings) can affect application performance. Avoid using these log output settings in a production environment.
| Output Options | Description |
|---|---|
| all | Specifies the outputs to which an application sends all log events. The log output types must be separated by a comma when more than one output is configured. For example: all = stdout, logfile Note: To ease the troubleshooting process, consider using unique names for log files that different applications generate.
Changes take effect: after restart |
| trace | Specifies the outputs to which an application sends the Trace level and higher log events (that is, log events of the Standard, Interaction, and Trace levels). The log outputs must be separated by a comma when more than one output is configured. For example: trace = stderr, network Default Value: no default value
Changes take effect: after restart |
| debug | Specifies the outputs to which an application sends the log events of the Debug level and higher (that is, log events of the Standard, Interaction, Trace, and Debug levels). The log output types must be separated by a comma when more than one output is configured—for example: debug = stderr, /usr/local/genesys/logfile
Note: Debug-level log events are never sent to Message Server or stored in the Log Database.
Changes take effect: after restart |
| interaction | Specifies the outputs to which an application sends the Interaction level and higher log events (that is, log events of the Standard and Interaction levels). The log outputs must be separated by a comma when more than one output is configured. For example: interaction = stderr, network Default Value: no default value
Changes take effect: after restart |
| standard | Specifies the outputs to which an application sends the log events of the Standard level. The log output types must be separated by a comma when more than one output is configured. For example: standard = stderr, network. Default Value: no default value
Changes take effect: after restart |
SMConfig Console
This page describes how to configure SpeechMiner using the command line.
Before you begin consider the following:
- SMConfig creates an .xml file(s) that contains the details and selections you made in the SMConfig panel(s).
- Instead of configuring SMConfig from scratch every time you deploy SpeechMiner, you can simply run the same .xml file(s) on each environment.
- You can create an .xml file for each SMConfig panel or one .xml file that contains details for all the panels.
- Once the .xml file is created you can change the order in which the panels are configured by simply editing the panel order within the .xml.
- You can edit the .xml file so that it includes any combination and panel order you want. For example, the .xml file can contain the same panel more than once.
- Once the .xml file for the SMConfig panel(s) is created you can modify it for the specific system.
If the deployment is the same as the previous system deployment you will only need to change the name and system credentials. - If the command line configuration process fails, the process will stop the execution and it will not continue to the next SMConfig panel.
To configure SpeechMiner using the command line:
- Export SpeechMiner configuration to an .xml file.
- Open SMConfig and configure its panels for the environment you are currently deploying.
- Click the Export button in the SMConfig panel(s) whose details you want to deploy using the command line.
- Select one of the following:
See pages above for details.
- All Panels: to create an .xml file with all the SMConfig details and selections.
- Current Panel: to create an .xml file with the SMConfig details and selections associated with the specific panel.
- Open your command line.
- Run the SMConfigconsole.exe (in the Installation folder in ...\utopy\tools\bin\release) with the path to the .xml file created in step #1.
- Review the command line results:
| Exit Code | Name | Description |
|---|---|---|
| 0 | Success | All of the panels were configured successfully. |
| 1 | ExceptionOnConfig | An exception was thrown when configuring a panel. |
| 2 | FailedToConfig | The panel could not be configured. |
| 3 | FailedToLogin | The login failed. |
| 4 | FailedToTeadXML | The process failed to parse the XML. |
| 5 | InputMissing | Input is misssing. |
A report will be written to the console. The report will include a status for each SMConfig panel.
If the command line results are a success SpeechMiner was configured successfully.