
Installing the SpeechMiner Components
The setup wizard is used to install all SpeechMiner components. You can run it separately on each machine on which you are installing SpeechMiner components. If you are installing multiple SpeechMiner components on the same machine, you can install them at the same time. For example, if you are installing the database server and the web server on the same machine, you can select both of them in the setup wizard. In most systems, SMConfig is installed on all server machines.
Installing Using the Wizard
To install components using the setup wizard:
If the system does not have an Internet connection, obtain and install Microsoft Visual C++ 2015 Redistributable (64-bit), before installing the ASP.NET Core/.NET Core: Runtime & Hosting Bundle.
- Open the installation package.
- From the FullInstaller folder, run SpeechMinerInstall.exe. The setup wizard opens, with the Welcome screen displayed.
- Click Next. The License Agreement screen opens.
- Select I accept the terms of the license agreement, and then click Next. The Installation Type screen opens.
- Select the installation mode:
- Analytics and Recording UI: SpeechMiner plays back and analyzes interactions recorded with Genesys Interaction Recording.
- Recording UI Only: SpeechMiner plays back the call audio for each interaction in the search results. The contents of the interactions are not processed by the speech-analytics system.
- Analytics Only: SpeechMiner imports interactions and their recorded call audio from any recording system. Once the interactions and their audio is imported SpeechMiner processes the contents of each interaction.
- Click Next. The Choose Components screen opens.
- In the list of components , select the components you want to install on the machine.
- Click Next. Which screen you see next depends on the components you selected in the previous screen.
- Modify the default installation location if necessary and then click Next.
- If you selected Indexer, define a user and password in the Authentication tab and click Next
- In the field provided enter the Elasticsearch data nodes (:9200) you created when installing Elasticsearch add click the + button to add the datanode to the list.
Do not add Master nodes to this list. - SSL & Security Enabled (Default ES8): https://username:password@ESserver:9200/
- Security Enabled, SSL Disabled: http://username:password@ESserver:9200/
- Security & SSL Disabled: http://ESserver:9200/
- Click Install. The installation process begins. When the process is completed, the following screen appears:
- Select Restart Now, and then click Finish. A warning message appears, and reminds you to configure SpeechMiner before you open it.
- Click OK. The server restarts.


Indexer Setup Notes: When providing the Elasticsearch link during Indexer setup, consider these formats based on your ES8 configuration:


Installing the SpeechMiner Database
The SpeechMiner database stores the interaction data and the results of interaction processing. It is usually installed on a dedicated machine. The following sections explain how to install the SpeechMiner database:
- Setup Wizard
- Manual Installation
- Storage Partitions
- Maintenance Jobs
- SQL CLR
- Recovery Model
- Autogrowth
Running the Setup Wizard
To begin the installation of the database server, run the setup wizard as described under Installing the Components.
To install the database server:
- On the database server machine, run the Setup Wizard, as described under Install Using the wizard.
- Follow the instructions there, until the Database Credentials screen opens.
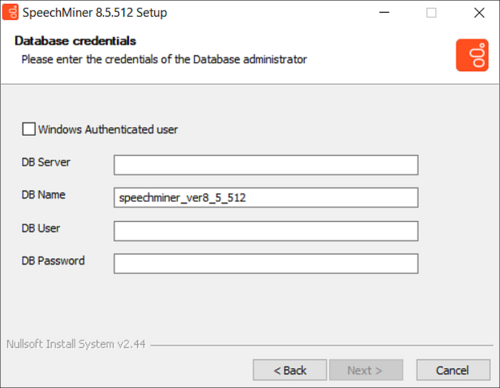
- In the Database Credentials screen, fill in the fields as follows:
Field Description Windows Authenticated User Select this option to use the Windows username and password you used to log into the machine as the DB User and DB Password. When you select this option, the DB User and DB Password become unavailable. DB Server Enter the name of the server on which you want to install the SpeechMiner database. If you want to install the database on an SQL Named Instance, the server name should be entered as server_name\instance_name. DB Name Enter the name of the database in the format speechminer_verX_Y (for example, speechminer_ver8_5). DB User Enter SA. (The credentials of the user name entered here will be used for the process of creating the SpeechMiner database.)
Note: This field is not available when Windows Authenticated User is selected.
DB Password Enter the DB password. Only a user with Administrator permissions can enter password credentials.
Note: This field is not available when Windows Authenticated User is selected. In addition, when creating a DB Password you cannot use = and ; as part of the DB Password.
- Click Next. The Choose Install Location screen opens.
- Modify the default installation location if necessary, and then click Install. The installation process begins. When the process is completed select Restart Now, and then click Finish. A warning message appears.
- From the warning message, click OK. The server restarts.
- After the database-server installation is completed, check that the speechminer_verX_Y database is present. This can be done by opening SQL Server Management Studio on the SQL server (for example, in the Start menu, under All Programs, select Microsoft SQL Server 2008 R2 > SQL Server Management Studio) and reviewing the list of databases on the server.


Manually Installing the SpeechMiner Database
An alternative way to perform the database installation is to use the SQL backup file (for example, data_sql_2008.bak) deployed in C:\Program Files (x86)\Genesys\Software\Support during any regular install. Restore this backup on the SQL server and choose settings based on the settings in the steps above. After restoration is complete, update the database properties as follows:
- For both the Data and Log files, change Options\Recovery Mode to Simple and change the Files\Autogrowth\File Growth parameter to 1024 MB for Data files and 256 MB for Log files.
To enable the SQL Server Service Broker:
- Run the SP command: EXEC sp_enableServiceBroker
- If sp_enableServiceBroker does not enable the Service Broker, run the following query:
- Run the following query to verify that SQL Server Service Broker is enabled:
The SP will try to enable the service broker with ENABLE_BROKER. If it does not succeed, it will run the command with NEW_BROKER. This SP will also use the current DB name correctly.
ALTER DATABASE [DB_NAME] SET ENABLE_BROKER WITH ROLLBACK IMMEDIATE
SELECT is_broker_enabled FROM sys.databases WHERE database_id=DB_ID()
A value of 1 indicates that the Service Broker is enabled.
If the enable SQL Server Service Broker query fails:
- Close all connections to the database.
- Run the following query:
- Run the following query to verify that SQL Server Service Broker is enabled: SELECT is_broker_enabled FROM sys.databases WHERE database_id=DB_ID()
ALTER DATABASE [DB_NAME] SET ENABLE_BROKER WITH ROLLBACK IMMEDIATE
To disable the SQL Server Service Broker:
- Run the following query: ALTER DATABASE [DB_NAME] SET DISABLE_BROKER WITH ROLLBACK IMMEDIATE
Creating the Storage Partitions
If the database server is an Enterprise Edition, you must create the storage partitions on the database. To do this, after you install the database server, run the following SQL query on the SpeechMiner database:
EXEC sp_create_DB_storage_partitions
Configuring the Database Maintenance Jobs
When the database is installed, a database maintenance job (SpeechMiner_Maintenance_job - <database>) is automatically created. If the maintenance job doesn’t exist, you should execute sp_createMaintenanceJob stored procedure to create it. You should schedule the job to run daily or weekly at a time when call volume is expected to be low. In addition to scheduling the job to run, you can also modify it to suit your requirements.
By default, the maintenance job does the following:
- Shuts down the SpeechMiner UPlatform service
- Rebuilds fragmented database table indexes
- Restarts the system
- Purges logs of messages that are older than one month
- Purges logs of user events that are older than one year
- Purges the report agent filter by removing entries that are older than 30 days and creating a new list of agents
- When working with a system that includes text interactions, it is recommended to configure the system to purge text interactions older than # years.
- It is recommended to delete (or archive) interactions whose topics/terms do not meet the strictness threshold after a configurable number of days. Doing this will reduce the number of interactions waiting to be re-indexed after SMART topic or program changes are applied. For additional assistance, contact Genesys Customer Care.
To open the maintenance-job script:
- From SQL Server Management Studio, under Databases > SQL Server Agent > Jobs, double-click the job.


The job may optionally include the sp_updateUntilYesterdayMaxChannels and sp_agentFilterCleanByDays steps. In addition, any procedure that rebuilds indexes and purges old calls should be added as a step in the maintenance job.
- When creating an Agent, if you create a username but you do not enter a firstname and lastname in the fields provided, the specific Agent's name will appear blank in the Search Filter > Agents & Work Groups list.
- When creating an agent hierarchy it is recommended that the hierarchy be created in the Configuration Server if you have the Genesys Interaction Recording (GIR) system or through the UConnector if you are working with an external recording system.
- Creating the agent hierarchy in both the Configuration Server and through the UConnector at the same time is not supported. You must work with one or the other.
- If both GIR and UConnector are not available you can use the stored procedure sp_createAgentsFromPartitions as a step in the maintenance job to create agents according to work group and agent partitions.
- The stored procedure is supplied as is. You may need to change it if it does not work well with your data. For example, if the names of work groups are repeated, you will not get the results you expect.
- For example, if your system has the following partitions:
- /WGA/WGB/AgentA
- /WGC/WGB/AgentB
- You will see the following in the Agents filter after executing sp_createAgentsFromPartitions:
- WGA/WGB/AgentA
- WGA/WGB/AgentB
- WGC/WGB/AgentA
- WGC/WGB/AgentB
Changing the Job Owner
- Open the SQL Management Tool.
- Alter the Stored procedure called sp_createMaintenanceJob.
- In the following procedure text replace dbuser with an existing database user.
- Execute the updated Stored procedure to create the correct job.
@owner_login_name=N'dbuser'
Cleaning Low Strictness Events
When there are search/index performance issues, it is recommended that you delete old events using found=0 by performing one or both of the following procedures:
Initial Cleanup
Delete all the events using found=0 (low strictness events) older than x=days.
- Create a SQL job to run the following command. For example purposes the parameter in the following code is 30 days.
declare @maxCallID int
select  @maxCallID= max(callID) from callmetatbl with (nolock) where dbo.tod2time(calltime)< dateadd (d,-30,GETUTCDATE())
DECLARE @counter INT;
SET @counter = 1;
deletemore:
SELECT TOP 100000 EntryID
INTO #Temp
FROM callEventsTbl
WHERE callID < @maxCallID and found=0
DELETE FROM callEventsTbl where EntryID in (select EntryID from #temp)
SET @counter = @@ROWCOUNT
IF @counter > 0
BEGIN
DROP TABLE #Temp
WAITFOR DELAY '00:00:01'
GOTO deletemore ;
END
ELSE
BEGIN
DROP TABLE #Temp
END
To ensure that older events are deleted, modify the maintenance job as follows:
- Connect to the SpeechMiner database.
- Go to SQL Server Agent and find the Speechminer Maintenance job.
- Click Properties.
- Under steps click New to add a step after the last step. The name of the step should be Cleanup unfound Events.
- Add the following command to the new step:
declare @maxCallID int
select  @maxCallID= max(callID) from callmetatbl with (nolock) where dbo.tod2time(calltime)< dateadd (d,-30,GETUTCDATE())
DECLARE @counter INT;
SET @counter = 1;
WHILE @counter > 0
BEGIN
  BEGIN TRANSACTION;
  DELETE TOP (100000) callEventsTbl
    WHERE callID < @maxCallID and found=0
  SET @counter = @@ROWCOUNT;
  COMMIT TRANSACTION;
END
Deploying the SQL CLR
After you install the database, you should deploy the SQL Common Language Runtime (CLR) assembly on the SQL server. To do this, on the Master, you must set the permissions of the XmlSerializers.dll and enable CLR integration, as explained below.
To deploy the SQL CLR:
- On the SQL server, open the SQL Server Management Studio. (For example, in the Start menu, under All Programs, select Microsoft SQL Server 2008 R2 > SQL Server Management Studio.)
- On the left side of the window, right-click the SQL server and then select New Query. A blank text area opens on the right side of the window.
- Copy the following commands and paste them into the text area:
use [master]
CREATE ASYMMETRIC KEY SQLCLRTestKey FROM EXECUTABLE FILE =
'\\<Machine_Name>\c$\Program Files (x86)\Genesys\Software\Support\sqlclr.XmlSerializers.dll'
GO
use [master]
CREATE LOGIN SQLCLRTestLogin FROM ASYMMETRIC KEY SQLCLRTestKey
GO
use [master]
GRANT  EXTERNAL ACCESS ASSEMBLY TO SQLCLRTestLogin
- In the text area, change <Machine_Name> to the name of the machine on which the SpeechMiner database was installed.

- Above the text area, select Execute. The commands are executed. When the process is completed successfully, Query executed successfully appears at the bottom of the window.
ImportantIf you get an error message that says, "The certificate, asymmetric key, or private key file does not exist or has invalid format," try changing the path to point at the local drive—for example, C:\Program Files (x86)\Genesys\Software\Support\sqlclr.XmlSerializers.dll.
- Open another New Query.
- Copy the following commands and paste them into the New Query text area:
EXEC sp_configure 'show advanced options', 1
GO
RECONFIGURE
GO
EXEC sp_configure 'clr_enabled', 1
GO
RECONFIGURE
GO
- Above the text area, select Execute. The commands are executed. When the process is completed successfully, CLR integration is enabled, and Query executed successfully appears at the bottom of the window.
- Open another New Query.
- Browse to C:\Program Files (x86)\Genesys\Software\Support.
- Run the SQLCLR.sql script.

The clr assembly is created with EXTERNAL_ACCESS. To create an EXTERNAL_ACCESS or UNSAFE assembly in SQL Server refer to: http://msdn.microsoft.com/en-us/library/ms345106.aspx
- Copy the following commands and paste them into the New Query text area:
EXEC sp_configure 'clr_enabled', 0
GO
RECONFIGURE
GO
EXEC sp_configure 'clr_enabled', 1
GO
RECONFIGURE
GO
Configuring the Recovery Model
In order to save disk space, it is recommended to set the recovery model of the SpeechMiner database to Simple.
To set the recovery model to Simple:
- On the SQL server, open the SQL Server Management Studio. (For example, in the Start menu, under All Programs, select Microsoft SQL Server 2008 R2 > SQL Server Management Studio.)
- On the left side of the window, right-click the database and then select Properties. The Database Properties window opens.
- On the left side of the window, select Options.
- On the right side of the screen, under Recovery model, select Simple.
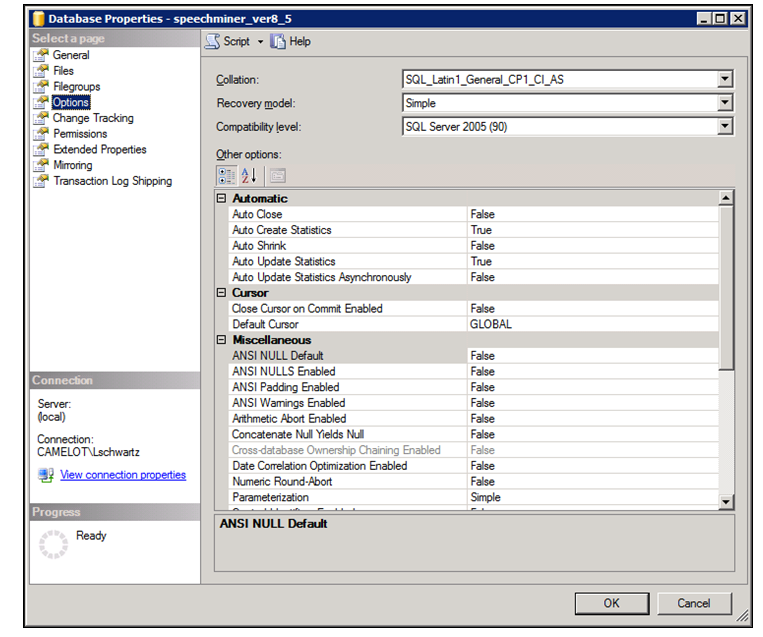
- Click OK. The setting is implemented, and the window closes.

Configuring the Autogrowth
To modify the Autogrowth settings:
- On the SQL server, open the SQL Server Management Studio. (For example, in the Start menu, under All Programs, select Microsoft SQL Server 2008 R2 > SQL Server Management Studio.)
- On the left side of the window, right-click the database and then select Properties. The Database Properties window opens.
- On the left side of the window, select Files.
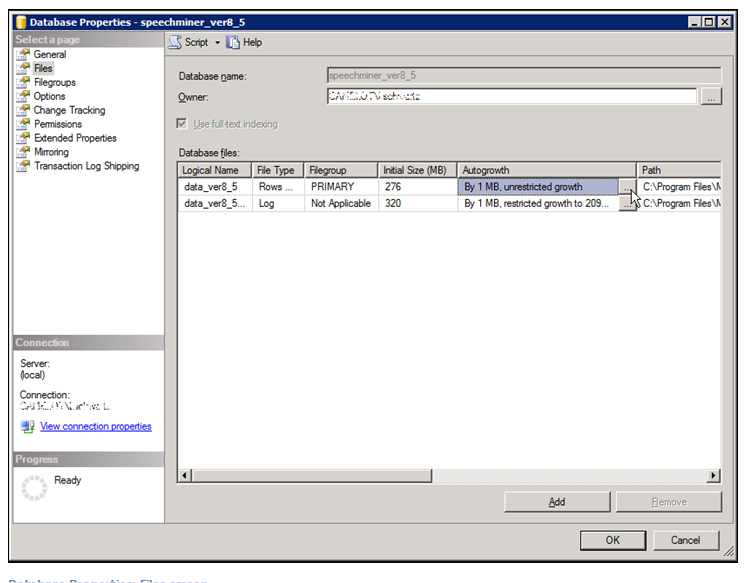
- On the right side of the screen select Autogrowth
 in the Data File row. The Change Autogrowth dialog box opens.
 - Verify that Enable Autogrowth is selected.
- Under File Growth, select Megabytes, and then, in the text box on the right enter 1024.
- Click OK. The setting is changed in the Properties window.
- On the right side of the screen select Autogrowth in the Log File row. The Change Autogrowth dialog box opens.
- Verify that Enable Autogrowth is selected.
- Under File Growth, select Megabytes, and then, in the text box on the right enter 256.
- Click OK. The setting is changed in the Properties window.
- In the Properties window, click OK. The setting is implemented, and the window closes.


</tabber>
Creating the Required Folders
After you install the SpeechMiner components, manually create the shared folders as listed in the table. These folders will be used by SpeechMiner to store the audio, index, and backup files used by the system.
All SpeechMiner machines should have access to these shared folders, and they should be shared with all groups and users that require access to them. It is recommended to create the folders on the same LAN as the SpeechMiner system components.
The folder names listed below are recommended, for convenience, but you can actually use any names you choose. In addition, you can create multiple folders for most of the folder types, as explained below. For information about configuring SpeechMiner to use these folders, see Sites & Machines.
| Folder Name | Description | Quantity |
|---|---|---|
| Input | Folder in which interactions data and metadata will be placed by Uconnector when it retrieves them from the recording system; fetchers collect the data from input folders, prepare it for processing by SpeechMiner, and then place it into store folders. | One folder for each fetcher task; if there are multiple recording systems, or multiple storage media used for storing the unprocessed data, a fetcher task must be created for each data source and for each input folder. For information about deciding how many fetchers to create, see Configuring Machines and Tasks. |
| Interaction Receiver Input | Folder in which the audio files that are received from the Genesys Interaction Recording solution will be placed, and later processed by the Interaction Receiver.
Note: This is a different folder than the Input folder which is used by fetchers. |
One for the entire system. |
| Store | Folder in which interactions will be placed by fetchers to await processing by SpeechMiner. | The system can have multiple store folders—for example, if there are multiple storage media used for storing the processed data, you can create a folder on each of them. |
| Filtered | Folder in which interactions with non-existant or inactive Programs will be placed. | One for each site in the system. |
| Grammar | The "package" folder, in which the rules for processing voice interactions, including those defined in SMART, are stored. | One for the entire system.
Note: If you want to have more than one copy of the folder, you can create additional folders and configure SpeechMiner to use them. If you do this, SpeechMiner will save the same content in each of the folders, so that you will have backups. |
| Index | Folder in which the system will store an index of calls, metadata, and events, so that they can be found quickly during searches. | One for the entire system. |
| Backup | Folder in which SpeechMiner will store backups of SMART definition sets (Program, Topic, and Category definitions). | One for the entire system.
Note: If you want to have more than one copy of the folder, you can create additional folders and configure SpeechMiner to use them. If you do this, SpeechMiner will save the same content in each of the folders, so that you will have backups. |