
Additional Configurations
The following configurations are recommended for the successful completion of the SpeechMiner configuration process:
Configuring the Browser
End users of SpeechMiner access its browser-based interface from Internet Explorer or Google Chrome, which connects to the SpeechMiner Web server through the local network. In order for the SpeechMiner interface to work properly, you must configure each user's browser as explained below. The configuration changes that must be implemented are to allow popups from the SpeechMiner domain, to treat the SpeechMiner domain as part of the local intranet (or as a trusted site), and to enable automatic updating of cached web pages.
In addition, if Internet Explorer is running on a Windows Server 2008 machine or Windows Server 2012 machine, the Enhanced Security Configuration feature should be turned off.
Refer to the Turning Off the Enhanced Security Configuration Feature on Windows Server 2008 / Windows Server 2012 / Windows Server 2019 section below.
- To run SpeechMiner 8.5.5 you must use a minimum resolution of 1280X1024. We recommend that you work with a 1680x1050 resolution.
- When working with Internet Explorer 11+, the Online Help documentation may not appear as it should due to your Internet Explorer compatibility view settings. To view the Online Help properly, go to the Tools menu, select Compatibility View Settings and verify that Display intranet sites in Compatibility View is not checked.
Refer to one of the following procedures to configure the browser-based interface:
Configuring Internet Explorer
- In the Internet Options dialog box, in the Security tab, select Local Intranet.
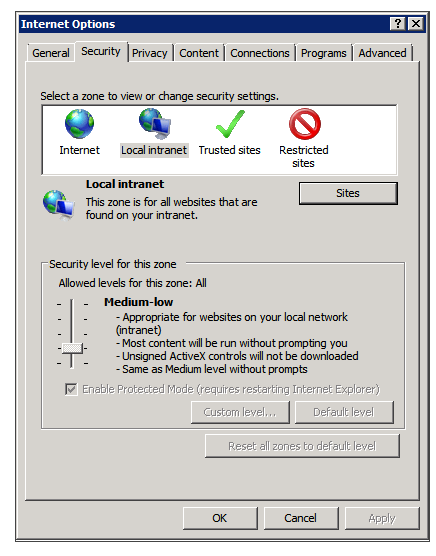
- Add the SpeechMiner domain to the list of web sites in the Local Intranet zone.
- Click Sites > Advanced and add the SpeechMiner web server URL to the list of safe websites. Note: This step is not required if you already turned off the Enhanced Security Configuration Feature.
- Click Custom Level to customize the local intranet zone security.
- Under Miscellaneous > Access data sources across domains, select Enable.
- In the Privacy tab, add the SpeechMiner domain to the list of web sites that are permitted to open popups.
- In the General tab, under Browsing history, select Settings.
- Under Check for newer versions of stored pages, select Automatically.
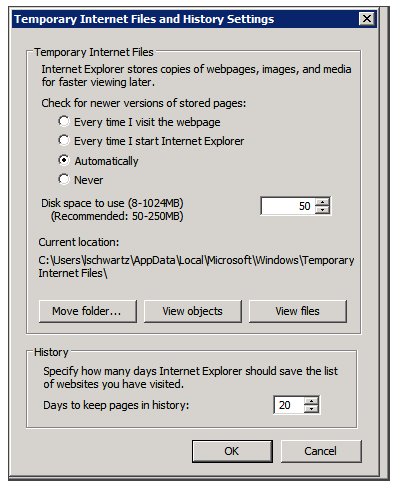
- Click OK to save the changes.

Selecting Enable makes Screen Recording playback possible because it allows access from the browser to Interaction Recording Web Services.


In newer versions of Internet Explorer, the same information can be found in File > Properties.
Turning Off the Enhanced Security Configuration Feature on Windows Server 2008
- In the Server Manager, in the home page (the top level), expand the Security Information section. The current settings for the Enhanced Security Configuration feature appear under IE Enhanced Security Configuration (ESC).

- If the current settings are not Off for Administrators and Off for Users, click Configure IE ESC. The Internet Explorer Advanced Security Configuration dialog box opens.
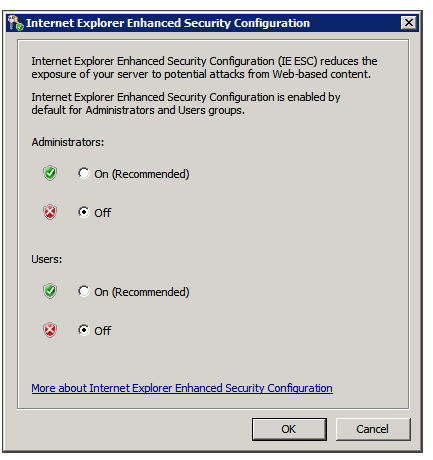
- For both Administrators and Users, select Off.
- Click OK to save the changes.


Turning Off the Enhanced Security Configuration Feature on Windows Server 2012 / Windows Server 2019
- In the Server Manager, in the home page (the top level), select Local Server.
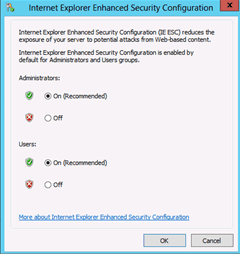
- In the Server Properties for the Local Server, you will see the option for IE Enhanced Security Configuration. Click On to change the option.
- At this point, you will be prompted with the options to turn off Internet Explorer Enhanced Security Configuration for Administrators and/or Users. For both Administrators and Users, select Off and click OK.
- Click the Refresh button
 at the top of the Server Manager and the IE Enhanced Security Configuration should now show as Off.


Configuring Chrome
By default Chrome disables popups. For this reason, perform the following steps to to configure Chrome to work properly with the SpeechMiner UI:
- In the Chrome browser, click the Customize and control Google Chrome menu
 , and select Settings.
 - Click Advanced at the bottom of the page and under Privacy and security, click Content Settings....
- Click Popups and verify that Allowed is enabled. If it is not enabled click the slide button
 to enable popups.
 - To allow popups for the SpeechMiner UI site:
- Click ADD in the Allow row.
- In the Add a site window under Site type the address http[s]://host:port (speechminer webserver url) in the field provided.
- Click ADD to add the site to the list of sites from which you allow popups.
Verify that Java Script is Enabled
- In the Chrome Browser, navigate to Chrome Settings > Show Advanced Settings > Privacy > Content Settings.
- Under Java Script, select Allow all sites to run Java Script (recommended).
For more information about enabling Java Script, see the following example https://support.google.com/adsense/answer/12654.
ADDP Timeout Settings
The following two configServer DB table timeout values control the Configuration Server timeout connection.
- ClientTimeout
- ServerTimeout
Enable Config Server Logging
When working with a 8.5.510 system, you can enable Config Server operation logs by configuring the PSDKLogEnabled parameter in the configServer table in the database to 1. By default the logging is off (0).
Tone Frequency Configuration
Tone frequencies are used to find non-linguistic events (for example, busy tone, dial tone, and so on). By default SpeechMiner is configured with tone frequencies according to US standards. Other countries may have different frequencies.
To change the tone frequency settings, you must modify the following tone frequency settings in the NLEParams table in the SpeechMiner database:
- DTMF_VECTOR - touch keys tones
- BUSYTONE_VECTOR - busy tone
- DIALTONE_VECTOR - dial tone
- RINGBACK_VECTOR - ring back tone
Set Wave Graph Visibility for Long Recordings
Configuring the 'WaveGraphCallDurationLimit parameter in the webServiceParams table enables you to limit the Media Player wave graph visibility for recordings that do not include Analytics.
It is recommended to limit the visibility to recordings of the Media Player wave graph that are no longer than 30 minutes.
Set the WaveGraphCallDurationLimit parameter to 1800 seconds (30 minutes).
Setting the Date and Time
The webServiceParams table includes the following parameters for configuring the date and time display:
- globalDateFormat: Configures the date format, for example: MM/dd/yy
- globalDateTimeFormat: Configures the time format, for example: hh:mm tt
- globalDateTimeOffsetFormat: Configures the timezone format, for example: +/- nn:nn
For additional information about the options available, see http://www.w3.org/TR/NOTE-datetime.
When the following SpeechMiner's interface languages are used for the Web interface, the only formats supported for globalDateTimeFormat are the following 24-hour formats: H:mm:ss, H:mm, HH:MM or HH:mm.
- German - Germany
- Spanish - Spain
- Spanish - USA
- French - France
- Italian - Italy
- Portuguese - Brazil
Archive Quality Management Evaluation Sessions
Archiving evaluation sessions, enables you to remove completed and expired evaluation sessions no longer needed online, but which must still be accessible at a later date if required. That is, archived sessions will be removed from the session grid, and will only be visible when the user filters to view archived sessions. By limiting the number of sessions that appear, archiving also enables you to maximize performance by minimizing search and filter response times.
There are two types of archiving options:
- Automatic Archive - Enables you to schedule archiving after a specific period of time.
- Manual Archive - Enables you to select specific sessions to archive.
Automatically Archive an Evaluation Session
Automatic archive is configured per system and after the entire system is installed and configured.
Automatic archive includes 2 tasks, that run on the platform and archive sessions x days after the sessions are completed and/or expired.
To change when Automatic archive is run, you must change the default values for the following parameters in the QMParams table:
- ArchiveCompletedSessionsAfterDays - Represents the number of days that must pass before the system archives sessions that have been completed.
- ArchiveExpiredSessionsAfterDays - Represents the number of days that must pass before the system archives sessions that have expired.
Manually Archive an Evaluation Session
To manually archive an evaluation session refer to the SpeechMiner User Manual > Quality Management > Evaluation Sessions > Archive an Evaluation Session.
Export evaluation and/or session data from Quality Management
To set the maximum number of evaluations and/or sessions from which data can be exported, you must set the following parameters in the webServiceParams table:
- Maximum number of evaluations (default 10): MaxEvaluationsForQMSessionsExport
- Maximum number of sessions (default 1000): MaxExportedQMSessions
Configure the Default Score to 100%
When performing an Evaluation Session, the Default scores to 100% option enables you to turn on/off all the default answers in the forms associated with the the specific Evaluation Session.
When this option is turned on the form score is 100%. Also, when this option is turned on or off, all the information entered up to this point will be deleted.
Once the evaluator chooses to turn on the Default scores to 100% option, and subsequently answer all the questions in the form, the evaluator can change the default answers and reduce the score.
To activate the Default scores to 100% option in the Evaluation Session page, you must set the following parameter in the QMParams table:
- AutofillSessionFormsByDefault
- 0 - Do not activate the Default scores to 100% option.
- 1 - Activate the the Default scores to 100% option when an Evaluation Session is opened.
Configure the Quality Management Exactly Value
When creating or editing a new Quality Management evaluation (not including the Calibration Evaluation), you can limit the amount of interactions associated with each Evaluation Session created as a result of the specific evaluation. To do this, you must configure the Exactly parameter.
To define the maximum and default values for the Exactly parameter, configure the following fields in the QMParams table:
- DefaultExactlyForDistributedInteractionEvaluation (default = 100)
- MaxExactlyForDistributedInteractionEvaluation (maximum = 1000)
- DefaultExactlyForDistributedAgentEvaluation (default = 3)
- MaxExactlyForDistributedAgentEvaluation (maximum = 30)
- DefaultExactlyForSharedEvaluation (default = 100)
- MaxExactlyForSharedEvaluation (maximum = 1000)
Display Media Player Wave Graph
To display the Media Player wave graph you must set the WaveGraphVideoRendering parameter in the webServiceParams table to 1.
Agent Evaluation Configuration
To configure the maximum number of agents that can be selected to create a Distributed Agent Evaluation session (that is, a nonrecurring evaluation), you must set the MaxAgentsInOneTimeDistributedEvaluations parameter in the webServiceParams table to a specific value.
The default value is MaxAgentsInOneTimeDistributedEvaluations = 20.
Configuring Ad Hoc Evaluation Expiry Date
To change the default Ad Hoc Evaluation Expiry Date, you must change the DefaultAdHocExpiration parameter in the webServiceParams table to a specific value.
The default hour value is DefaultAdHocExpiration = 24.
Configure Internet Information Server (IIS) Recycling
The IIS default configuraion is a set to a period of 1740 minutes (29 hours). When a recycle is completed, the following system log message appears:
A worker process with process id of 'xxxx' serving application pool 'speechminer' has requested a recycle because the worker process reached its allowed processing time limit.
It is recommend that the recycling configuration of the SpeechMiner's application pool be set to a specific hour during the night, when no one is likely to be working with the system.
To configure the SpeechMiner application pool recycle:
- Open the IIS Manager.
- In the Connections pane, expand the server node and click Application Pools
- In the Application Pools page, select the SpeechMiner application pool, and click Recycling in the Actions pane.
- Select specific time(s), and in the corresponding box type a time at which you want the application pool to recycle daily (preferably during non-working hours. For example, 00:00 AM). The value that you enter is saved in the configuration based on a 24-hour clock.
- Verify that Regular time intervals is not selected.
- Click Next, select the events that should be logged when an application pool recycles and click Finish.
Request a Password when Exporting Encrypted Interactions
To force the user to enter a password when extracting interactions from a zip file, you must set the following parameter to True in the webServiceParams table:
- encryptExport
- If encryptExport is set to True, the user will not be able to export an Interaction List and/or a Saved Search from a Coaching Session.
- To open an encrypted zip file you should not use the Microsoft Windows default zip tool. You must use an external tool.
Set a limit for Exporting Audio Interactions
To limit the total exported audio files size, update the LimitExportSize parameter in the webServiceParams table.
The LimitExportSize value must be set in megabytes and the recommended limit is up to 1.5 GB.
If a limit is not set for LimitExportSize, the system may timeout when the amount requested for export is too large. When this happens, the export process will be aborted.
Export an Interaction List and/or a Saved Search from a Coaching Session
To enable a user to export an Interaction List and/or a Saved Search from a Coaching Session, you must set the following parameter to False in the webServiceParams table:
- encryptExport
Set the Forget Password Login Option
When configuring SpeechMiner you can give users the option of recovering forgotten passwords.
If you choose to enable users to recover their forgotten passwords, the SpeechMiner log in screen will contain a Forget Password? link.
When the user clicks the Forget Password? link, the user will be required to enter his email address.
The user will then receive an email with a Reset Password link.
By default the Reset Password link is only available for 4 hours. This default number can be changed.
To enable a user to recover his password perform the following:
- Access the webServiceParams table.
- Change the PasswordRecovery field from false to true.
To change the Reset Password link default:
- Access the webServiceParams table.
- Change the resetPasswordTokenExpirationTime field from 4 hours to the amount you prefer and save.
To change the email message the user receives:
- Access the webServiceParams table.
- Change the resetPasswordMailBody field to the content you prefer the user to receive.
The email message content should contain <resetLink>.
<resetLink> represents the Reset Password link. - Change the resetPasswordMailSubject field to the subject you prefer the user to receive and save.
Setting the Session Timeout Value
Web.config includes the following timeout parameter:
Timeout - Determines the period of time, after which the session expires and the user is logged out of the system.
To change the Session Timeout Value:
- Open the web.config file.
- Go to <system.web> under <configuration> and add the following line: <sessionState timeout="enter the # in minutes"></sessionState>
- Run IISReset in the command line.
Setting the Resource Type
The resourceType table contains a list of all the possible resource types.
To enable/disable a resource type in SpeechMiner, update the isEnabled field in the resourceType table with the relevant status.
The following Resource Types can be enabled/disabled for the Search filter:
- Call
- Chat
- Free Text
- Social
Enable HTTPS for SpeechMiner
The process of enabling HTTPS for SpeechMiner depends on how your system is configured. The following represent three different system configuration scenarios for which HTTPS can be enabled:
- Enable HTTPS for SpeechMiner when Internet Information Service (IIS) is configured with HTTPS.
- Enable HTTPS for SpeechMiner when Load Balancer is configured with HTTPS and IIS is configured with HTTP.
- Enable HTTPS for SpeechMiner when both Load Balancer and IIS are configured with HTTPS.
- Securing SpeechMiner Connections
Enable HTTPS for SpeechMiner on IIS
- Create a self signed server certificate to enable the https protocol:
- Open the Microsoft Management Console (MMC).
- Select File > Add / Remove Snap-in.
- Select Certificate and click Add.
- In the Add or Remove Snap-ins, select the Certificates snap-in from the list provided and click Add. The Certificate snap-in window opens.
- Select Computer account and click Next.
- Select Local computer and click Finish and OK.
- Under Certificates (Local Computer), right-click Personal, Select All Tasks, Request New Certificates. The Certificate Enrollment window opens:
- Click Next
- Click Active Directory Enrollment Policy and Next.
- Select Public Web Server with Export and click Enroll and Finish.
- Configure the Report Server:
- Open the Reporting Services Configuration Manager.
- Select Web Service URL.
- Select Advanced.
- Under Multiple SLL Identities, click Add and select the certificate you created.
- Click OK and select the https URL.
- Under Multiple SSL Identities, click Add and select the certificate you created.
- Click OK and select the Report Manager URL.
- Create an SSL Binding:
- Open IIS Manager.
- Select Default Web Site and in the right Action pane click Bindings.
- Click Add.
- In the Type list select https.
- In the IP address list select All Unassigned.
- In the Port field enter the relevant port number.
- In the SSL Certificate list select the relevant SSL Certificate.
- Configure SSL settings:
- In the IIS Manager, click Default Web Site.
- Under IIS, select SSL Settings.
- Select Require SSL and click Apply.
- Restart the IIS Server.
IIS Manager Error: The process cannot access the file because it is being used by another process. (Exception from HRESULT: 0x80070020)
Additional information about SSL on IIS 7 can be found here: http://learn.iis.net/page.aspx/144/how-to-set-up-ssl-on-iis-7/
Enable HTTPS for SpeechMiner when Load Balancer is configured with HTTPS and IIS is configured with HTTP
- Download and install Microsoft URL Rewrite Module 2.0 for IIS.
- Add the following code to the web.config file in side <system.webServer>:
<rewrite>
<rules>
<rule name="HTTPS_AlwaysOn" patternSyntax="Wildcard">
<match url="*" />
<conditions>
<add input="{HTTP_REFERER}" pattern="genesyscloud.com" />
</conditions>
<serverVariables>
<set name="HTTPS" value="on" />
</serverVariables>
<action type="None" />
</rule>
</rules>
</rewrite>
Importantgenesyscloud.com should be replaced with your Load Balancer URL. - Restart IIS.
Enable HTTPS for SpeechMiner when Load Balancer and IIS are configured with HTTPS
- Enable HTTPS for SpeechMiner when Internet Information Service (IIS) is configured with HTTPS.
- Enable HTTPS for SpeechMiner when Load Balancer is configured with HTTPS and IIS is configured with HTTP.
Securing SpeechMiner Connections
TLS 1.2 Connections
You can configure SpeechMiner to work with TLS 1.2.
SpeechMiner supports all TLS 1.2 connections as long as the server is configured to use TLS 1.2 and the server certificate is trusted.
- When configuring SpeechMiner to work with TLS 1.2, verify that the connection is specified in the client exactly the same as it appears in the certificate.
- To ensure that the SQL server is working with an encrypted connection, the SQL connection must be configured to use a Protocol Encrypted Connection and a Trust Server Certificate. Both of these should be configured in the SQL Native client 11.0 Configuration Manager Properties window.
Configure UPlatform to work with TLS 1.2
For UPlatform to work with TLS 1.2, the name of the ODBC SQL driver should be manually changed in the UPlatform SpeechMiner Configuration file.
- Install the latest ODBC SQL driver (version 13) in the UPlatform machine.
- In the clients system, after completing the UPlatform installation, update the Uplatform.exe.Config file under appSettings the new ODBC driver as follows: <add key="sql_driver_name" value="driver={ODBC Driver 13 for SQL Server};" />
- Restart UPlatform.
Working with HTTP
Starting with 8.5.512.37, as part of a security feature update, SpeechMiner is upgraded to work only with HTTPS connections. However to enable HTTP, remove the attribute requireSSL="true" from SpeechMiner Web’s web.config file.
- Open IIS Manager.
- On the left panel, expand <Server Name> > Sites > Default Web Site.
- Right click on SpeechMiner and click Explore. This opens a folder containing the web.config file.
- Remove the requireSSL="true" from the web.config file.
Additional Configuration for Recording Modes
- Create a new application for SpeechMiner with a Genesys Generic Server template in the Genesys Administration Extension:
- Follow the Creating Applications Objects procedure in the Procedures tab of the Applications page in the Genesys Administration Extension document.
- Verify that the name of the application that you create is the same as the ApplicationName field in the configServer table of the SpeechMiner database.
- Creating a SpeechMiner application does not require configuring connections or options and is not integrated with LCA.
Configuring a SpeechMiner Web Application
Configure a new SpeechMiner Web application when your default web site is not sufficient for your systems demands.
- Open the IIS Manager.
- Under Connections, select Sites > Default Web Sites and right-click SpeechMiner.
- Click Remove to remove the existing SpeechMiner Web Application.
- Under Connections right-click the web site to which you want to add the SpeechMiner Web Application.
- Select Add Application.
- In the Application Name field enter SpeechMiner for the new web application.
- Click Select.
- Open the Application Pool list and select SpeechMiner.
- Click OK.
- In the Physical Path click the Browse button and select the Installation > Web folder. The default folder is c:\Program Files (x86)\Genesys\Software\utopy\product\web.
- Click OK. The SpeechMiner Web Application appears under the web site to which you selected to add the SpeechMiner Web Application.
Defining Caching Reports
All Caching tasks are listed in the ReportCachingParams and ReportCachingGlobalParams tables.
In the default database there is one Caching task that caches all the reports in the expanded widgets for all the active partition sets during the last 30 days.
You can select different reports to cache then those defined by default. You can also delete the existing cache and create a new cache.
To define a new cache report:
- Access the ReportCachingParams table in the database and insert a new row.
- Define the following parameters:
Parameter Description enabled 1 reportsQuery The query that retrieves the report id’s and the partition strings associated with the report you want to cache. @templatesToExclude The templates to exclude from caching. @usersToExclude The users to exclude from caching. @daysUserIsActive The users that should be cached. For example, if this is 7, then only users that are active in the last 7 days should be cached. runAtTime Defines when the caching task will run within 24hrs. The maximum is 1440 minutes for 24hrs. For example, if you want the cache task to run at 12 midnight and your UTC difference is +2, enter -120. It is the difference between UTC and the local time you want it to run in. The difference is in minutes. nextTimeToRun The next time the Caching task is set to run. Set this parameter to a low value. During the initial run the task automatically sets the correct value. - Access the ReportCachingGlobalParams table in the database and define the following parameters:
Parameter Description numberOfProcesses The number of parallel threads that should be cached (at the same time). keepLogMessages The number of days log messages associated with caching tasks be should be kept. NotificationMail The email address belonging to the users to whom the caching task report should be sent when the caching is complete. webComputerName The name of the web server to which the reports are cached. - Log into SMConfig.
- Under Machines & Tasks, select one or more machines on which the Caching task will run.
- Click Edit.
- Select Report Caching.
- Click Ok.
- Click Save.
- Select the Report tab.
- In the Set reports caching time (minutes) field enter 1440 (this number represents 24 hours).
- Select all the report templates and click Save.
- Verify that the Caching task is running:
- Access the reportCachingLog table.
- Select the table records and verify that the Caching task ran.
- Access the ulogger and verify that it is caching the selected reports.
If you select more than one machine the Caching task will be divided equally between the machines that run simultaneously. The more machines the faster the Caching task will be completed.
The following Properties window appears:

The following Report Deployment page is opened:

Report Server Email Configuration
Configure the Report Server email as follows so that the report schedule and report deliverable functions operate as expected.
- Access the Report Server machine.
- Open Reporting Services Configuration Manager.
- Click Connect to connect to the Report Server.
- Select Service Account and define a user account with access to the SMTP server.
- Click Apply.
- Select E-mail Setting and define the SMTP Server and default Sender Address.
- Click Apply.
Integrated Windows Authentication
Integrated Windows Authentication enables you to ensure that your SpeechMiner users are not required to log into SpeechMiner every time they want to access the application.
- Open IIS Manager and navigate to the level you want to manage. For information about opening IIS Manager, see Open IIS Manager (IIS 7).
- In Features View, double-click Authentication.
- On the Authentication page, select Windows Authentication.
- In the Actions pane, click Enable to use Windows authentication and Disable to use Anonymous authentication.
- In your application's Web.config file or in the machine-level Web.config file, ensure that the authentication mode is set to Windows as shown here.
For information about navigating to locations in the UI, see Navigation in IIS Manager (IIS 7).
...
<system.web>
 ...
 <authentication mode="Windows"/>
 ...
</system.web>
...
Multiple Language Support for the User Interface
To enable your user interface to display in more than one language perform the following steps:
- Create a copy of the SpeechMiner web folder (C:\Program Files (x86)\Genesys\Software\utopy\product\WEB).
- In IIS create an additional SpeechMiner application and select SpeechMiner as the Application Pool.
- Under Advanced Settings change the path of the new physical folder to the new web folder.
- In the ...\utopy\product\web.config file change en-US to one of the supported languages.
For a list of the supported languages, refer to SpeechMiner Language Support
Disable the Multi-Language support feature
The web UI is displayed in a language that you selected in the browser. If you select an unsupported language in the browser, the web UI defaults to the language selected in the SMConfig application.
To disable the Multi-Language support, perform the following steps:
- SMConfig Config File:
- Navigate to the installation path of SpeechMiner:
- C:<installationpath>\Software\utopy\tools\bin\release
- Open the XML configuration file: SMConfig.exe.config.
- In the file, search for the parameter: multilingualSupport.
- Set its value to False.
- Close and reopen SMConfig.
- Restart SM Web from SMConfig.
- Navigate to the installation path of SpeechMiner:
- SpeechMiner Web Config File:
- Navigate to the installation path of SpeechMiner:
- C:<installationpath>\Software\utopy\product\WEB
- Open XML configuration file: web.config.
- In the file, search for the parameter: multilingualSupport.
- Set its value to False.
- Restart the SM Web.
- Navigate to the installation path of SpeechMiner:
Purging Fragments Configuration
By default, recognition fragments are stored in the database for two weeks. After two weeks the fragments are purged.
The default purge value can be configured so that when you create a Trending Cluster Task you can configure a filter criteria for fixed dates older than two weeks.
To change the default purging fragments value, set a different value in the PurgeFragmentAfterXDays field in the CallRecognizer database table.
Redirect SpeechMiner URL to Load Balancer
After logging into SpeechMiner using Load Balancer, and the SpeechMiner session times out, SpeechMiner may be redirected to the wrong URL.
To verify that SpeechMiner is not redirected to the wrong URL, set the externalApplicationBaseUrl in the webserviceparams table to the correct Load Balancer URL (for example, http://lb/speechminer).
Once you assure that SpeechMiner is directed to the correct URL you can Enable HTTPS for SpeechMiner when Load Balancer is configured with HTTPS and IIS is configured with HTTP. For details refer to the HTTPS for SpeechMiner tab in this page.
Configure Default SMART Show Calls Since Value
The default Show Calls Since value can be configured so that users do not have to calculate and change the date themselves.
To change the default Show Calls Since value, set the DAYS_FOR_TOPIC_AUDIT field in the SMARTConstants table.
If you enter values lower or equal to zero or a null value (the default), 1/1/1970 will appear in the field.
If you enter other values, the field will contain the current date minus the value entered in the field (including the current date). For example, if today is November 6th, 2017 and the value is 5, the field will show November 2nd, 2017 and if the value is 1, the field will show November 6th, 2017.
Configure Default SMART Event Update Value
When a new SMART Strictness value is applied, the Update Event value determines the number of previous days from which the system will fetch events to update. If this value is null, all events are updated with the new strictness value.
To change the default Event Update value, set the DAYS_TO_UPDATE_EVENTS field in the SMARTConstants table to # days.
Remove SpeechMiner Metadata Fields
To remove metadata fields from the SpeechMiner Metadata filter perform the following steps for each metadata field you want to remove:
- Run the following SQL command:
- delete from CallMetaExTypes where fieldName='<FIELD_NAME>'
- delete from callMetaExTbl where fieldName='<FIELD_NAME>'
- Mark all the interactions that should be re-indexed by running the following SQL command
exec dbo.sp_reindexCallsByParams 3,0,0," - Restart the SpeechMiner platform.
Configuring Enhanced digits filtering
Update the following value in the callRecognizer table in database for modifying/updating digit filtering condition:
COMPLEX_FILTERED_CONDITION
CORS Support
Cross-origin resource sharing (CORS) configurations are available in the Speechminer Web.config file.
The Access-Control-Allow-Origin and Access-Control-Allow-Methods values in customHeaders section has CORS related configurations.
- Any domains that should be included can be added to Access-Control-Allow-Origin.
- Any HTTP methods that should be included can be added to Access-Control-Allow-Methods.
By default, all domains and HTTP methods - GET, POST, PUT, DELETE, OPTIONS are included.
The Web.config file is available in Speechminer installation path. It can be navigated from IIS.
Path: IIS > Select Default WebSite in left side panel and expand > Right click on Speechminer > Explore.