Outbound campaigns
As an agent, you might work on campaigns (for example, collections, telemarketing, or fundraising) where you make outbound calls to contacts. You can view and manage your campaigns from the My Campaigns tab.
Contents
What types of campaigns are available?
- Preview campaigns, in which you manually request (or pull) a number to dial from the system.
- Progressive or Predictive campaigns, in which the system automatically connects you to a contact.
- Push-Preview campaigns, in which the system automatically sends you a record to preview, then you click to connect the call.
Video Tutorial: Outbound Campaigns
Here are four tutorial videos that give you a quick overview of being an agent in an Outbound Campaign. The first video introduces Outbound Campaigns, the second demonstrates Predictive and Progressive (automatic) campaigns, the third demonstrates Preview (manual) campaigns, and the fourth demonstrates Push-Preview (semi-automatic) campaigns.
- Overview
| [+] Show video: Outbound Campaign Overview |
- Automatic record retrieval (and scheduling a callback)
| [+] Show video: Automatic Mode |
- Manual record retrieval
| [+] Show video: Manual Mode |
- Semi-automatic record retrieval
| [+] Show video: Semi-automatic Mode |
How do I work with Preview campaigns?
In campaigns using Preview dialing mode, you request a record from the system and then dial the contact. You can preview the case information and other details before you start the call. You must be in a Ready status to receive interactions.
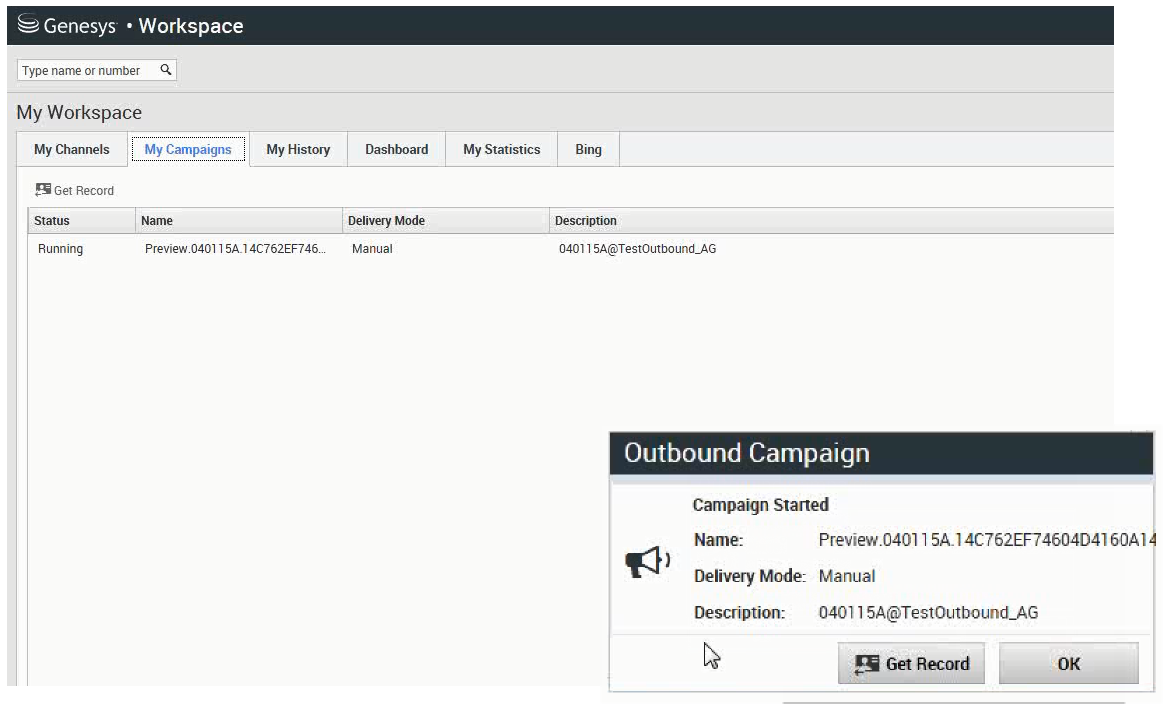
You'll get a pop-up notification each time an administrator loads or starts a new campaign. When you get the Campaign Started pop-up, you can choose:
- Get Record to retrieve a contact record from the campaign list.
- OK to join the campaign. (With this option you'll have to retrieve a record manually. Go to My Campaigns, select the campaign you want to use, and select Get Record.)
When you have previewed the record, use:
![]() to call the contact. When the call is connected, you can monitor the call status and use the standard voice call controls to manage the call.
to call the contact. When the call is connected, you can monitor the call status and use the standard voice call controls to manage the call.
![]() to decline the record. You can then choose Call this contact later to return the record to the campaign list or Do not call this contact to remove the contact from the campaign list.
to decline the record. You can then choose Call this contact later to return the record to the campaign list or Do not call this contact to remove the contact from the campaign list.
![]() to stop receiving records(Done and Stop).
to stop receiving records(Done and Stop).
To start receiving records again, go to My Campaigns, select the campaign you want to use, and select Get Record.
If asked, select the caller ID details you want to use.
How do I work with Progressive and Predictive campaigns?
In campaigns using Progressive and Predictive dialing modes, you are connected automatically to outbound calls.
You'll get a pop-up notification each time an administrator loads or starts a new campaign. When you get the Campaign Started pop-up, click OK to join the campaign.
If your status is Ready, either you are automatically connected to the call, or a new interaction preview appears and you can then Accept to connect the call, or Reject to return the record to the top of the calling list. If you do nothing, the interaction goes back to the top of the calling list.
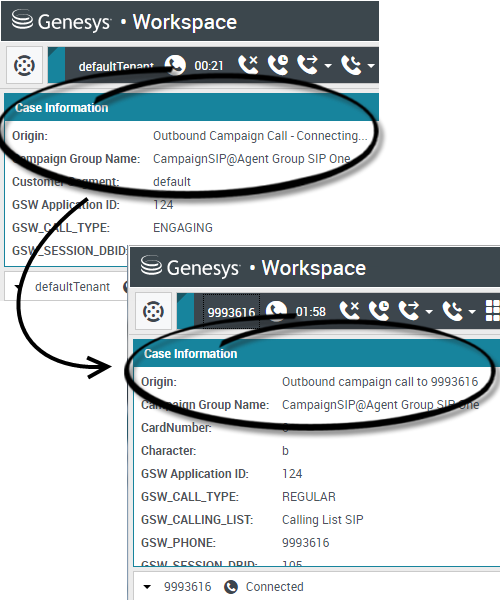
When you accept the call the contact or customer is not yet on the line. In the pop-up notification and in the call Case Information areas, you will see that the Origin of the call is Outbound Campaign Call - Connecting...
As soon as the person answers the phone and the call is connected, the Origin of the call changes to Outbound campaign call to <name or number of contact>. Information about the call might be added to the Case Information area.
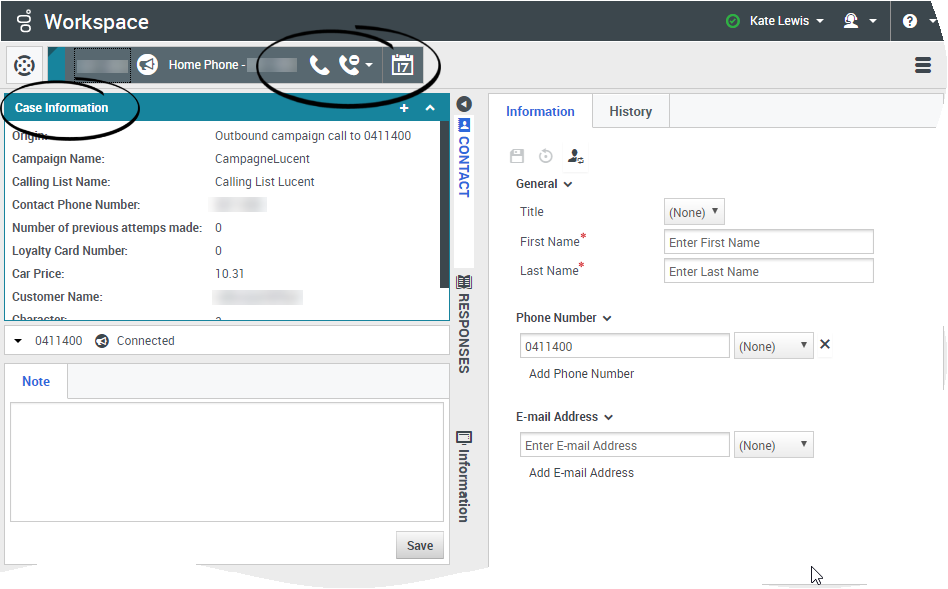
When you're connected to the contact, you can view the campaign call information, the Call Status, and the available Call Actions. Use the standard call controls to manage the call.
Note: In some environments, you might not be connected to the outbound call until after the contact has answered the phone. In this case, you will not see that the Origin of the call is Outbound Campaign Call - Connecting..., instead it will immediately show you the name and or number of the contact.
How do I work with Push-Preview campaigns?
In campaigns using Push-Preview dialing mode,a record is delivered to your desktop automatically from the system and then you dial the contact. You can preview the case information and other details before you start the call. You must be in a Ready status to receive records.
You'll get a pop-up notification each time an administrator loads or starts a new campaign. When you get the Campaign Started pop-up, click OK to join the campaign.
If your status is Ready, a new interaction preview appears. You can then Accept to connect the call, or Reject to return the record to the top of the calling list. If you do nothing, the interaction goes back to the top of the calling list.
When you have previewed the record, use:
![]() to call the contact. When the call is connected, you can monitor the call status and use the standard voice call controls to manage the call.
to call the contact. When the call is connected, you can monitor the call status and use the standard voice call controls to manage the call.
![]() to decline the record. You can then choose Call this contact later to return the record to the campaign list or Do not call this contact to remove the contact from the campaign list.
to decline the record. You can then choose Call this contact later to return the record to the campaign list or Do not call this contact to remove the contact from the campaign list.
If asked, select the caller ID details you want to use.
How do I schedule callbacks for a campaign?
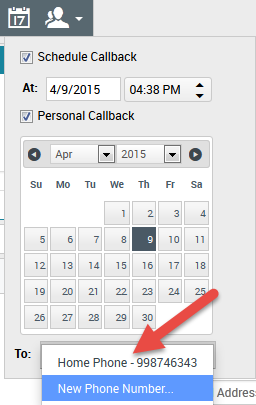
During a campaign, you might not be able to reach the contact or they might request to be called back at another specific date and time. You can schedule a callback at any time while you are handling an Outbound campaign call, even after the call has ended.
![]() opens the Schedule Callback window, where you can set a date, time, and even a different phone number for the callback. You can also specify whether the callback is personal (you will handle the callback) or whether any available agent will handle the callback.
opens the Schedule Callback window, where you can set a date, time, and even a different phone number for the callback. You can also specify whether the callback is personal (you will handle the callback) or whether any available agent will handle the callback.
Tip: During Preview campaigns, you might be able to use this feature to postpone a preview call before the call is dialed.
When you've set the desired properties for the callback, the Schedule Callback button changes to ![]() to indicate that a callback is scheduled. You can then end the call.
to indicate that a callback is scheduled. You can then end the call.
If you need to make changes to a scheduled call back, you can open the Schedule Callback window and make changes to the settings.
To cancel a scheduled callback, clear the Schedule Callback box. This must be done before closing the Outbound Record or the Interaction Preview.
When a rescheduled callback is directed to your workstation, an interaction preview is displayed as usual. The only difference is that the Case Information includes an indication in the Origin field that the call is a Callback or a Personal Callback.
Note: You might see an error message displayed in the Workspace interface when you try to mark done an Outbound interaction that you have rescheduled. This can happen if the specified rescheduled date and time are invalid (for example, you might have set the rescheduled date and time in the past). You must fix any errors or cancel the reschedule first before you can mark the interaction done.


