screen-recording.client.address
Section: interaction-workspace
Default Value: 127.0.0.1
Valid Values: String corresponding to the Screen Recording Client ip address or host name
Changes Take Effect: After the next platform configuration refresh interval.
Introduced: 9.0.000.31
Specifies the IP address or host name on which Screen Recording Client listens for credentials.
Deploying Genesys Softphone
This article describes how to install and configure Genesys Softphone in both standard and Virtual Desktop Infrastructure (VDI) environments.
Environment prerequisites
Ensure that your environment meets the prerequisites described in the following sections. This section covers the prerequisites for Genesys Softphone 9.0.1 and lower versions as well.
There is a prominent difference in using Visual C++ Redistributable Packages for Visual Studio 2019 (required for Genesys Softphone 9.0.1) and Visual C++ Redistributable Packages for Visual Studio 2013 (required for Genesys Softphone 9.0.0). These differences are noted in the respective procedures for user's convenience. Unless explicitly noted, all other prerequisites are required for installing Genesys Softphone in the environment you chose to deploy the software.
Supported operating systems
Refer to the Genesys Softphone and the Virtualization Platform Support topics in the Genesys Supported Operating Environment Reference Manual for a list of the latest supported operating systems.
Prerequisites for a full deployment of Genesys Softphone on a physical workstation
To work with Genesys Softphone, ensure that your system meets the software requirements established in the Genesys Supported Operating Environment Reference Manual, and meets the following minimum software requirements:
-
Visual C++ Redistributable Packages for Visual Studio 2019 (or above) is required for Genesys Softphone VDI Adapter 9.0.1:
- The 64-bit version of the redistributable is installed by the Genesys Softphone 64-bit installer.
-
Visual C++ Redistributable Packages for Visual Studio 2013 is required for Genesys Softphone VDI Adapter 9.0.0:
- The 32-bit version of the redistributable is installed by the Genesys Softphone 32-bit installer.
- The 64-bit version of the redistributable is not installed by the Genesys Softphone 64-bit installer, so you must install vcredist64.exe from the above link when the 64-bit version of Genesys Softphone is installed.
- .NET Framework 4.0 or higher: This framework is used only when the administrator installs Genesys Softphone with an HTTPS connector based on a self-signed certificate.
- Quality of service (QoS) for voice, either one-to-one or on a conference connection capability, requires the following:
- ≤ 150 ms of one-way latency from mouth to ear (per the ITU G.114 standard)
- ≤ 30 ms jitter
- ≤ 1 percent packet loss
- 17 to 106 kbps of guaranteed priority bandwidth per call (depending on the sampling rate, codec, and Layer 2 overhead)
- 150 bps (plus Layer 2 overhead) per phone of guaranteed bandwidth for voice control traffic
- ImportantQoS policies are managed by the operating system. To configure a QoS policy in Windows, refer to Quality of Service (QoS) Policy in the Microsoft documentation.
- A headset or other microphone and speaker audio device that is supported by Windows OS installed on the workstation.
Prerequisites for deployment in a VDI environment
To work with Genesys Softphone in a VDI environment, ensure that your system meets the software requirements established in the Genesys Supported Operating Environment Reference Manual, and meets the following minimum software requirements:
- On the workstation running the VDI client:
- For Citrix Workspace (formerly Citrix Receiver) for Windows (applicable to Genesys Softphone VDI Adapter 9.0.0 and 9.0.1):
- Visual C++ Redistributable Packages for Visual Studio 2013 (32-bit version). The Genesys installation package 32-bit installs this redistributable package on the workstation where it is executed.
- For VMWare Horizon on Windows,
- Visual C++ Redistributable Packages for Visual Studio 2019 (or above) is required for Genesys Softphone VDI Adapter 9.0.1. The 64-bit package of the Genesys Softphone VDI Adapter installs this redistributable package on the workstation where it is executed.
- Visual C++ Redistributable Packages for Visual Studio 2013 is required for Genesys Softphone version 9.0.0. You must install the vcredist64.exe from the link location before running the Genesys Softphone VDI Adapter for VMWare Horizon.
- Quality of service (QoS) for voice, either one-to-one or on a conference connection capability, requires the following:
- ≤ 150 ms of one-way latency from mouth to ear (per the ITU G.114 standard)
- ≤ 30 ms jitter
- ≤ 1 percent packet loss
- 17 to 106 kbps of guaranteed priority bandwidth per call (depending on the sampling rate, codec, and Layer 2 overhead)
- 150 bps (plus Layer 2 overhead) per phone of guaranteed bandwidth for voice control traffic
- ImportantQoS policies are managed by the operating system. To configure a QoS policy, refer to the documentation for your platform.
- A headset or other microphone and speaker audio device that is supported by the OS installed on either the client or the host.
- For Citrix Workspace (formerly Citrix Receiver) for Windows (applicable to Genesys Softphone VDI Adapter 9.0.0 and 9.0.1):
- On the workstation used to build deployments for running eLux systems:
- Virtual Driver for Citrix shared object.
- libgsecurity module.
- Scout Enterprise ELIAS tool.
- Windows workstation from which to run the Genesys Softphone VDI Adapter executable.
- On the workstation used to build deployments for HP ThinPro systems:
- The packaging tool recommended by your HP vendor.
- On the VDI environment (Citrix Virtual Application/Desktop or VMWare Horizon server) that runs the application layer of the Genesys Softphone runtime:
-
Visual C++ Redistributable Packages for Visual Studio 2019 (or above) is required for Genesys Softphone version 9.0.1.
- The 64-bit version of the redistributable is installed by the Genesys Softphone 64-bit installer.
-
Visual C++ Redistributable Packages for Visual Studio 2013 is required for Genesys Softphone version 9.0.0.
- The 32-bit version of the redistributable is installed by the Genesys Softphone 32-bit installer.
- The 64-bit version of the redistributable is not installed by the Genesys Softphone 64-bit installer. You must install vcredist64.exe from the link location when the 64-bit version of Genesys Softphone is installed.
- .NET Framework 4.0 or higher: This framework is used only when the administrator installs Genesys Softphone with an HTTPS connector based on a self-signed certificate.
-
Visual C++ Redistributable Packages for Visual Studio 2019 (or above) is required for Genesys Softphone version 9.0.1.
- In the Citrix Virtual Application/Desktop settings:
- In Citrix Virtual Apps and Desktop LSTR 2203, the virtual channel allow list feature is enabled by default. This means that in this Citrix release, and any older deployment where administrator explicitly enables this feature, only the Virtual Channels shipped by Citrix are authorized by default.
In this deployment, the administrator must explicitly authorize the Genesys Softphone Virtual Channel to make Genesys Softphone for VDI operate successfully. This can be done using the instructions on the Citrix Virtual Channel Security page. As a Citrix Administrator, you need to add a Virtual channel allow list policy and configure it with the value:
- In Citrix Virtual Apps and Desktop LSTR 2203, the virtual channel allow list feature is enabled by default. This means that in this Citrix release, and any older deployment where administrator explicitly enables this feature, only the Virtual Channels shipped by Citrix are authorized by default.
Installing Genesys Softphone for Windows
(For information on installing Genesys Softphone in a VDI environment see Installing the Genesys Softphone VDI Adapter)
Beginning with Genesys Softphone 9.0.020.08, multiple installation packages are available from the download center, 32-bit and 64-bit. Ensure that you download the correct package for your environment.
To install Genesys Softphone, follow these steps:
- Download the Genesys Softphone installation package.
- Double-click the setup.exe file located in the <Genesys Softphone Install Package Directory>\windows\ directory to open the Genesys Installation Wizard.
- In the Welcome to the Installation window, click Next.
- In the Choose Destination Location window, click Next to accept the default destination folder, or click Browse to select another destination location.
- In the Deployment Type window, click Standard or VDI: Citrix or VMware Horizon (for virtualization deployments only), and then click Next.
- In the Startup and Secure Connection options window, choose one or more of the following options, and then click Next:
- Auto Startup: Specifies that Genesys Softphone launches when Windows starts. Agents do not have to manually launch Genesys Softphone before they launch Workspace or other agent desktops.
-
Enable Dynamic Configuration Connector: Specifies that Workspace Web Edition (Agent Desktop) is allowed to dynamically configure Genesys Softphone when it is launched.
If you select this option, the Dynamic Configuration Connector Parameters window is displayed.
- Specify the Connector Port for Genesys Softphone. This port must be compliant with the value specified by the sipendpoint.uri option.
- Enable HTTPS secure connections (optional). If you select this option, you must choose the type of security certificate that you use:
- Self-signed Certificate: In this mode, the IP creates a self-signed certificate, installs it in the Personal Certificate section of the workstation where setup.exe is executed and also installs it as a root certificate authority at the machine level in the workstation where setup.exe is executed.
- Certificate Authorities from the Windows Certificate Store.
ImportantTo properly install the self-signed certificate, .NET Framework 4.0 or higher is mandatory.
- If you do not select the Enable Dynamic Configuration Connector option and are upgrading Genesys Softphone, you can select Configuration Option to preserve the existing configuration file. Otherwise, the installation process overwrites the existing configuration file with the new upgrade version. Click Next.
- In the Ready to Install window, select Install. The wizard installs Genesys Softphone and all associated files in the selected directory and displays the Installation Status window. The installation might take several minutes.
- In the Installation Complete window, select Finish.
Installing Genesys Softphone in Silent mode for Windows
To install Genesys Softphone in Silent mode, use the Installation Wizard Silent arguments as follows:
- Update the genesys_silent.ini file by making the following modifications:
- Add the path to the Genesys Softphone directory. For example, InstallPath=C:\GCTI\Genesys Softphone.
- Specify if Genesys Softphone is a physical workstation ("Std") or on a desktop/application virtualization environment (Citrix or VMWare Horizon) ("Citrix") by using the DeploymentType=<Std or Citrix> parameter.
- Specify whether Genesys Softphone starts automatically when Windows starts by using the Startup=<Std or Auto> parameter.
- Specify whether Workspace Web Edition can dynamically modify the Genesys Softphone configuration by using the Connector=<Disable or Enable> parameter.
- If you are deploying Softphone for Workspace Web Edition dynamic configuration:
- If the Connector is enabled, specify the Connector Port by using the ConnectorPort=<port number> parameter.
- Specify whether the connector uses HTTPS secure connection by using the HTTPS=<NotUsed or Used> parameter.
- If you are using a secure connection, specify the certificate type to be used by using the CertificateType=<SelfSigned or WindowsStore> parameter.
- If you assign the value WindowsStore to the CertificateType option, specify the certificate thumbprint by using the CertThumbPrint=<certificate thumbprint> parameter.
- If you are upgrading Genesys Softphone, specify the version, build number, and if the existing configuration file is to be preserved ("preserve") or replaced ("nopreserve") before the upgrade:
- IPVersion= <current (before upgrade) version of Genesys Softphone on this box>
- IPBuildNumber= <current (before upgrade) build number of Genesys Softphone on this box>
- OldCfgFile= <preserve or nopreserve the existing configuration file for this upgrade> (this parameter is ignored if the Connector is enabled)
- Execute the following command:
setup.exe /s /z"-s 'FullPathToGenesysSilentConfigurationFile' -sl 'FullPathToGenesysSilentResultFile'" where:- /s specifies that the installation is running in InstallShield Silent Mode.
- /z passes the Genesys Silent mode silent parameters to the installation.
- -s specifies the full path to the silent configuration file. The <Full path to Genesys Silent Configuration file> is optional. If the <Full path to Genesys Silent Configuration file> parameter is not specified, the installation uses the genesys_silent.ini file in the same directory where the setup.exe file is located.
ImportantEnclose the value of the <Full path to Genesys Silent Configuration file> parameter by apostrophes (') if the parameter contains white symbols.
- -sl specifies the full path to the installation results file. If the <Full path to Genesys Installation Result file> parameter is not specified, the installation creates the genesys_install_result.log file in the <System TEMP folder> directory.
Important
- Enclose the value of the <Full path to Genesys Installation Result file> parameter in apostrophes (') if the parameter contains white space characters.
- Replace -sl flag by -t for verbose logs of the silent installation process.
The InstallShield setup.exe installer requires that:
- There is no space between the /z argument and quotation mark. For example, /z"-s" is valid, while /z "-s" is not valid.
- There is a space between the -s,-sl parameters and quotation mark. For example, /z"-s c:\temp\genesys_silent.ini" is valid, while /z "-sc:\temp\genesys_silent.ini" is not valid.
For example,
setup.exe /s /z"-s 'C:\8.5.000.05\windows\b1\ip\genesys_silent.ini' -sl 'C:\GSP\silent_setup.log'".
- After executing this command, verify that Genesys Softphone is installed in the C:\<Genesys Softphone Directory>, and that the silent_setup.log file has been created in the C:\GSP\ directory.
Installing the Genesys Softphone VDI Adapter (Windows)
If you installed Genesys Softphone in a VDI environment, you must install the Genesys Softphone VDI Adapter on each Windows workstation by following these steps:
- From the Genesys Download Center, download the Genesys Softphone VDI Adapter package corresponding to your environment:
- For Citrix, use the Genesys Softphone VDI Adapter 32-bit package.
- For VMWare Horizon, use the Genesys Softphone VDI Adapter 64-bit package.
- Double-click the setup.exe file located in the <Genesys Softphone VDI Adapter Install Package Directory>\windows\ directory to open the Genesys Installation Wizard.
- In the Welcome to the Installation window, click Next.
- In the Select Operating System window, select the option that is appropriate for your environment. For Citrix environments, select Citrix support on Windows. For VMware Horizon environments, select VMware Horizon support on Windows. Click Next.
- If the Choose Destination Location window is presented (if installing on VMware Horizon), click Next to accept the default destination folder, or click Browse to select another destination location.
- In the Ready to Install window, select Install. The wizard installs Genesys Softphone VDI Adapter and displays the Installation Status window.
- In the Installation Complete window, select Finish.
Installing the Genesys Softphone VDI Adapter (eLux)
If you installed Genesys Softphone in a VDI environment, you must install the Genesys Softphone VDI Adapter on each eLux workstation by following these steps:
- From the Genesys Download Center, download the Genesys Softphone VDI Adapter package 32-bit or 64-bit.
- Double-click the setup.exe file located in the <Genesys Softphone VDI Adapter Install Package Directory>\windows\ directory to open the Genesys Installation Wizard.
- In the Welcome to the Installation window, click Next.
- In the Select Operating System window, select eLux, specify the destination to install the installation package, and click Next.
- In the Ready to Install window, select Install. The wizard installs Genesys Softphone VDI Adapter and displays the Installation Status window.
- In the Installation Complete window, select Finish.
- The installation package installs the following items:
- a Virtual Driver for Citrix shared object
- a libgsecurity module
- a startup script to update the Citrix module.ini config file.
- These files are packaged into an EPM/FPM pair, each with a separate signature file with four files for the VD package and three files with certificates used for signing:
- genesysvd-<ip-version>-1.UC_RP6_X64-1.0.fpm
- genesysvd-<ip-version>-1.UC_RP6_X64-1.0.fpm.sig
- genesysvd-<ip-version>-1.UC_RP6_X64-1.0.epm
- genesysvd-<ip-version>-1.UC_RP6_X64-1.0.epm.sig
- certificates_chain_01.pem: Genesys certificate used for signing packages
- certificates_chain_02.pem: DigiCert Trusted G4 Code Signing CA
- certificates_chain_03.pem: DigiCert Trusted Root G4
- Import the package files to the existing container and add them to the client image using the Unicon
Scout Enterprise ELIAS tool:
- Using the Security / Manage certificates menu option, import the certificates as trusted.
- If the client is configured with signature check, the VeriSign Root CA certificate must be installed on each client in the /setup/cacerts folder.
- To add packages to the container, in ELIAS select the Container / Import Package menu option, then select the files with .the epm extension.
- To update the image definition file (IDF), open it in ELIAS, then add the new package by selecting Genesys VD for Citrix, <ip-version> in the right pane and press the <== button.
-
Update the client workstation using the Scout Enterprise Console and perform these steps:
- Check the firmware configuration of the relevant Thin Clients by selecting Device configuration and then choosing Firmware.
- Update the device by selecting the Commands / Update option to initiate the update and force a device restart.
Installing the Genesys Softphone VDI Adapter (HP ThinPro)
If you installed Genesys Softphone in a VDI environment, you must install the Genesys Softphone plugin for VMWare Horizon and Citrix Client on each HP ThinPro workstation by following these steps:
- From the Genesys Download Center, download the Genesys Softphone VDI Adapter 32-bit or 64-bit package.
- To open the Genesys Installation Wizard, double-click the setup.exe file located in the <Genesys Softphone VDI Adapter Install Package Directory>\windows\ directory.
- In the Welcome to the Installation window, click Next.
- In the Select Operating System window, select HP ThinPro, specify the destination to install the installation package, and click Next.
- In the Ready to Install window, select Install. The wizard installs Genesys Softphone VDI Adapter and displays the Installation Status window.
- In the Installation Complete window, select Finish.
- The installation package installs the following file for the Genesys Softphone plugin for VMWare Horizon and Citrix Client.
- This file is packaged into a DEB file:
- vdhgenesys_<ip-version>_amd64.deb
- Deploy the Genesys Softphone plugin for VMWare Horizon and Citrix Client on ThinPro host:
- Manual deployment:
- Copy the client-side package to any convenient location accessible by wget or scp.
- From the main menu, switch to Administrator on the ThinPro host.
- To copy the client-side package on ThinPro host, start Xterm.
- To install the client-side package, run the following commands:
- fsunlock
- dpkg -i vdhgenesys_<ip-version>_amd64.deb
- fslock
- Bulk deployment:
- Use the packaging tools and procedures provided by HP to build a new ThinPro OS package that contains the Genesys Softphone VDI Adapter Debian package, then distribute it to the HP ThinPro hardware boxes.
- Manual deployment:
Installing Genesys Softphone VDI Adapter in Silent mode
To install Genesys Softphone VDI Adapter in Silent mode, use the Installation Wizard Silent arguments as follows:
- Update the genesys_silent.ini file by making the following modifications:
- Specify if Genesys Softphone VDI Adapter should be installed for Windows (Citrix) ("citrix_windows", only on the 32-bit version), Windows (VMware Horizon) ("vmware_horizon", only on the 64-bit version), eLux ("citrix_elux_5"), or HP ThinPro OS (Citrix and VMware Horizon) ("vmware_pro") by using the DeploymentType parameter. For example, DeploymentType=citrix_windows.
- If installing on VMware Horizon, you can choose to install to a specific location by specifying the path with the InstallPath parameter. For example, InstallPath=C:\GCTI\Genesys SoftphoneVDIAdapter.
- If installing on eLux5, add the path to the Genesys Softphone VDI Adapter directory using the InstallPath parameter. For example, InstallPath=C:\GCTI\Genesys SoftphoneVDIAdapter.
ImportantBeginning with version 9.0.1, the Genesys Softphone VDI Adapter for HP ThinPro supports both Citrix and VMWare Horizon environments. The 9.0.0 version supports only VMWare Horizon. - If you are upgrading Genesys Softphone VDI Adpater specify:
- IPVersion= <current version of Genesys Softphone VDI Adapter on this box (before upgrade)>
- IPBuildNumber= <current build number of Genesys Softphone VDI Adapter on this box (before upgrade)>
- Execute the following command:
setup.exe /s /z"-s 'FullPathToGenesysSilentConfigurationFile' -sl 'FullPathToGenesysSilentResultFile'" where:- /s specifies that the installation is running in InstallShield Silent Mode.
- /z passes the Genesys Silent mode silent parameters to the installation.
- -s specifies the full path to the silent configuration file. The <Full path to Genesys Silent Configuration file> is optional. If the <Full path to Genesys Silent Configuration file> parameter is not specified, the installation uses the genesys_silent.ini file in the same directory where the setup.exe is located.
ImportantEnclose the value of the <Full path to Genesys Silent Configuration file> parameter by apostrophes (') if the parameter contains white symbols.
- -sl specifies the full path to the installation results file. If the <Full path to Genesys Installation Result file> parameter is not specified, the installation creates the genesys_install_result.log file in the <System TEMP folder> directory.
ImportantEnclose the value of the <Full path to Genesys Installation Result file> parameter in apostrophes (') if the parameter contains white space characters.
The InstallShield setup.exe installation starter requires that:
- There is no space between the /z argument and quotation mark. For example, /z"-s" is valid, while /z "-s" is not valid.
- There is a space between the -s,-sl parameters and quotation mark. For example, /z"-s c:\temp\genesys_silent.ini" is valid, while /z "-sc:\temp\genesys_silent.ini" is not valid.
For example,
setup.exe /s /z"-s 'C:\9.0.007.03\windows\b1\ip\genesys_silent.ini' -sl 'C:\GSP\silent_setup.log'".
- After executing this command, verify that Genesys Softphone VDI Adapter is installed in the expected directory, and that the silent_setup.log file has been created in the C:\GSP\ directory.
Installing Genesys Softphone for macOS
To install the Genesys Softphone for macOS:
- Download the Genesys Softphone installation package.
- Open a Terminal session. From the <IPversion>/mac/bX/ip directory path, run the install.sh script using administrator privileges:
- sudo ./install.sh
- ImportantIf the installation fails due to insufficient macOS user privileges (for example, you receive an error message due to "unidentified developers"), you can perform the following workaround:
- Open a Terminal session and run the following command:
sudo spctl --master-disable. This allows applications from unidentified developers to be opened. - Execute the Genesys Softphone installation script.
- When the installation is complete, run the command
sudo spctl --master-enableto revert the system back to the default privilege settings.
- Open a Terminal session and run the following command:
- At the Launch Genesys Softphone on MacOS startup prompt, enter y to enable Softphone to run automatically when the agent is opening the OS session or n for Softphone to be started manually by agent.
- At the Enable connector to allow dynamic configuration by Workspace Web Edition prompt, enter n to select standalone mode or y to enable the connector.
- If you are upgrading Genesys Softphone in standalone mode, you can then enter n to overwrite the existing configuration file (Softphone.config) or y to continue using the existing configuration file.
- If you choose to enable the connector, confirm the default connector port number (8000), or enter the port number you want to use. You can then enter y to enable a secure connection (HTTPS) or n to use a non-secure connection (HTTP).
- Enter y to accept the destination directory for the installation and continue.
- After the installation process completes, the script displays messages to confirm the following:
- The Tuning file attributes are automatically tuned.
- If you enabled the connector with a secure connection (HTTPS), the RSA private key certificate is automatically created and installed.
You can launch Genesys Softphone from the Applications folder:
![]()
Installing Genesys Softphone in Silent mode for macOS
To install the Genesys Softphone in Silent mode:
- Update the genesys_silent.ini file by making the following modifications:
- Add the absolute path to the Genesys Softphone directory. For example, InstallPath=/Applications/Genesys Softphone.app.
- Specify whether Genesys Softphone starts automatically when MacOS starts by setting the AutoStart=<yes or no> parameter.
- Specify whether Workspace Web Edition can dynamically modify the Genesys Softphone configuration by setting the EnableConnector=<yes or no> parameter.
- If you are deploying Genesys Softphone for Workspace Web Edition dynamic configuration:
- If the Connector is enabled, specify the Connector Port by setting the ConnectorPort=<port number> parameter.
- Specify whether the connector uses HTTPS secure connection by setting the SecuredCommunication=<yes or no> parameter.
- Specify whether to keep the existing configuration file during upgrades by setting the PreserveConfigFile=<yes or no> parameter. If you enter no for this value, the configuration file is overwritten during the upgrade. (This parameter is ignored if the Connector is enabled.)
- Enter the following command using administrator privileges:
sudo ./install.sh -s -fr /<IPpath>/<IPversion>/mac/bX/ip/genesys_silent.ini -fl /<IPpath>/<IPversion>/mac/bX/ip/genesys_install_result.log where- <IPpath> is the path to the installation package.
- <IPversion> is the version of the installation package version you are installing. For example, 9.0.014.12.
Pre-configuring Genesys Softphone
The Genesys Softphone installation includes a configuration file (<Genesys Softphone Directory>/Softphone.config>) with configuration settings that are applied to Genesys Softphone when it starts.
The configuration file is organized into containers. Each container is divided into domains that are further divided into sections that hold the settings for a group of parameters. The following configuration file examples describe the settings in each container:
For the description and valid values of each parameter, see Configuration Options Reference.
Basic container
The Basic container sets the Genesys Softphone user's DNs and the protocol used.
<Container name ="Basic">
    <Connectivity user ="DN0" server="Server0:Port0" protocol="Protocol"/>
    <Connectivity user ="DN1" server="Server1:Port1" protocol=" Protocol"/>
</Container>Genesys container
The Genesys container sets the policy, endpoint, session, device, connector, codecs, proxy, mailbox, system, and security parameters.
Configuring the agent's DN
Set the following TServer section option for the DNs of the Place to which the agent is logging in:
- sip-cti-control = talk,hold,dtmf
For information about configuring DN objects, see the Genesys Administrator Extension Help.
Configuring SIP Server
Genesys recommends setting the following SIP Server application options:
- dual-dialog-enabled=true (default value)
- make-call-rfc3725-flow=1 (allows for better and/or simpler codec negotiation)
- ring-tone-on-make-call=true (default value)
- use-register-for-service-state=true
For more information about these options, see the SIP Server Deployment Guide.
Suppressing the ringtone
A ringtone is generated for all incoming calls to Genesys Softphone. To suppress the ringtone for third-party call control for the originating DN, configure the following SIP Server option with one of the following values:
- make-call-alert-info=<urn:alert:service:3pcc@genesys>
or
- make-call-alert-info=<file://null>;service=3pcc
Conditional auto-answer
Starting from version 9.0.024.06, Genesys Softphone supports conditional auto-answer, based on the value of Alert-Info SIP header in the incoming INVITE. This header can be added by URS when routing call to the agent, using SIP_HEADERS extension in the RouteCall request. For more information, see the SIP Server Deployment Guide. Include the following value to force auto-answer for the call:
Alert-Info: <file://null>;info=alert-autoanswer
where the header value in single angle brackets is currently ignored by Softphone and only required to comply with SIP standard. The info parameter after the semicolon triggers the auto-answer.
Mass deployment on multiple workstations
Genesys Softphone can be distributed to end user workstations through Desktop Configuration Management solutions, such as Microsoft Endpoint Manager (formerly Microsoft SCCM), that enable mass deployments of desktop software.
Although Genesys Softphone is not shipped with a Microsoft Software Installer (MSI), you can repackage Genesys Softphone setup into an MSI using the silent installation mode. Next, use a repackaging tool, such as https://www.exemsi.com/ to repackage the MSI. Finally, deploy the resulting MSI package using your Desktop Configuration Manager.
Post-installation procedures
Enabling FIPS
Beginning with the version 9.0.101.xx, Genesys Softphone is Federal Information Processing Standards (FIPS) compliant. This means that Genesys Softphone requires configuring OpenSSL 3.x through the FIPS (fips.dll) module.
To enable FIPS,
- Locate the fipsinstall.bat script in the Genesys Softphone installation path.
- In the Administrator Console, run the fipsinstall.bat script.
- Running the script automatically configures OpenSSL. You can verify the configuration from the following sample output:
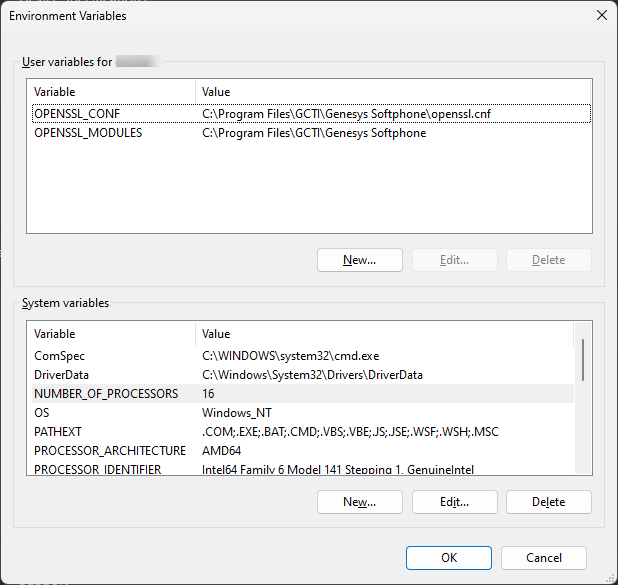
C:\Program Files\GCTI\Genesys Softphone>fipsinstall.bat

C:\Program Files\GCTI\Genesys Softphone>echo off
HMAC : (Module_Integrity) : Pass
SHA1 : (KAT_Digest) : Pass
SHA2 : (KAT_Digest) : Pass
SHA3 : (KAT_Digest) : Pass
TDES : (KAT_Cipher) : Pass
AES_GCM : (KAT_Cipher) : Pass
AES_ECB_Decrypt : (KAT_Cipher) : Pass
RSA : (KAT_Signature) : RNG : (Continuous_RNG_Test) : Pass
Pass
ECDSA : (PCT_Signature) : Pass
ECDSA : (PCT_Signature) : Pass
DSA : (PCT_Signature) : Pass
TLS13_KDF_EXTRACT : (KAT_KDF) : Pass
TLS13_KDF_EXPAND : (KAT_KDF) : Pass
TLS12_PRF : (KAT_KDF) : Pass
PBKDF2 : (KAT_KDF) : Pass
SSHKDF : (KAT_KDF) : Pass
KBKDF : (KAT_KDF) : Pass
HKDF : (KAT_KDF) : Pass
SSKDF : (KAT_KDF) : Pass
X963KDF : (KAT_KDF) : Pass
X942KDF : (KAT_KDF) : Pass
HASH : (DRBG) : Pass
CTR : (DRBG) : Pass
HMAC : (DRBG) : Pass
DH : (KAT_KA) : Pass
ECDH : (KAT_KA) : Pass
RSA_Encrypt : (KAT_AsymmetricCipher) : Pass
RSA_Decrypt : (KAT_AsymmetricCipher) : Pass
RSA_Decrypt : (KAT_AsymmetricCipher) : Pass
INSTALL PASSED
For using FIPS security module set the following environment variables:
  set OPENSSL_MODULES=C:\Program Files\GCTI\Genesys Softphone
  set OPENSSL_CONF=C:\Program Files\GCTI\Genesys Softphone\openssl.cnf
- After executing the script, set the following environment variables in the Windows system (see screenshot) to activate the full FIPS compliance.
- OPENSSL_MODULES
- OPENSSL_CONF
- An example setting is shown in the following screenshot.