Lab Sample
This sample is a Javascript Web interface, available through the Admin UI.
This sample illustrates how to implement a Desktop/Mobile browser web application that communicates with GMS and performs supported contact scenarios. It is primarily meant to be used by developers as a reference to build a Javascript-based web application with GMS.
Important
You can also use this sample to test your GME deployment.
Access the Web demo of the Sample
Make sure that GMS is started. By default, the samples template is loaded and a samples service should be available in the list of Configured Services.
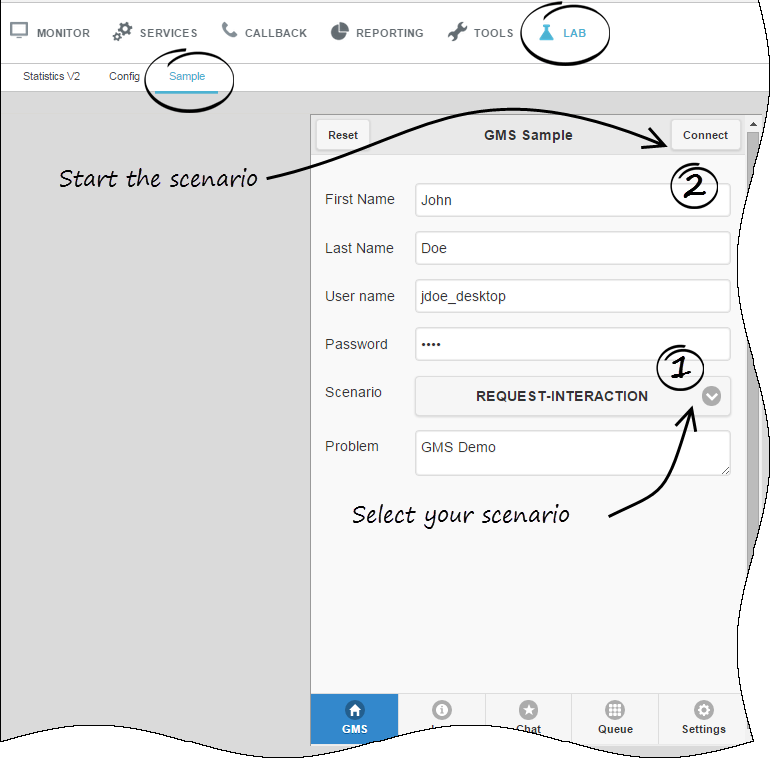
To access the sample, start the Service Management UI and navigate through Admin UI > Lab > Sample.
You can try a list of scenarios (1) by selecting a scenario, (2) click Connect to submit your query to GMS.
The following screens are available by clicking the corresponding tabs.
- GMS - The application home screen showing which GMS scenario can be executed.
- Log - Displays log messages related to client-server communication and application debug messages.
- Chat - Allows exchange of chat messages between client and agent. Notices relating to agent status and connections are also displayed.
- Queue - For delay scenarios, checks the status of the interaction in the queue (when a request has been placed and is waiting for an agent).
- Settings - Application settings can be made on this screen.
Configure the Sample
[+] See the list of configuration steps
Step 1: Resource Group—Add Access Number
Why:
GMS provides this access number to the user, and the user dials in to this access number.
How:
GMS Service Management UI
Procedure:
- Go to the GMS Service Management UI > Tools > Resources.
- Add the access number to the DNIS group.
Step 2: GMS Service—Create Service request-interaction
Why:
This service is responsible for receiving the GMS request and providing an access number to the user.
How:
GMS Service Management UI
Procedure:
- Go to the GMS Service Management UI > Services > Configured Services.
- Click Add Service.
- Set Configure Service = request-interaction.
- Set Service Name = request-interaction.
- Click Save.
Step 3: GMS Service—Create Service match-interaction
Why:
This service helps to match a voice call with an existing GMS service responsible for providing the access number.
How:
GMS Service Management UI
Procedure:
- Go to the GMS Service Management UI > Services > Configured Services.
- Click Add Service.
- Set Configure Service = match-interaction.
- Set Service Name = match-interaction.
- Click Save.
Step 4: GMS Service—Create Service request-access
Why:
This service lets you:
- Create a new access to a service
- Allocate a new DN in the resource group
How:
GMS Service Management UI
Procedure:
- Go to the GMS Service Management UI > Services > Configured Services.
- Click Add Service.
- Set Configure Service = request-access.
- Set Service Name = request-access.
- Click Save.
Step 5: GMS Service—Create Service request-chat
Why:
This service is responsible for receiving the GMS request and providing a URL to start the chat interaction.
How:
GMS Service Management UI
Procedure:
- Go to the GMS Service Management UI > Services > Configured Services.
- Click Add Service.
- Set Configure Service = request-chat.
- Set Service Name = request-chat.
- Click Save.
- Set the service property _chat_endpoint = Environment:gms_builtin (Note: For single tenant: Resources:gms_builtin.)
Step 6: Inbound SCXML Service—Voice
Why:
The inbound service matches the voice call with an existing GMS service. If a matching service is found, the GMS user data is attached to the interaction, and the call is routed to the agent.
How:
- Configuration Manager > Switches > SIP_Switch
- Configuration Manager > Scripts
Procedure:
- Create a route point associated with the access number configured in the procedure Resource Group Add Access Number.
- Set Annex > Orchestration section > application = script:GMSInbound.Voice.GMSMatchBuiltin.
- Create an enhanced routing script GMSInbound.Voice.GMSMatchBuiltin.
- Set Annex > Application section > url = http://<gmshost:gmsport>/genesys/1/document/service_template/callback/src-gen/IPD_Voice_GMSMatch.scxml.
- Set Annex > ApplicationParms/app_find_agent_timeout = 30.
- Set Annex > ApplicationParms/app_match_gms_builtin = true.
- Set Annex > ApplicationParms/app_match_target = <target> (Example: Customer_Service@stat_server.GA).
- Set Annex > ApplicationParms/app_no_match_target = <target> (Example: All_Standard_Agents@stat_server.GA).
- Set Annex > ApplicationParms/app_require_access_code = false.
- Set Annex > ApplicationParms/app_require_ani = true.
- Set Annex > ApplicationParms/app_treatment_waiting_for_agent = <blank> (A blank value will force the service to use a packaged music file.).
- Make sure that MSML capabilities are configured and working to play treatments. This step is required because this service includes play treatments, and has a dependency on Media Server.
Step 7: Inbound SCXML Service—Chat
Why:
This inbound service attaches the GMS user data to the interaction, and routes the interaction to the agent.
How:
- Configuration Manager > Chat Server
- Configuration Manager > Scripts
Procedure:
- Go to Configuration Manager > Chat Server.
- Create an end point that was specified in procedure GMS Service Create Service request chat (sub-step 6):
- gms_builtin = GMSInbound.Chat.QueueBuiltin
- Go to Configuration Manager > Scripts.
- Create an interaction queue that you just specified, above.
- Name: GMSInbound.Chat.QueueBuiltin
- Annex > Orchestration/application = script:GMSInbound.Chat.QueueBuiltin.Routing
- Create an interaction queue view.
- Name: GMSInbound.Chat.QueueBuiltin.View 1
- Annex > View/Queue = GMSInbound.Chat.QueueBuiltin
- Create an Enhanced Routing Object that you just specified, above.
- Name: GMSInbound.Chat.QueueBuiltin.Routing
- Annex > Application/url = http://<gms_host>:<gms_port>/genesys/1/document/service_template/callback/src-gen/IPD_Chat_QueueBuiltin.scxml
- Annex > ApplicationParms/app_find_agent_timeout = 30
- Annex > ApplicationParms/app_match_gms_builtin = true
- Annex > ApplicationParms/app_match_target = <target> (Example: Customer_Service@Stat_Server.GA)
- Annex > ApplicationParms/app_no_match_target = <target> (Example: All_Standard_Agents@Stat_Server.GA)
Step 8: Interaction Workspace—Display GMS Attached Data
Why:
GMS attaches data to the call prior to routing it to the agent. This attached data is displayed to the agent when the call arrives at the agent desktop (Interaction Workspace), and helps the agent to understand the source of the call, as well as to understand the additional information sent from the customer’s device when creating the Callback.
How:
Configuration Manager > Business Attributes
- Create a new business GMSCaseData attribute of type Interaction Operational Attribute.
- Create new attribute values:
- first_name
- last_name
- location_lat
- location_long
- GMS_Call_Direction
- GMS_MatchMethod_AccessNumber
- GMS_MatchMethod_ANI
- GMS_MatchResult
- GMS_MatchReason
- GMS_ServiceName
- GMS_UserData
- Set the following Application > InteractionWorkspace options:
- interaction-workspace > interaction.case-data.format-business-attribute = GMSCaseData
- interaction-workspace > toast.case-data.format-business-attribute = GMSCaseData
Implemented Scenarios
This sample supports the scenarios described in the Callback Scenarios. These scenarios are server-driven, which means that the server instructs the client with the actions needed to carry out the scenario. The client just needs to perform these actions and the follow-up dialog with the server. Therefore, the client is flexible enough to support any scenario that is built using the same kind of actions. The following actions are supported:
- DialNumber - The app makes a phone call when running on a mobile browser.
- ConfirmationDialog - The app displays a message requesting the user to confirm a follow-up action.
- DisplayMenu - The app displays a menu for the user to select an item that may affect how the scenario proceeds.
- StartChat - The app starts a chat conversation. Asynchronous HTTP notifications (CometD messages) are used for receiving Chat Server events.
- get-dialog* - Retrieves the dialog details and displays the dialog to the user. Dialogs are limited to alerts.
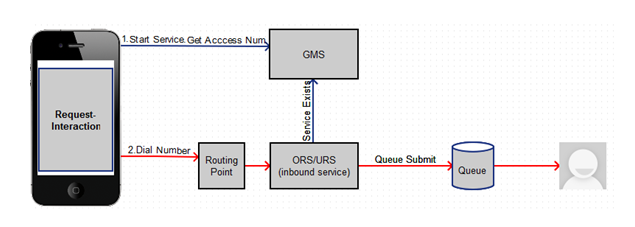
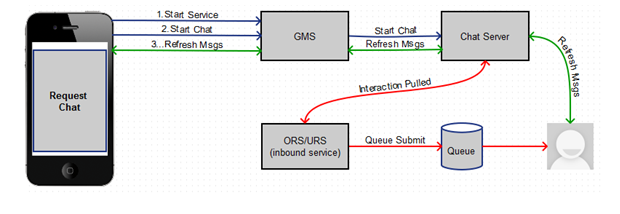
This sample also supports the request-interaction scenario, and the chat-interaction scenario.
Push notifications through CometD are supported. Delayed scenarios are supported by using push notifications only; the app will not poll the server to be notified about agent availability.
Testing Built-in Scenarios
[+] See the instructions to test the built-in scenarios
Scenario request-interaction Test Procedure

- On the Agent Desktop:
- Log in agent.
- Make voice ready.
- Using the Javascript sample: Service Management UI > Lab > Sample:
- Log in agent and make voice ready.
- Set Contact# = <customer phone from which call will be dialed>
- Set Scenario = REQUEST-INTERACTION
- Click Connect.
- Dial displayed Number to Call.
- Expected result:
- Treatment is played.
- Call is routed to agent.
- Toast is displayed with attached data.
- Call is connected to agent.
- For a successful GMS call, GMS_MatchResult = SUCCESS is displayed in the agent desktop as attached data.
Scenario request-chat Test Procedure

- Agent Desktop
- Log in agent.
- Make chat ready.
- Using the Javascript sample: Service Management UI > Lab > Sample:
- Set Scenario = REQUEST-CHAT
- Click Connect.
- Expected result:
- GMS app displays chat tab.
- Chat interaction is routed to agent.
- Toast is displayed with attached data.
- Chat is connected to agent.
- GMS app shows agent has joined chat.
- Agent desktop shows customer has joined chat.
- On a successful GMS call GMS_MatchResult = SUCCESS
- Customer and agent can now exchange messages.
Compiling and Running the Sample
Important
This step is required only if you download the code sample in order to modify the source code.
Prerequisites
In order to use this sample app, you need to have GMS installed and running, and the services that you want to make use of must be deployed.
The source code of this sample is available via a downloadable war file:
Genesys Mobile Services JavaScript Sample War File
Install the War File
- Download and unzip the .zip file from the above link.
- Copy the webcallback.war file into the webapps directory.
- Edit the start.ini file to make sure that it contains:
--module=server,jsp,jmx,resources,websocket,ext,plus,annotations,deploy,security,servlets,continuation
etc/jetty.xml
etc/jetty-ssl.xml
etc/jetty-deploy.xml
etc/jetty-http.xml
etc/jetty-https.xml
jetty.send.server.version=false
Important
Comment any
rewrite line. You should not run the sample in a Production server.
Access the Sample
- Start GMS
- Access the app at the following URL: http://<gmshost>:<gmsport>/webcallback/index.html.
- Set the Settings > Contact#.
- Select Scenario and then click the Connect button (located in the top right corner in the GMS tab of the application).
Important
- The CometD client is automatically started when the application loads in the browser.
- Make sure that your URL starts with the value specified in GMS > Server > external_url_base when you access the Service Management UI.
About the Code
The majority of the code is in two files:
- index.html - Controls the presentation aspects of the application, which includes the GMS response handler.
- gms.js - Responsible for interfacing with GMS and as well as managing the CometD connection.
index.html
The following screens are presented to the user and can be displayed by clicking the corresponding tabs.
- GMS - The application home screen showing which GMS scenario can be executed.
- Log - Displays log messages related to client-server communication and application debug messages.
- Chat - Allows exchange of chat messages between client and agent. Notices relating to agent status and connections are also displayed.
- Queue - For delay scenarios, checks the status of the interaction in the queue (when a request has been placed and is waiting for an agent).
- Settings - Application settings can be made on this screen.
gms.js
Two objects are implemented in this file:
- gmsInterface - Allows the creation of GMS callback services and delegates responses to index.html::onResponseRecieved.
- gmsNotificationClient - Responsible for starting the CometD client and connecting to the GMS CometD channel. When the message is received, the callback function index.html::onCometNotification is invoked.
Disclaimer
THIS CODE IS PROVIDED BY GENESYS TELECOMMUNICATIONS LABORATORIES, INC. ("GENESYS") "AS IS" WITHOUT ANY WARRANTY OF ANY KIND. GENESYS HEREBY DISCLAIMS ALL EXPRESS, IMPLIED, OR STATUTORY CONDITIONS, REPRESENTATIONS AND WARRANTIES WITH RESPECT TO THIS CODE (OR ANY PART THEREOF), INCLUDING, BUT NOT LIMITED TO, IMPLIED WARRANTIES OF MERCHANTABILITY, FITNESS FOR A PARTICULAR PURPOSE OR NON-INFRINGEMENT. GENESYS AND ITS SUPPLIERS SHALL NOT BE LIABLE FOR ANY DAMAGE SUFFERED AS A RESULT OF USING THIS CODE. IN NO EVENT SHALL GENESYS AND ITS SUPPLIERS BE LIABLE FOR ANY DIRECT, INDIRECT, CONSEQUENTIAL, ECONOMIC, INCIDENTAL, OR SPECIAL DAMAGES (INCLUDING, BUT NOT LIMITED TO, ANY LOST REVENUES OR PROFITS).


