applebcsession.emojis-business-attribute
Section: interaction-workspace
Default Value:
Valid Values: Any valid busines attribute name.
Changes Take Effect: At the next interaction
Valid Name of Business Attribute containing emojis.
applebcsession.pending-response-to-customer
Section: interaction-workspace
Default Value: 30,50
Valid Values: A comma-separated list value: warning time, maximum time
Changes Take Effect: At the next interaction.
Defines two alarm thresholds, in seconds, that warn agents that they have a pending response to a chat from a customer. Three levels are displayed: before the warning time, between the warning time and the maximum time, and after the maximum time.
applebcsession.new-message-blinking-duration
Section: interaction-workspace
Default Value: 0
Valid Values: Any integer from 0 to 2147483647
Changes Take Effect: At the next interaction
Introduced: 9.1.003.04
Specifies the duration of blinking interaction bar on a new incoming message. 0 value is for infinite.
applebcsession.new-message-blinking
Section: interaction-workspace
Default Value: true
Valid Values: true, false
Changes Take Effect: At the next interaction
Introduced: 9.1.003.04
Specifies whether the interaction bar blinks on a new incoming message.
intercommunication.applebcsession.queue
Section: interaction-workspace
Default Value:
Valid Values: Name of a valid Script object of type Interaction Queue
Changes Take Effect: At the next attempt to request a conference with an Agent Group or with an agent of a particular Skill
Specifies the name of the Interaction Queue that is used by the routing-based feature for Apple Messages for Business. The following attached data is added by Workspace: IW_RoutingBasedOriginalEmployeeId, IW_RoutingBasedTargetId, IW_RoutingBasedTargetType, IW_RoutingBasedRequestType.
applebcsession.max-text-message-size
Section: interaction-workspace
Default Value: 5000
Valid Values: Any integer from 1 to 2147483647.
Changes Take Effect: At the next interaction
Specifies the maximum size of the message in bytes.
applebcsession.transcript-interactions-count
Section: interaction-workspace
Default Value: 20
Valid Values: Any integer from 1 to 1000
Changes Take Effect: At the next interaction
The number of previous chat sessions that are shown when the Agent clicks "See older messages...".
Handling Apple Messages for Business Interactions on Workspace Desktop Edition
This section describes using Workspace Desktop Edition to receive and handle interactions coming from the Apple Messages for Business channel of Genesys Messaging Apps.
Receiving and Handling an Inbound Apple Messages for Business Interaction
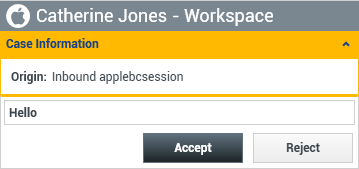
If you are the selected internal target of an inbound Apple Messages for Business interaction, you receive a notice on your workstation desktop. You can decide to accept or reject the interaction.
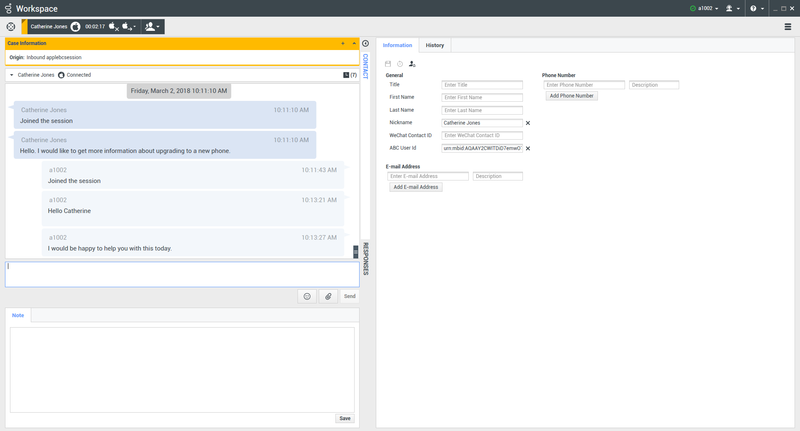
If you accept it, the Apple Messages for Business Interaction window is displayed. The Apple Messages for Business Interaction window contains information about the interaction and the controls that you need to complete the interaction.
The message area appears similar to a smartphone-based messaging app client:
- Client messages are left-aligned.
- Agent messages are right-aligned.
- Errors are centered.
- The date for when the session started is centered.
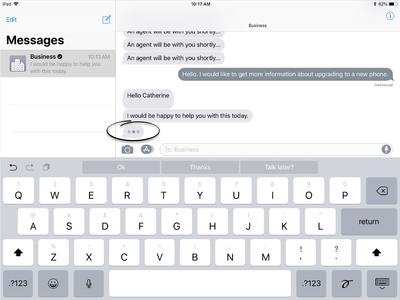
- The customer sees a typing notification when the agent is writing a message, as shown below.
Each message contains a timestamp of when the message is received by the plugin. If there is a delay in receiving a message, the message origination time is shown using bold font and the message arrival time is shown as a tooltip. When there is no delay, only the message arrival time is shown.
If there is an issue in displaying the message in the correct chronological order, the timestamp is highlighted in red. If the customer's contact information matches an entry in your contact database, the customer's name appears in the message area. Otherwise, a default nickname appears.
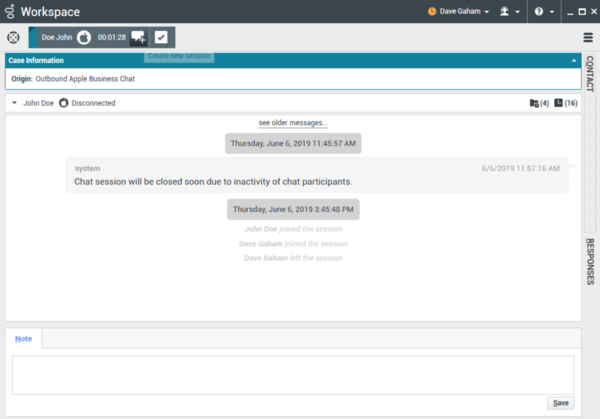
Additionally, if the customer previously contacted your company using Apple Messages for Business, these previous interactions appear in the message area. Depending on your settings and the number of previous messages, you might need to click see older messages... to see previous Apple Messages for Business messages from the current contact. Records of previous Apple Messages for Business interactions, as well as records of other interaction types, also appear in the Contact History view in Workspace.
You can see the transcript only for the current Apple Messages for Business channel.
- Administrators can configure colors and text size. See the configuration options page for more information.
- Administrators can configure the option applebcsession.transcript-interactions-count to specify how many messages from previous interactions appear in the chat message window.
- Administrators can configure the option applebcsession.max-text-message-size to set the maximum size of the outbound text message, specified in bytes by converting the message string to UTF-8 encoding. A notification appears below the message area if the maximum value is exceeded. Some symbols might require additional characters, such as emojis.
- Administrators can enable agents to see messages from multiple Apple Messages for Business channels in the transcript by setting the applebcsession.show-cross-channel-messages option to True.
- Administrators can set the delay timespan using the applebcsession.message-delay-timespan option to indicate whether there is a delay in receiving a message or not.
Lesson: Handling an inbound Apple Messages for Business interaction
Purpose: To handle an inbound Apple Messages for Business interaction properly.
Prerequisites
- You are logged in to Workspace (see Lesson: Logging in to Workspace).
- Your status is Ready for the Apple Messages for Business media channel (see Lesson: Going Ready in the Workspace Main window).
- You are the internal target of the inbound interaction.
Start
- A preview of the inbound interaction is displayed on your workstation desktop in an interactive-notification view. The Interaction Preview contains a summary of information that pertains to the interaction, including contact information and type of interaction. The Interaction Preview might also contain Case Information, which is part of the case data about the interaction.
- You can choose to accept or reject the interaction in the Interaction Preview by performing one of the following steps:
- Click Accept to display the interaction.
- Click Reject to return the interaction to the queue.
- Do nothing. The interaction will time out and be redirected.
- To reply to the message, just enter text in the message area. You can copy and paste selected text.
- (Optional) If necessary, you can transfer the conversation to another agent, or invite another agent to join a conference.
- Click
 (transfer) or
  (conference), and select the type of target.
 - Click the magnifying glass to search by name or phone number.
- Click
- Before agents can request a conference, an administrator must:
- Set the option intercommunication.applebcsession.queue before agents can request a conference via the Skill or Group option.
- Create a Business Attribute of type Interaction Subtype with the name InternalConferenceInvite.
- For more information on transfers, refer to the Workspace documentation topic Lesson: Starting an instant SMS transfer, which is similar to the Apple Messages for Business procedure.
- Administrators can enable or disable the incoming message blinking feature using the applebcsession.new-message-blinking option. Additionally, they can also control the duration of blinking using the applebcsession.new-message-blinking-duration option when this feature is enabled.
- Administrators can control whether the chat transcript window scrolls automatically down or not whenever there is a new message by configuring the applebcsession.focus-on-new-messages option.
End
Next Steps
- You may wish to use some of the the features in described in Apple Messages for Business Functionality and Workspace Functionality below. When you are finished, click Done to stop the current interaction.The information is saved in the contact history and the Apple Messages for Business Interaction window is closed. You can also set a disposition code.
Pending response indicator
When you receive a message from a contact, a timer is started and a pending response indicator appears next to the interaction-type icon at the top of the Apple Messages for Business interaction window (![]() ). The duration of the timer is specified by your administrator with the option applebcsession.pending-response-to-customer. This timer indicates that you have a pending response to the contact.
). The duration of the timer is specified by your administrator with the option applebcsession.pending-response-to-customer. This timer indicates that you have a pending response to the contact.
The color of the pending response indicator begins as green. If you have not responded by a specific time interval, the indicator changes to yellow. If you still have not responded by a second time interval, the indicator changes to red and begins to flash. The indicator disappears after you send a message to the contact.
If you have a pending response, and the Apple Messages for Business interaction window is not the active window, the Workspace task icon begins to flash in the Windows taskbar, regardless of the condition that is displayed by the pending response indicator. This flashing stops as soon as you navigate back to the interaction by clicking the Interaction control bar.
Using workbins
Your company might use workbins to manage Apple Messages for Business interactions. A workbin is like a queue in which you can store interactions that are to be handled later. Additionally, when you log out, open Apple Messages for Business interactions are transferred to a workbin for later use. If a customer resumes one of these interactions, it is automatically removed from the workbin and transferred to an available agent.
Click ![]() to transfer the interaction to a workbin. The interaction closes in Workspace but the session remains active in the background (server-side) and for the end customer.
to transfer the interaction to a workbin. The interaction closes in Workspace but the session remains active in the background (server-side) and for the end customer.
To retrieve the interaction from the workbin, select the interaction and click Open, as shown below:

Standard Response Library
You can use the Workspace Standard Response Library to insert prepared replies into your conversation. Text is sent first in a separate message, followed by attachments (if any). You can click the X above an attachment file to remove it from the response.
You can also use standard responses to insert structured messages that use Apple Messages for Business-specific features, such as
These features are described in more detail below.
- See Using The Standard Response Library in the Workspace Desktop Edition documentation for more general information on using standard responses.
- You can also use a shortcut to insert a standard response into an Apple Messages for Business interaction. For information on how to use these shortcuts, refer to Using a shortcut to insert a standard response.
- Administrators can refer to the eServices Manager documentation for information on configuring structured messages for Apple Messages for Business.
- Refer to the Apple Messages for Business documentation for more information on using structured messages.
- High contrast theme is also supported for Apple Messages for Business structured messages.
Apple Pay
This response allows customers to pay for a purchase using Apple Pay.
You use this feature in the same way you would use a standard response. In the Responses tab, select the standard response that uses the Apple Pay feature.
The customer receives the message and provides a response.
Customizing the Apple Pay message
Select the Apple Pay message to access the following tabs and settings:
- Payment Request tab
- Label—This column contains one or more line items for which the customer must pay.
- Amount—This column specifies the price for each line item.
- Subtotal—The total amount of the line items for which the customer must pay.
- Tax Rate—The tax rate to use to calculate Total Amount price.
- Total Label—The text label for the Total Amount value.
- Total Amount—The total price, which includes tax.
- Tax Shipping—If selected, tax is also applied to the shipping cost (see Shipping Methods, below).
- You can click the Add or Remove button to manually add or delete line items before sending this Apple Pay request to the customer.
- Shipping Methods tab
- Label—This column contains one or more shipping methods that the customer can choose.
- Detail—This column provides more information about each shipping method.
- Amount—The cost for each shipping method.
- Tax—If you selected Tax Shipping in the Payment Request tab, this column shows the tax to be charged for the shipping method.
- As an agent, you can click the Add or Remove button to manually add or delete shipping methods before sending this Apple Pay request to the customer. The customer can select one of the provided shipping methods before he or she pays. If the customer does not make a selection, the default shipping method (the first item in the Shipping Methods list) is automatically applied.
- Extra Information tab
- Information in this tab might vary depending on your configuration. Ask your administrator for additional information.
- Received Message tab
- These settings are typically pre-configured in the standard response. Only change these settings if directed to do so by a supervisor or manager.
Custom Extensions
Custom extensions are custom-built iMessage or iOS apps that provide extended functionality. For example, your company might have an app that helps customers to access additional information on your server, such as account information.
You use this feature in the same way you would use a standard response. In the Responses tab, select the standard response that uses the Custom Extension.
The customer receives the message and selects a response.
Configuring the Custom Extension
Select the Custom Extension to access the following tabs and settings:
- Custom Extension tab—The information on this tab is specific to your custom extension. At a high level, the information you see here specifies the parameters and values used by the custom extension. Do not modify this information unless directed to do so by a manager or supervisor.
- Received Message tab—This tab shows a preview of the message to be sent to the customer.
Date Picker
The Date Picker feature enables you to provide the customer with a list of dates from which to make a selection. For example, you might provide a list that prompts the customer to choose a date for scheduling a service call.
You use this feature in the same way you would use a standard response. In the Responses tab, select the standard response that uses the Date Picker feature.
The customer receives the message and selects a response.
Customizing the Date Picker
Select the Date Picker to access the following tabs and settings:
- Event tab
- Title—Provide a title for the Date Picker message.
- Location—(Optional) Describe a location for the Date Picker event.
- Latitude—(Optional) Provide a latitude for the location.
- Longitude—(Optional) Provide a longitude for the location.
- Radius—(Optional) The location radius, in meters. If the latitude and longitude fields are missing or empty, this field is ignored.
- Timeslots tab
- Click Add to add a timeslot. In the StartTime field, select a date and time for the timeslot. Go to the Duration section to specify the length of the timeslot.
- You can click Add to add another timeslot. To delete a timeslot, select the timeslot and click Remove.
- Received Message tab
- These settings are typically pre-configured in the standard response. Only change these settings if directed to do so by a supervisor or manager.
- Reply Message tab
- These settings are typically pre-configured in the standard response. Only change these settings if directed to do so by a supervisor or manager.
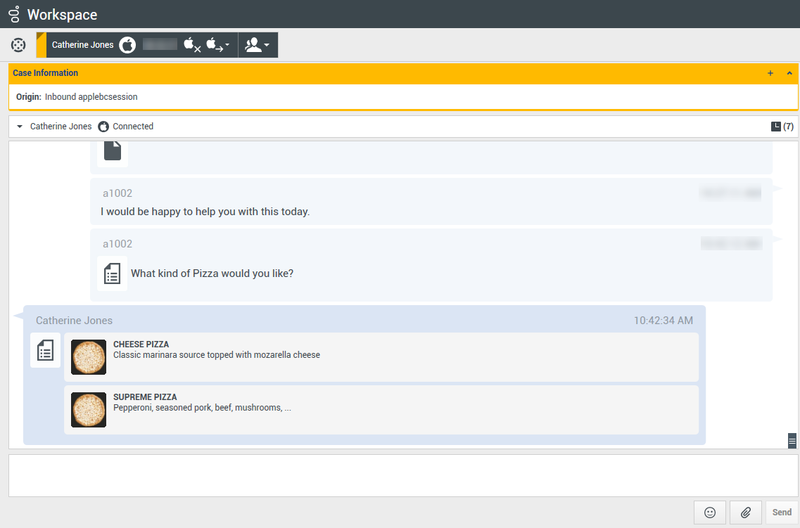
List Picker
The List Picker feature enables you to provide the customer with a list of options from which to make a selection. For example, you might provide a list that prompts the customer to choose a reward or a particular type of credit card.
You use this feature in the same way you would use a standard response. In the Responses tab, select the standard response that uses the List Picker feature.
The customer receives the message and selects a response.
Customizing the List Picker
Select the List Picker to access the following tabs and settings:
- List Picker tab
- Multiple Selection—Select this option to allow the customer to choose more than one item from the list.
- Right-click an object in the list section to access a contextual menu with the following options:
- Add Section—Add a new section to the list.
- Add Item—Add a new item to the selected section.
- Remove Section or Remove Item—Remove the selected section or item.
- Move Up—Move the selected object higher in the list.
- Move Down—Move the selected object lower in the list.
- Title—Provide a title for the List Picker message.
- Received Message tab
- These settings are typically pre-configured in the standard response. Only change these settings if directed to do so by a supervisor or manager.
- Reply Message tab
- These settings are typically pre-configured in the standard response. Only change these settings if directed to do so by a supervisor or manager.
Rich Links
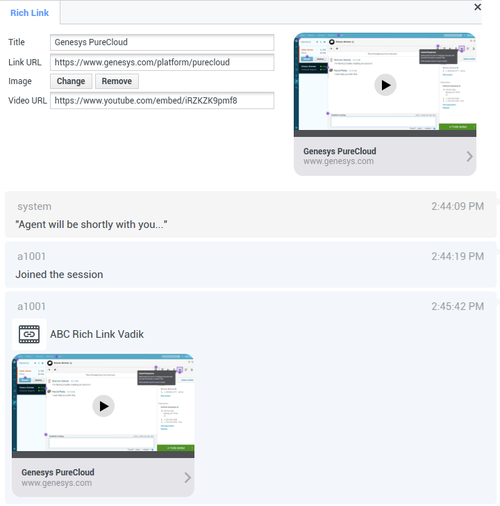
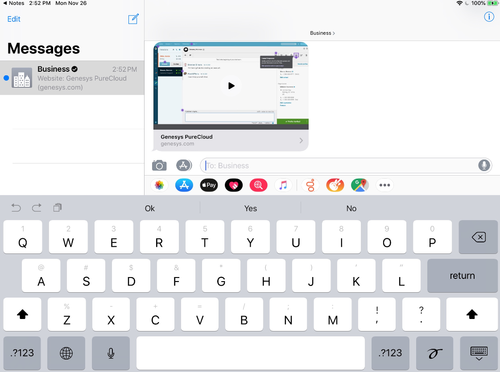
You can use Rich Links to show customers an inline preview of an image or video within the chat. Unlike regular messages, customers can view the media immediately without having to click a "Tap to Load Preview" message.
You use this feature in the same way you would use a standard response. In the Responses tab, select the standard response that uses the Rich Link feature. An example standard response that uses a Rich Link is shown below:
The customer receives the message and can view the media directly in the chat, as shown below:
Supported file types
The following image formats are supported (file size must be less than 1 MB):
- PNG
- JPG/JPEG
- GIF
- BMP
Support for streaming video is dependent on Apple. Video format support is not limited by this plugin.
Attachments
Click ![]() to attach a file. After attaching a file, you can preview the file before clicking Send when the applebcsession.two-step-attachment-upload option is set to true. If the option is set to false, the attachment is sent immediately after you select the file.
to attach a file. After attaching a file, you can preview the file before clicking Send when the applebcsession.two-step-attachment-upload option is set to true. If the option is set to false, the attachment is sent immediately after you select the file.
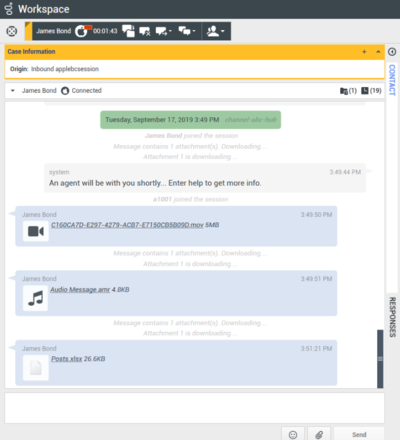
You can also receive attachments.
- Click the corresponding icon in the transcript area to display or play the attachment.
- Right-click the icon and select Save as... to save the attachment.
- The file size of an attached file must be smaller than 100 MB.
- The size and type of file that you can attach or receive might be further limited by your configuration.
- A system specific file icon is shown.
The following attachment types are supported:
- Non-multimedia files—Non-multimedia files are opened by the default application for that file type. Currently, the following document types are supported: PDF, DOC(X), PPT(X), and XLS(X).
- Audio—An audio attachment icon appears in the message area. Select the icon to open the audio file.
![]()
- Images—A preview of the image appears in the message area. Select the image to open the image.
- Videos—A video attachment icon appears in the message area. Select the icon to open the video.
![]()
A thumbnail that indicates the attachment type along with the attachment’s file name and size is displayed for each incoming attachment.
Emojis
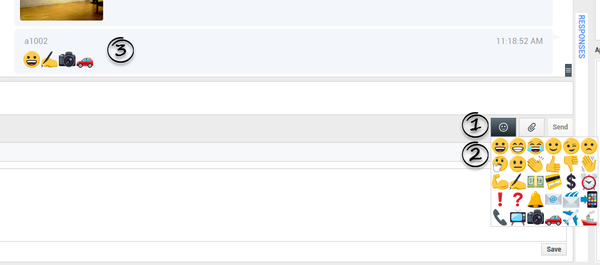
Apple Messages for Business provides a set of emojis that you can use in chat interactions.
- Click the smiley-face icon to get a selection window.
- Select an emoji.
- When you select an emoji, it appears in the message area.
- The emoji offering is determined by the setting of the applebcsession.emojis-business-attribute option. If there are no emojis configured or no section specified in applebcsession.emojis-business-attribute option, the ABC plugin displays a default set of emojis.
- Refer to the "Enabling emojis" section in the Chat topic of the Workspace Desktop Edition Deployment Guide for information on how to create the business attribute.
Web links
All URL links are shown as hyperlinks in the chat window. Click a link to open it in the system default web browser.
Sending outbound messages
You can initiate a conversation with a past contact using the My History view, Interaction Search view, or by viewing the history for a particular contact in the Contact Directory. Select a past interaction with the contact and click ![]() .
.
The interaction opens and you can use the same functionality as an inbound interaction to converse with the contact.
Alternatively, if you have not yet marked an interaction as Done, you can click ![]() in the interaction control bar to create a new outbound session.
in the interaction control bar to create a new outbound session.
Other Workspace Functionality
While you are interacting with your Apple Messages for Business contact, you can use the general Workspace functionality in the Apple Messages for Business Interaction window.
- Use the Note to attach a note to the interaction history. See Managing Contact History.
- View Case Information for the current interaction.
- View and manage contact history. See Managing Contact History
- View and manage contact information. See Lesson: Finding and viewing an interaction in the contact database.
- Your account might be configured to let you assign an interaction with an unknown contact to a known contact in the contact database by using the Manual Contact Assignment feature.
- Use the Standard Response Library for pre-written text for replies and comments. Click the vertical Responses button, as shown in the Using The Standard Response Library lesson.
- Cross over into another media channel. If, as an agent, you learn other contact information, such as a contact's phone number or email address, you can manually enter this information on the Information tab. The corresponding choice for other media channels is then displayed when you click the Party Action menu that is next to the name of the contact. You can then reply by using a voice call, an email, an SMS message, or any other supported media channel for a Apple Messages for Business contact. Workspace displays a drop-down list of available channels to access a contact.
- If you want to transfer the interaction to another internal target or consult with another internal target about the interaction, you can perform the following functions:
- Instant-transfer the interaction to another internal target. See Lesson: Starting an instant SMS transfer, which is similar to the Apple Messages for Business procedure.
- Start a consultation with another party:
- Start an Instant Messaging consultation. See Lesson: Initiating an Instant Messaging session.
- Start a Voice consultation. See Starting a Voice Consultation.
- You can enable the high contrast theme for Apple Messages for Business.

