Using the Gplus Adapter Application
<multistep> Overview=
- Logging in
- Changing your status
- Receiving calls
- Call Handling
- Transferring Calls
- Call Wrapup
- Managing Click-To-Dial
- Changing Extension
- Signing out
|-| Logging In=
Enter your username (email address) and password and click Log In at the Login screen, as shown below:
After you login, the dialpad opens. You can use the the dialpad to:
- Make an outbound call
- Change your online status (select file:Cti_sf_statusicon.png)
- Change your phone number (select file:Cti_sf_dropdown.png)
- Log out
|-| Changing Your Status=
To change your online status, click on the top online status bar to select one of the following statuses:
- Ready
- After Call Work
- Aux Work
- Not Ready
- Offline
|-| Receiving Calls=
For inbound calls, the adapter displays toast data for the call allowing the agent to review the data before accepting or rejecting the call. Note that the accept or reject buttons may or may not be present depending on the type of phone being used.
|-| Call Handling=
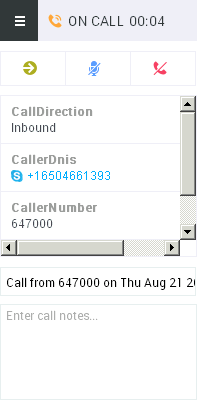
For active inbound calls, the following options are displayed near the top of the dialpad:
- Go to Call Transfer
- Hold or Resume the call
- Hang Up the call
- Agents can add notes relating to the call and can overwrite the default subject.
|-| Transferring Calls=
To consult, conference, or blind transfer active calls, click on the name of another agent in Ready state or select desirable Contact and a dialog box appears with the following options:
- file:blind.png Blind transfer the call to the other agent and disconnect.
- file:consultcall.png Consult with the other agent, put the customer on hold, and enable the remaining three options.
- file:addcall.png Adds the customer to the conference along with the other agent.
- file:transfercall.png Transfer the call to the other agent.
- file:disconnectcall.png Disconnect the other agent and add the customer back to the call.
|-| Call Wrapup=
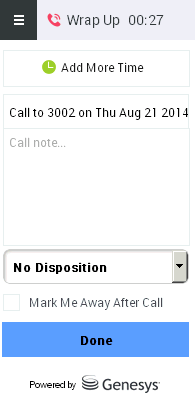
When the call finishes, the following wrap-up screen appears|
- Click the Add More Time button to extend your wrap up time.
- Optional: Add a call note in the Call note... field.
- Optional: select from a pre-configured list of Disposition codes (configured in VCC Dashboard). You will stay in the ACW state until you mark your status as Ready. For more information, please see Workspace Web Edition Configuration Guide.
- Enable Mark Me Away After Call to automatically set your status as Not Ready, so you do not receive another call.
- Click Done when finished with the call to update the call information in the database.
|-| Managing Click-To-Dial=
Click the number to initiate an outbound call.
|-| Changing Extension=
To change the extension, select file:Moreicon.png and enter the new extension number then click the Save (pencil icon) button.
thumb|center|Changing Extenstion
|-|
Signing Out=
To sign out, select file:cti_sf_dropdown.png, and click Sign Out.
|-| </multistep>


