Contents
Configuring and Starting a GMS Cluster
Prerequisites
- GMS version 8.5.x
- Red Hat Linux version 5.0 (32 bit and 64 bit), 4Gb RAM or Higher (for the HA Proxy Load Balancer)
- JDK 1.6.30 or higher
- GMS nodes and cluster are configured.
- External Cassandra is configured.
Introduction
The process for initializing a GMS cluster (whether it is a single node, multiple node, or multiple data center cluster) is to first correctly configure the Node and Cluster Initialization Properties in each node’s cassandra.yaml configuration file, and then start each node individually, starting with the seed node(s). Configuration file cassandra.yaml is automatically generated by GMS Installation Package, you don't need to update the file until you need specific settings. Installation Package proposes to choose between the type of node "seed node/Not a seed node". The following section explains how the GMS cluster is setup.
Initializing a Single-Node Cluster
GMS is intended to be run on multiple nodes, however, you may want to start with a single node cluster for evaluation purposes.
To start GMS on a single node, set the following required properties in the cassandra.yaml file:
cluster_name: GMS Cluster
initial_token:
(Optional) The following properties are already correctly configured for a single node instance of Cassandra. However, if you plan on expanding to more nodes after your single-node evaluation, setting these correctly the first time you start the node is recommended.
seeds: <IP of GMS node>
listen_address: <IP of GMS node>
rpc_address: <IP of GMS node>
Start GMS on the node.
Initializing a Multi-Node or Multi-Data Center Cluster
To correctly configure a multi-node or multi-datacenter cluster you must determine the following information:
- A name for your cluster
- How many total nodes your cluster will have, and how many nodes per data center (or replication group)
- The IP addresses of each node
- The token for each node (see Calculating Tokens). If you are deploying a multi-datacenter cluster, make sure to assign tokens so that data is evenly distributed within each data center or replication grouping (see Calculating Tokens for Multiple Data Centers).
- Which nodes will serve as the seed nodes. If you are deploying a multi-datacenter cluster, the seed list should include a node from each data center or replication group.
This information will be used to configure the Node and Cluster Initialization Properties in the cassandra.yaml configuration file on each node in the cluster. Each node should be correctly configured before starting up the cluster, one node at a time (starting with the seed nodes). For example, suppose you are configuring a 4 nodes cluster spanning 1 rack in a single data center. The nodes have the following IPs, and one node in the rack will serve as a seed:
- GMS node 172.25.157.171 (seed)
- GMS node1 172.25.157.177
- GMS node2 172.25.157.179
- GMS node3 172.25.157.185
The cassandra.yaml files for each node would then have the following modified property settings.
node0
cluster_name: 'GMS Cluster'
initial_token:
seed_provider:
       - seeds: '172.25.157.171'
listen_address: 172.25.157.171
rpc_address: 172.25.157.171
node1
cluster_name: 'GMS Cluster'
initial_token:
seed_provider:
       - seeds: '172.25.157.171'
listen_address: 172.25.157.177
rpc_address: 172.25.157.177
node2
cluster_name: 'GMS Cluster'
initial_token:
seed_provider:
       - seeds: '172.25.157.171'
listen_address: 172.25.157.179
rpc_address: 172.25.157.179
node3
cluster_name: 'GMS Cluster'
initial_token:
seed_provider:
       - seeds: '172.25.157.171'
listen_address: 172.25.157.185
rpc_address: 172.25.157.185
When the installation and configuration are done for all GMS's, you can start each instance.
Load Balancing Between GMS Instances
Load balancing is a computer networking methodology to distribute workload across multiple computers or a computer cluster, network links, central processing units, disk drives. In a GMS Cluster, Load Balancing is used to distribute the workload across multiple GMS instances. The installation of HAProxy is described here. See also How to setup HAProxy as Load Balancer for Nginx on CentOS 7 Once installed, you have to create a configuration file for HAProxy "haproxy-gms.cfg" and copy the following in the file:
global
    daemon
    maxconn 256
defaults
    mode http
    timeout connect 5000ms
    timeout client 50000ms
    timeout server 50000ms
frontend http-in
    bind *:8080
    default_backend cluster_gms
listen admin
    bind *:9090
    stats enable
backend cluster_gms
        balance roundrobin # Load Balancing algorithm
        #following http check, is used to know the status of a GMS (using NodeService from GMS)
        option httpchk GET /genesys/1/node
        option forwardfor # This sets X-Forwarded-For
        ## Define your servers to balance
        server server1 172.25.157.171:8080 weight 1 maxconn 512 check
        server server2 172.25.157.177:8080 weight 1 maxconn 512 check
        server server3 172.25.157.179:8080 weight 1 maxconn 512 check
        server server4 172.25.157.185:8080 weight 1 maxconn 512 check
Once done, you can start HAProxy using the following command:
[root@bsgenhaproxy haproxy]# ./haproxy -f haproxy-gms.cfg GMS Service Management UI
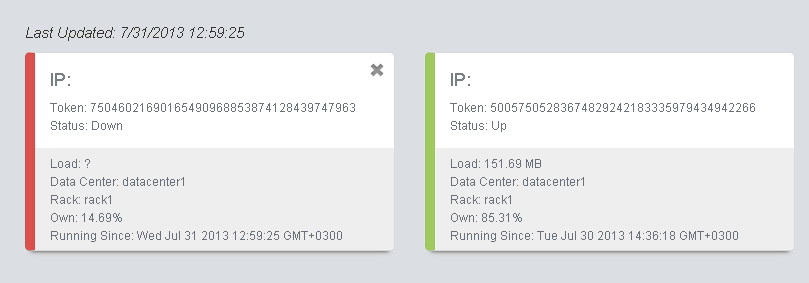
Cluster view in the GMS Service Management User Interface, Home page:
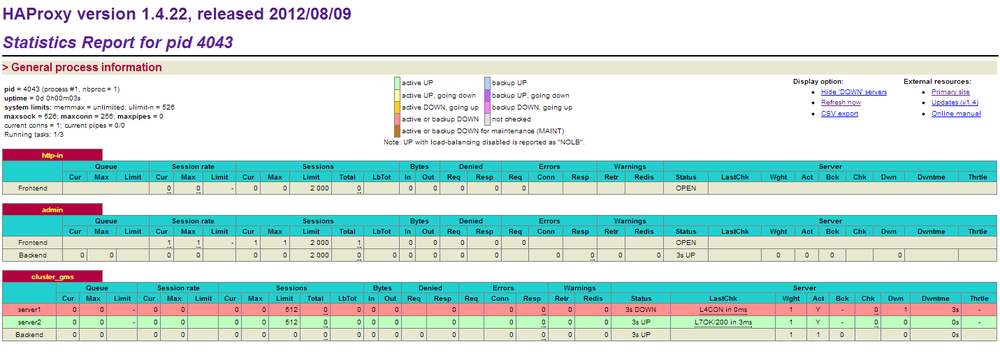
HAProxy Statistics Report page
The following page is available at: http://<haproxy_host>:9090/haproxy?stats
You can now use the HAProxy endpoint http://<haproxy_host>:<haproxy_port> as the main entry point for the Cluster.
Limitations
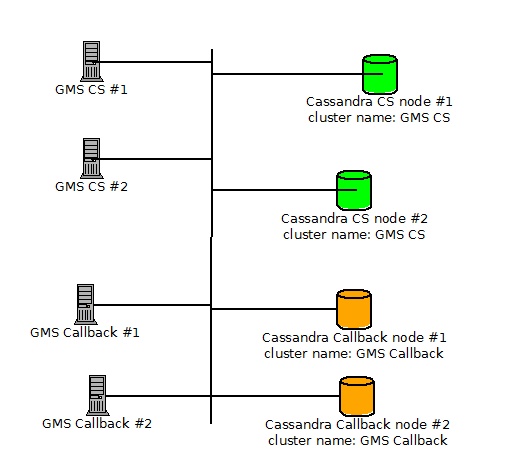
If you set up different clusters of GMS for different purposes (Callback, and so on), you must change the cluster name in order to be able to start GMS (this applies to embedded, and external Cassandra clusters if they are set up for different purposes).
Example of GMS architecture with Cassandra clusters for different purposes:


