
Simple Engagement Model
Contents
Overview
The Simple Engagement Model is a simple solution to add Web Engagement to your website with limited effort. You can use the GWE Plug-in for Genesys Administrator Extension to define, in a few clicks, Web Engagement categories that contain business information related to URL or web page titles. These categories are used in the CEP rule templates, which provide rules that define when to submit actionable events to Web Engagement — this is what starts the engagement process.
For example, lets look at Solutions on the Genesys website. In this scenario, you can define a Solution category associated with the http://www.genesys.com/solutions page and several or all solution sub-pages, such as http://www.genesys.com/solutions/cloud or http://www.genesys.com/solutions/enterprise-workload-management.
- To associate the category with all the pages containing the "solutions" string in the URL, you can create the "solutions" tag. This tag defines the "solutions" string as a plain text expression to search in the events triggered by the visitor browsers.
- To set up a specific list of sub-pages for the Solutions category, you can create a tag for each sub-page:
- The "cloud" tag, which defines the "cloud" string as the plain text expression to search in the events triggered by the visitor browsers.
- The "enterprise-workload" tag, which defines the "enterprise-workload-management" string as the plain text expression to search in the events triggered by the visitor browsers.
Now your rules can use this category to match solution-related pages.
The templates for category-based rules define how to process events sent from the Web Engagement Frontend Server. They define both the type of events to take into account and the action to perform. The Genesys Rules Authoring Tool loads the template and uses its content to help you define rules. These templates are created with your application and can be modified with the Genesys Rules Development Plug-in (in Composer or in Eclipse).
Default Rule Templates
The default templates for the Simple Engagement Model define how to process events sent from the Web Engagement Frontend Server. They define both the type of events and the action to perform. Later, you'll use the Genesys Rules Authoring Tool to create rules based on these templates.
| Singleton | |||
| Description | The template receives each single event as a formal parameter. If the event's value matches the right category, then the actionable event is sent to the Web Engagement Backend Server.
 GWM single.png | ||
| Expression Example | When
Then
| ||
| Sequence | |||
| Description | This template analyses the event stream received from the categorization engine and builds the sequence of events by category values. As soon as the event sequence is completed, the actionable event is submitted. Note that the event sequence must follow a specific order.
 Click to enlarge. | ||
| Expression Example | When
and
(...)
Then
| ||
| Set | |||
| Description | This template analyses the event stream received from the categorization engine and collects the events by category values. As soon as the event set is completed, the actionable event is submitted. If you use this template, the event order is not taken into account.
 GWM Set.png | ||
| Expressions | When
and
or
and
Then
| ||
| Counter | |||
| Description | This template analyses the event stream received from the categorization engine and counts events which occur for a given category. As soon as the counter is reached, the actionable actionable event is submitted.
 GWM Counter.png | ||
| Expressions | When
Then
| ||
| Search | |||
| Description | The actionable event is submitted if a Search event occurs. | ||
| Expressions |
When
Then
| ||
| Timeout | |||
| Description | The actionable event is submitted if a Timeout event occurs. | ||
| Expressions |
When
Then
| ||
Implementing the Simple Engagement Model
Complete the steps below to implement the Simple Engagement Model:
Plug-in for GAX Overview
You can add and remove categories for Web Engagement through the Category interface in the Genesys Administrator Extension plug-in. You create these categories during the Application Development process if you use the Simple Engagement Model when you Create Business Information.
Each category is compliant with the category definition and includes tags to define business information related to your website. To access the Categories interface, open Genesys Administrator Extension and navigate to Proactive Engagement > Categories.

Features
The Categories interface includes the following features:
| Feature | Usage |
|---|---|
| Create categories. | See Creating a Category for instructions. |
| Create matching tags. | See Creating Category Matching Tags for instructions. |
| Delete matching tags. | Select the tag in the Category Matching Tag section and click X.  Click Delete. |
| Delete categories. | Select the category in the list and click Delete. The Delete Confirmation dialog opens. Click OK. Delete Confirmation. |
Creating a Category
Prerequisites
- Your environment includes Genesys Administrator Extension. See Genesys environment prerequisites for compliant versions.
- You installed the Web Engagement Plug-in for Genesys Administrator.
Start
- In Genesys Administrator Extension, navigate to Proactive Engagement > Categories. The Categories interface opens.
- Click Switch Tenant, select the tenant where you deployed Genesys Web Engagement, and click OK.
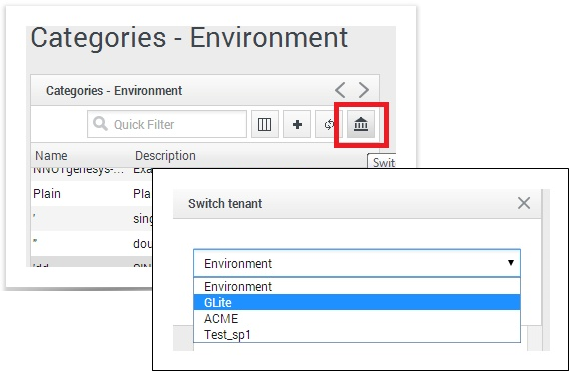 Click the Switch tenant.
 - Click + to add a new Category. The New panel opens.
- Enter a Category Name. For instance, pfs-login.
- Optionally, you can enter a Category Description.
- Enable Show category in Interaction Workspace to display this category in Interaction Workspace if an agent opens interactions that are related to it.
- Click Save. The Products category is added to the list.

End
Creating Category Matching Tags
Each category should have at least one Category Matching Tag, which contains an expression to search in the URLs and titles submitted with the events of the browser. For instance, a tag to identify the http://www.genesyslab.com/products/genesys-inbound-voice/overview.aspx page could be the plain expression 'genesys-inbound-voice' or the regular expression 'Inbound Voice'.
Prerequisites
- You completed Creating a Category.
Start
- In Genesys Administrator Extension, navigate to Proactive Engagement > Categories and select a catetory. The <category name> panel opens.
- In the Category Matching Tags section, click +. The New panel opens.
- Fill in the form to create a tag. Consult the table below for more information about the form fields.
Field Description Name The display name for your tag. For example, Inbound Voice. Type The type of expression to search. There are three options: - Regular Expression — A regular expression search.
- Plain Text — A substring search. This is the default.
- Google Like Expression — Selecting this option opens a new window where you can enter an expression using Google search operators. When you click Generate to REGEX, it converts the expression to a regular expression and populates the Expression field.
Expression The expression to search. This can be plain text or a regular expression. Case-sensitive Selecting this field makes the regular expression case-sensitive. It is not selected by default. Language Select the language for the tag. This allows you to make the search expression specific to the localization of the browser. - Click Save. The tag is added to the list of Category Matching Tags.
- If needed, you can also define display names for the category that are language specific. In the Language-specific DisplayNames section click +. The New panel opens.
- Enter a Name.
- Select a Language.
- Click Save. The language-specific display name is added to the list on the <category name> panel.
- Click Save on the <category name> panel.
End
Regular Expressions in Tags
You can create tags that use regular expressions to search for matches by selecting "Regular Expression" from the Type list. A regular expression is a sequence of elements, either a word or expression inside quotes. Each search element can be preceded by a '-' to exclude that element. A wildcard symbol '*' can be used inside or outside of the quotes. If you prefer, you can select "Google Like Expression" for the Type, which converts anything you enter in the "Expression" field to a regular expression. If your expression is incorrect, your expression is not converted.
Search Request Patterns (Google Like Expression)
The following table describes the patterns in search requests.
| Search Options | Description |
|---|---|
| Search for all exact words in any order. search query |
The result must include all the words. These words can be substrings attached to other words—for example, [Web-search query1]. |
| Search for an exact word or phrase. "search query" |
Use quotes to search for an exact word or set of words in a specific order without normal improvements such as spelling corrections and synonyms. This option is handy when searching for song lyrics or a line from literature—for example, ["imagine all the people"]. |
| Exclude a word. -query |
Add a dash (-) before a word to exclude all results that include that word. This is especially useful for synonyms like Jaguar the car brand and jaguar the animal. For example, [jaguar speed -car]. |
| Include "fill in the blank". query *query |
Use an asterisk (*) within a query as a placeholder for any terms. Use with quotation marks to find variations of that exact phrase or to remember words in the middle of a phrase. For example, ["a * saved is a * earned"]. |
Next Steps
- Make sure the CEP Rule Templates are ready. See Publishing the CEP Rule Templates for details.
- Finish any customizations to the SCXML strategies or Browser Tier Widgets.
- Continue on with the Application Development Tasks.