Media Integration
Contents
You can integrate Genesys Web Engagement with second-party and third-party media to extend its capabilities beyond what is available with the basic GWE installation. The key integration points for both media types are the Notification Service or proactive invitation:
- The second-party media is a first-class citizen in the Genesys platform that can carry extra business attributes (attached data), like visitID, pageID, and so forth, for operational and reporting purposes. The key differentiator is that the second-party media is processed by Genesys components like Interaction Server. The principle of the integration is simple — taking control of the proactive invitation and Notification Service. Examples of second-party media include GWE Chat, Genesys Mobile Services (GMS) Chat, and Web API Chat.
- The third-party media is provided by third-party services that are not tightly integrated with the Genesys cross-channel platform (particularly with Interaction Server). The integration with third-party media boils down to taking control of the proactive invitation, which is part of the Notification Service.
The proactive invitation (represented by the Invitation Widget) is the key integration point that should be used when you need to overlay the widget on a page. The Notification Service should be used in all other cases.
Integration with Genesys Widgets
In order to integrate with Genesys Widgets, the media widget and media server components must propagate the Web Engagement visitID and pageID attributes to the interaction as attached data. You can get the visitID and pageID in the widget through the public _gt.push ['getIDs',callback] method in the Monitoring JS API. For proactively created chat sessions, you must attach a key-value pair with a key of webengagement and an empty string as the value. This key-value pair can be used later to distinguish between chat sessions that have been created proactively and reactively.
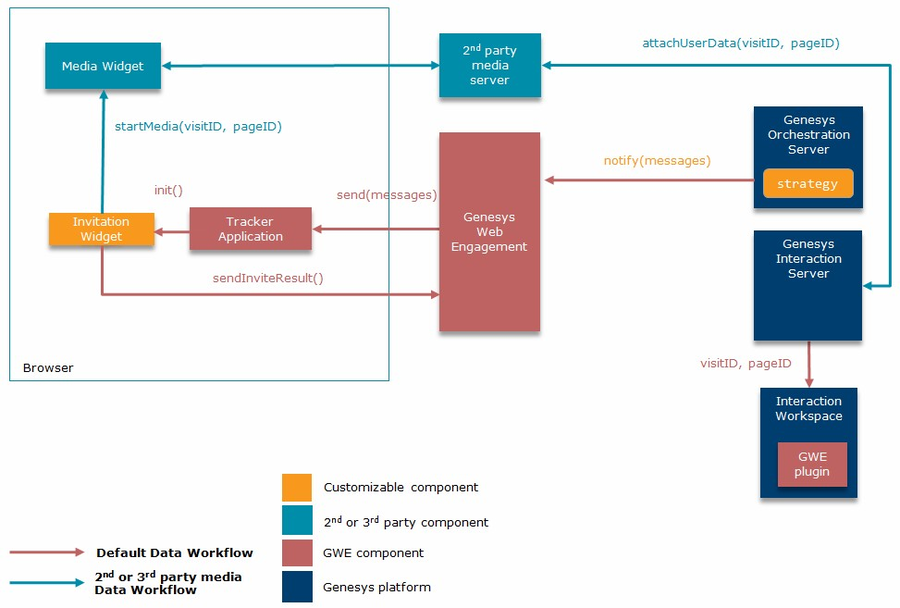
The diagram below shows an example of the data flow between components in a second-party media integration. Web engagement is initiated by Genesys Orchestration Server (ORS), which sends a notification to Genesys Web Engagement. As a result, the custom Invitation Widget appears in the browser. After the invitation is accepted by the user, the Invitation Widget passes the Web Engagement attributes (visitID and pageID) to the Media Widget. The third-party media server then starts a new interaction with the attributes as attached data. Based on this data, the Web Engagement Plug-in for Interaction Workspace can provide the browser history of the current user and other information.
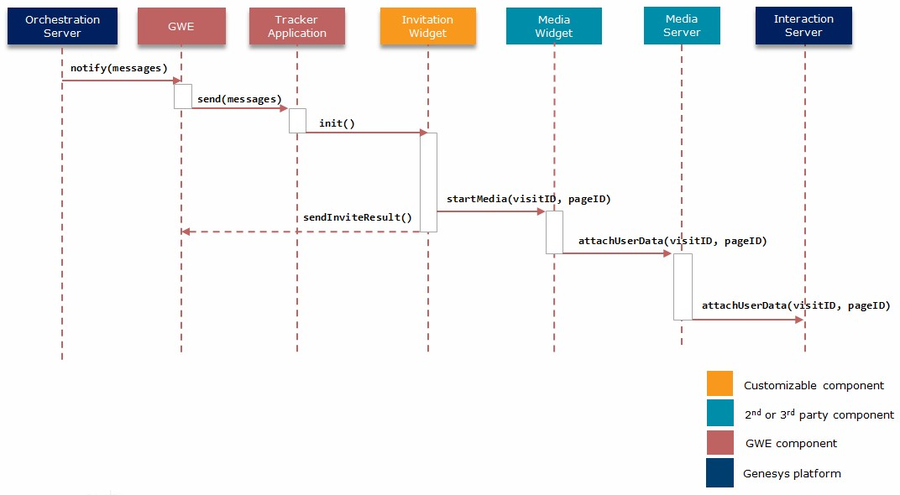
Here is another view of the data flow in a second-party media integration, shown in a sequence diagram:
Third-Party Media Integration
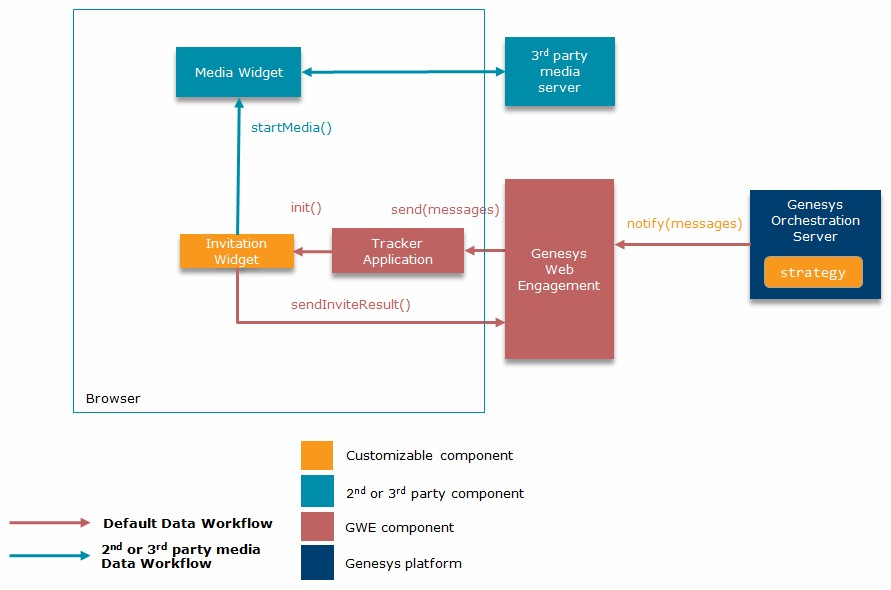
The diagram below shows an example of third-party media integration. Web engagement is initiated by ORS, which sends a notification to Genesys Web Engagement by using the Notification Service REST API. As a result, the custom Invitation Widget appears in the browser. After the invitation is accepted by the user, the Invitation Widget initiates the Media Widget. The third-party media server does not create an interaction in Genesys Interaction Server as it does in the second-party media integration scenario, but the same customization points are still available: Notification Service and proactive invitation.
Examples
GWE Chat Integration
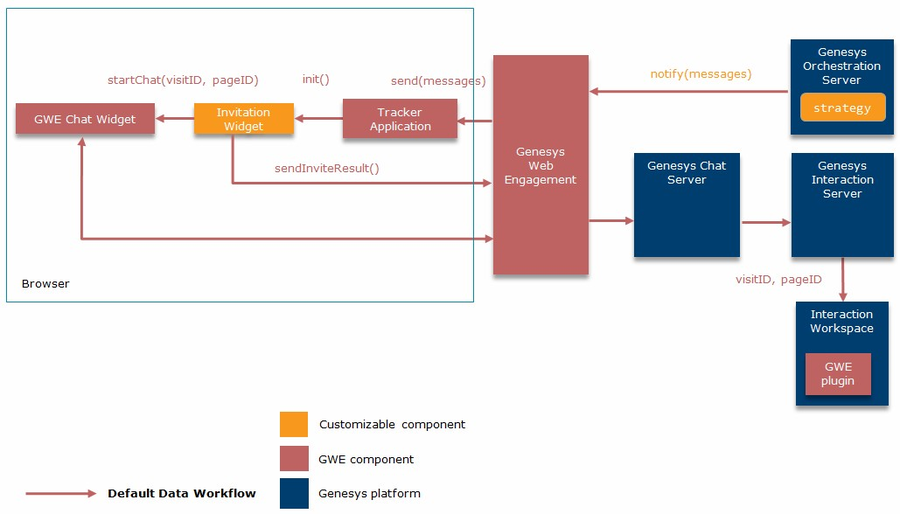
Genesys Web Engagement chat and callback use the same integration path as described in the Second-Party Media Integration section:
GMS Chat Integration
Let's look at how to integrate the second-party chat offered by Genesys Mobile Services instead of the standard Genesys Web Engagement chat. In this example, we use the GMS Chat Widget and initiate a chat session when the user accepts the proactive invitation.
The diagram below shows the data flow between components involved in the integration:
To integrate GMS with Genesys Web Engagement, we need to modify the following:
GWE Proactive Invitation
The proactive invitation is represented by the invite.html file (see Invitation Widget for details), but Genesys recommends that you make a copy of this file to modify for the integration. In this example, we use a copy called inviteGMS.html.
In this file, we need to change how the invitation reacts when it is accepted by a visitor. We can do this in the onAccept() function, which checks the invitation type and calls either startChat() or startCallback(). Since we want to integrate chat, we need to replace the standard startChat() with our own function called startGms(). This function opens the GMS Chat Widget window (indexGPE.html — we will create this file in the GMS Chat Widget section below) and passes the gmsScenario variable.
...
function startGms(gmsScenario) {
    openWindow(
        'http://<GMS Host>/genesys/admin/js/sample/cb/indexGPE.html',     // Customized GMS widget
        'GMS',                                                          // Window title
        gmsScenario                                                     // GMS scenario name
    );
}
function onAccept() {
    log('onAccept()');
    closeInviteDialogWindow();
    if (_config.type === INVITE_TYPE.CHAT) {
        startGms('CHAT-NOW');  // Start GMS 'CHAT-NOW' scenario
        sendInviteResult(INVITE_RESULT.ACCEPT_CHAT);
    } else if (_config.type === INVITE_TYPE.CALLBACK) {
        startCallback();
        sendInviteResult(INVITE_RESULT.ACCEPT_CALLBACK);
    } else {
        error('Invitation type not defined');
    }
}

...GWE Engagement Logic Strategy
In the previous section we made a new invitation widget for GMS chat, called inviteGMS.html, and now we need to modify the Engagement Logic Strategy to use this widget. The final notification message should look like the following:
...
var notification_message = [ {
        'page': event.pageID,
        'channel': 'gpe.appendContent',
        'data': {
            'url': '/server/resources/inviteGMS.html'
        }
    } ];
...GMS Chat Widget
The GMS Chat Widget is represented by the index.html file, which is included as part of the Lab Javascript (Web) Sample. Again, Genesys recommends that you make a copy of this file to modify for the integration. In this example, we use a copy called indexGPE.html.
The GMS Chat Widget is an HTML page that can be loaded as either an iframe or a pop-up, which makes it simple to pass additional data through URL variables. In the GWE Proactive Invitation section, we added the gmsScenario variable to the URL in the startGms() function. Now we need to change the GMS Chat Widget so that it automatically starts the GMS scenario defined in that variable.
First, we need to get gmsScenario from the URL:
...
    function getUrlVars (name) {
        var vars = [], hash, i,
                hashes = window.location.href.slice(window.location.href.indexOf('?') + 1).split('&');
        for (i = 0; i < hashes.length; i += 1) {
            hash = hashes[i].split('=');
            vars.push(hash[0]);
            vars[hash[0]] = hash[1];
        }
        return vars[name];
    }
...
Next, we need to change the scenario name and connect to GMS Server:
...
    function gpeStartScenario() {
        var scenario = getUrlVars('gmsScenario') || 'CHAT-NOW';     // Fetch scenario name. Default is 'CHAT-NOW'
        $('#settings [name=service_name]').val('samples_new');      // Example GMS Service
        $('#scenario').val(scenario);                               // Set scenario name

        connect();                                                  // Connect to GMS
    }
...
Finally, we need to add the required parameters (visitID and pageID) to the connect() function, which is responsible for setting up the connection to GMS Server:
...
    function connect(e) {
        // get data from ui
        var headers = new Object();
        headers.gms_user = $('#user_name').val();
        var params = new Object();
        params.first_name = $('#first_name').val();
        params.last_name = $('#last_name').val();
        params._provide_code = $('#provide_code').val();

        params.visitID = getUrlVars('visitID');             // Required parameters
        params.pageID = getUrlVars('pageID');               // Required parameters

        var scenario = $('#scenario').val();
        if ($('#scenario').val() == "VOICE-SCHEDULED-USERTERM") {
            params._desired_time = $('#available_time_slots').val();
        }
        var serviceName = $('#service_name').val();
        var serviceUrl;
        var responseHandler = onResponseReceived;
        if (scenario == "REQUEST-INTERACTION") {
            serviceUrl = 'request-interaction';
            // request interaction requires _phone_number instead of _customer_number as required by callback
            params._phone_number = $('#contact_number').val();
            responseHandler = onBuiltinCallbackResponseReceived;
        } else if (scenario == "REQUEST-CHAT") {
            serviceUrl = 'request-chat';
            params._customer_number = $('#contact_number').val();
            responseHandler = onBuiltinCallbackResponseReceived;
        } else {
            serviceUrl = 'callback/' + serviceName;
            params._customer_number = $('#contact_number').val();
        }
        // post data
        gmsInterface.createCallback(scenario, $('#url').val(), serviceUrl, params, headers, responseHandler);
        //gmsInterface.call_agent();
    }
...
Now that we've customized the GMS Widget, it can be started automatically with a connection to GMS Server in gpeStartScenario().
// inside onready callback
gpeStartScenario();


