Using Workspace Plugin for Skype for Business
Contents
For information about the general functionality for Workspace Desktop Edition, see the Workspace User's Guide.
Logging into Workspace Desktop Edition to Access Skype for Business
When you log into Workspace Desktop Edition, you'll see the My SfB tab in your My Workspace screen, and you sign in to Skype for Business with your Skype for Business username and password.
You can now control your Skype for Business presence on this tab.
Watch these videos:
Accepting or Rejecting Interactions
When a new inbound Skype for Business interaction is sent to your workstation, a toast notification is displayed at the bottom right-hand corner of your desktop.
You can:
- Accept — Open the interaction in the Workspace Desktop window.
- Reject — Decline the interaction. (Only visible if the interaction is sent through a Route Point)
If you do not accept the toast notification, it times out, and the interaction is not established.
If you accept the toast notification, the inbound interaction view is displayed.
IM Interactions
When you are in an Instant Messaging (IM) interaction and require additional information, you have the following options:
- IM Conferencing: You can add another agent to an existing IM interaction.
- IM Transferring: You can transfer an IM interaction to another agent.
- IM Consultation: You can consult with another agent.
- Escalating to Voice: You can escalate an IM interaction to a voice interaction. Once you have escalated an IM interaction to a voice interaction, you can escalate it again to video, if the customer has already activated video. You cannot escalate to video directly from an IM interaction.
- Handling IM Transcripts: You save and restore an IM transcript.
IM Conferencing
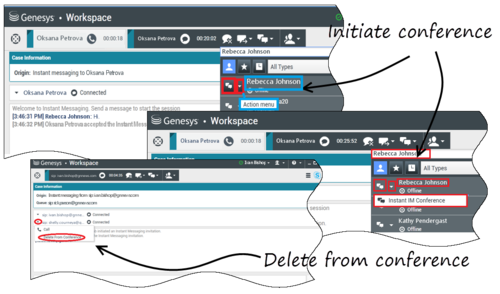
You can add another agent to an existing IM interaction. Select Instant IM Conference, and type the agent's name or contact URI into the text box. When you find the agent's name from the list, select Instant IM Conference, or the icon next to the agent's name.
The other agent receives a toast notification. The other agent can either accept or reject the interaction.
Now you can exchange IM messages with all parties in the conference.
When you are finished with the IM conference, you can remove either yourself or the other agent from the IM.
IM Transferring
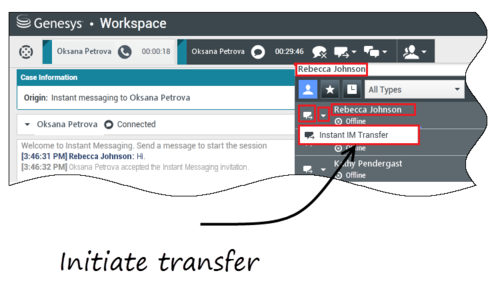
You can transfer an existing IM interaction to another destination (agent, queue, route point, etc). Select Instant IM Transfer, and type the agent's name or contact URI into the text box. You can also find the agent's name from the list of all agents. Select the Action menu or the icon next to the agent's name.
The other agent receives a toast notification and can either accept or reject the interaction.
IM Consultation
You can consult with another agent on an existing IM interaction. Select Start a Consultation, type the agent's name or contact URI into the text box, and select Start Instant Message Consultation from the Action menu.
A consultation IM window opens below the existing IM window. Type your IM message in the text field and press Send. A toast notification is displayed on the selected user site. The consultation IM is established when the agent accepts the toast notification for consultation IM.
You can now exchange messages with the other agent before returning to the conversation with your customer.
Escalating to Voice
Your customer might need to escalate the conversation from IM to voice or vice versa. The customer uses their Skype for Business client to initiate a voice call or an IM interaction to you. By default, the voice escalation call is auto-answered. However, an agent can answer the call manually if the interaction-workspace\lync.voice-escalation-auto-answer option is set to false.
Or, you might need to escalate the conversation from IM to voice or vice versa. Use your Workspace Desktop to initiate a voice call or an IM interaction to your customer.
Voice Interactions
When you are in a voice interaction and require additional information, you have the following options
- Voice Conferencing: You can add another agent to an existing voice interaction.
- Voice Transferring: You can transfer a voice interaction to another agent.
- Voice Consultation: You can pause a voice interaction while you consult with another agent.
- Escalating to Video: You can escalate a voice interaction to a video interaction, if the customer has already activated video. You, as the agent receiving the call, cannot choose unilaterally to escalate to video. Only the originator of the call can escalate to video.
Voice Conferencing
You can add another agent to an existing voice interaction. Select Instant Voice Conference, and type the agent's name or contact URI into the text box. When you find the agent's name from the list, select Instant Voice Conference, or the icon next to the agent's name. The other agent receives a toast notification. The other agent can either accept or reject the interaction. You, the customer, and the other agent are placed into a three-way conference. When you are finished with the voice conference, you can remove either yourself or the other agent from the voice conference.
Voice Transferring
You can transfer an existing voice interaction to another destination (agent, queue, route point, etc). Select Instant Voice Transfer, and type the agent's name or contact URI into the text box. You can also find the agent's name from the list of all agents. Select the Action menu or the icon next to the agent's name. The other agent receives a toast notification and can either accept or reject the interaction.
Voice Consultation
You can consult with another agent on an existing voice interaction. Select Start a Consultation, type the agent's name or contact URI into the text box, and select Initialize a Voice Consultation from the Action menu. The voice consultation is established when the agent accepts the toast notification for the voice consultation. Your main conversation will be on hold. If you were on a video call when you request a voice consultation, your video will be stopped and the start/stop video button will be unavailable during the consultation.
During a voice consultation, the mute button is not displayed in the voice consultation window. However, you can use the Mute button from the main interaction to mute the conversation.
You can speak with the other agent before going back to the conversation with your customer.
Escalating to Video
Your customer might need to escalate the conversation from voice to video or to de-escalate the conversation from video to voice. The customer uses their Skype client to initiate a voice call to you. You accept the call. Once you have accepted the call, the customer can escalate the voice call to video. You can add your own video to an existing video call if the customer has made a video call to the agent or has already added video to an existing call.
Video Interactions
When you are in a video call and require additional information, you have the following options
- Video Conferencing: You can add another agent to an existing video call.
- Video Transferring: You can transfer a video call to another agent.
- Video Consultation: You can pause a video call while you consult with another agent and, if necessary, later on do Transfer or Conference from this voice consultation.
Video Conferencing
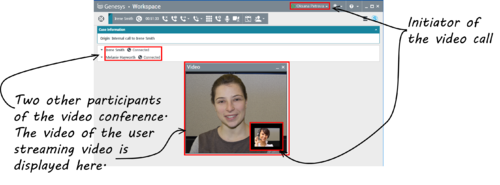
You can add another agent to an existing video call. Select Instant Call Conference, and type the agent's name or contact URI into the text box. When you find the agent's name in the list, select Instant Call Conference, or click the icon next to the agent's name. The other agent receives a toast notification and can either accept or reject the invitation to a call. Now you can speak with all parties in the conference with video, if the invitation was accepted. All participants in the conference can see the video of the customer. Only one agent can display video to the customer. Other agents will not be able to display their video unless the first agent stops his video. When you are finished with the video conference, you can remove either yourself or the other agent from the video conference.
Video Transferring
You can transfer an existing video interaction to another destination (agent, queue, route point, etc). Select Instant Call Transfer, and type the agent's name or contact URI into the text box. You can also find the agent's name from the list of all agents. Select the Action menu or the icon next to the agent's name. The other agent receives a toast notification and can either accept or reject the invitation.
Video Consultation
While you are on a video call, you can request a consultation with another agent.
Select Start a Consultation, type the agent's name or contact URI into the text box, and select Start Voice Consultation from the Action menu. A toast notification is displayed on the selected user site. Note that the consultation is voice only; video consultation is not available.
You can speak with the other agent before going back to the video call.
Note that while you are consulting with the other agent, the video is temporarily unavailable, even if the video call is On Hold or Connected. You can resume streaming after you end the consultation by pressing the Start video button.


