Deploying LRM
<multistep>
|-|
LRM Deployment Overview=
Use this overview of the deployment to serve as a License Reporting Manager (LRM) deployment quick reference. Select a link for more information or click Next Step to view details of each step. The browser back button is not supported on this page.
- Confirm platform support.
- Confirm installation requirements.
- Install GAX.
- Install the LRM Plug-in for GAX and add the LRM application to the Connections list for GAX.
- Import the LRM application template.
- Create a LRM DB and add a DAP.
- Create and configure the LRM application.
- Install LRM.
- Create the Entitlement File.
- Set the timezone to GMT on the LRM server and the GVP Reporting Server.
- Schedule the statistics gathering job.
- Plan data backup.
- Configure LRM High Availability (Optional).
- Enable Secure Connection Features (Optional).
- Configure Interaction Concentrator (ICON) and Interaction Workspace options.
- Install ICON.
- Add a DAP object for each ICON DB.
- Create a cron job to clean up old ICON data.
- Configure GVP Reporting Server for LRM.
- Start LRM.
|-|
Confirm platform support=
The Platforms Supported by LRM table lists the operating systems, databases, and virtualization that are supported by LRM in this release.
Platforms Supported by LRM
|
Platform category
|
Platform
|
Versions
|
| OS
|
Red Hat Linux
|
- 5.0 (32-bit)
- 5.0 (64-bit)
- 6.0 (64-bit)
|
| OS
|
Windows
|
2008 64-bit
|
| Database
|
MS SQL Server
|
2008
|
| Database
|
Oracle
|
|
| Database
|
PostgreSQL
|
9.0
|
| Virtualization
|
VMware
|
ESX 3.5
|
|-|
Confirm installation requirements=
- Confirm hardware sizing and performance information in the
Genesys Hardware Sizing Guide.
- Confirm you are using:
- Customer Interaction Management 8.x or Management Framework 8.x
- Genesys Interaction Concentrator 8.x
- Genesys Voice Platform Reporting Server 8.1.5 or later
- Sun Java Runtime Environment (JRE) 6.0 Update 19 or later
LRM Architecture
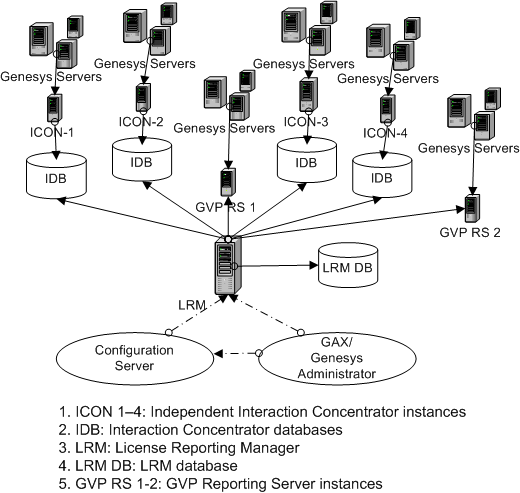
Any additional functionality not shown in the above diagram is designed to support ease of installation.
|-|
Install GAX=
Genesys recommends you install GAX release 8.1.0 or later. See the GAX Deployment Guide available on the Genesys Administrator page.
|-|
Install LRM Plug-in for GAX=
The LRM Plug-in for GAX is an add-on component that is hosted by an existing Genesys Administrator Extension (GAX) installation. The LRM Plug-in for GAX accesses data from the LRM database to provide on-demand reporting to Service Providers and tenant administrators in the GAX graphical user interface (GUI) application .
- Install the LRM plug-in files into the existing GAX directories to enable report generation of LRM statistics from GAX. See Installing a GAX compatible plug-in for details.
- In Configuration Manager, add the LRM Application object on the Connection tab of the GAX object.
Notes:
Refer to GAX online help for
- Report Generation – System Reports, Tenant reports, Agent and Place Group reports
- Provisioning
- Bundle upload
- Viewing Entitlements
|-|
Import the LRM application template=
To import the required application templates before you configure License Reporting Manager to work in your Genesys environment. Configuration Manager or Genesys Administrator can be used for this and all other procedures that are related to configuration.
- Open the Environment folder and select the Application Templates folder.
- From the File menu, select Import Application Template.
- In the Open window that appears, import the following template from your CD:
- templates/License_Reporting_Manager_812.apd.
- Click Open. The Properties window opens.
- Click OK. The template is imported into the Application Templates folder.
|-|
Create a LRM DB and add a DAP=
- Create your LRM database.
- Configure the DAP object on the General tab as a JDBC connection with the correct database server credentials for the DAP object.
- Set the role configuration option in the [lrm] section to main.
Exactly one of your DAPs must have the role value set to main for the LRM DAP. At least one of your DAPs must have the role value set to icon.
Tip
You do not need to run any SQL scripts create empty tables for LRM. LRM creates the tables automatically when the nightly job runs for the first time.
|-|
Create and configure the LRM application=
- Open the Environment folder and select the Applications folder.
- From the File menu, select New > Application. The Browse window opens, listing all application templates that are present in the Configuration Database.
- Choose the License Reporting Manager application template.
- Click OK. The Properties window appears.
- On the General tab, add a unique name to the Name field for this instance of LRM.
- Select the Server Info tab. In the Host Name field, add the name of the host on which you are installing the application.
- Select the Start Info tab, and add “...” to each of the following fields:
- Working Directory
- Command Line
These fields are automatically filled with the correct information when LRM is installed.
- Select the Connections tab. Right-click and select New. In the Server field, enter the name of each DAP. Add:
- A DAP for the LRM database. Set the value of role to main in the DAP Application.
- Click OK. Configuration of your LRM instance is complete.
|-|
Install LRM=
[+] Install LRM on Linux
To locate and launch the License Reporting Manager installation wizard to manually install LRM on Linux.
- Confirm your target computer meets the platform and component prerequisites that are listed in the Genesys Supported Operating Environment Reference Guide.
- Confirm you have installation rights.
- Locate the compressed installation files, Read_Me file, and templates on the installation DVD.
- In a terminal window, open and run the install.sh file in the License Reporting Manager directory on the installation DVD.
- When prompted, enter the Host Name or press Enter for “Local Host”.
- When you are prompted to do so, enter the Configuration Server Name, Network port number, User name, and Password.
- From the displayed list, choose an application that you want to install. When you are prompted to do so, enter the number of your chosen application.
- Enter the location in which you want your application to be installed. Provide the full path.
A list of files that have been installed in your application’s destination location is displayed, along with a message that informs you of your successful installation.
- Verify you have installed License Reporting Manager successfully by inspecting the destination directory of your application for completeness.
- Browse to the destination location of your LRM application.
- Inspect the directory and confirm it contains the following folders:
- Inspect the directory and confirm it contains the following files:
- lrm_startup.sh
- lrmserver.jar
You can now start License Reporting Manager.
Important
If the system has more than 50,000 agents, LRM requires additional Java Heap space to load the agent information from the Configuration Server. Edit the lrm_startup.sh file so that LRM_OPTS has the following Java parameter:
# Non-standard parameters
LRM_OPTS=-Xms2048m
Tip
To uninstall LRM, remove all of the files from the folder in which LRM is installed.
[+] Install LRM on Windows
To manually install LRM using the Genesys installation wizard provided on the LRM product DVD.
- On the License Reporting Manager 8.1 product DVD, open the lrm\Windows\ directory.
- Locate and double-click setup.exe to start the Genesys Installation Wizard.
- On the Welcome page, click the About button to review the read_me file for this installation package. The file also contains a link to the Release Notes file for LRM.
- Click Next to proceed with the installation.
Note: Click Next at the end of each step to proceed to the next page.
- On the Connection Parameters to the Genesys Configuration Server page, specify the following login parameters:
- Host and port of Configuration Server
- User name and password used to log in to the Configuration Layer.
- Select the application you want to install.
- The Choose Destination Location page displays the destination directory, as specified in the Working Directory property of the LRM Application object. If the path is configured as Working Directory is invalid, the wizard generates the following path to the destination directory:
- C:\Program Files\GCTI\LRM\<LRM Application Name>\
- If necessary, click one of the following:
- Browse—To select another destination folder. The wizard updates the Application object’s Working Directory property in the Configuration Database.
- Default—To reinstate the path specified in the Application object’s Working Directory property.
- On the Ready to Install information page, click one of the following:
- Back—To update any installation information.
- Install—To proceed with installation. The Installation Status window appears, showing the installation progress.
- On the Installation Complete page, click Finish.
- As a result of the installation, the wizard adds Interaction Concentrator icons to the following:
- Windows Start menu, under Programs > Genesys Solutions.
- Windows Add or Remove Programs dialog box, as a Genesys server.
- Windows Services list, as a Genesys service with the Automatic startup type.
- Verify you have installed License Reporting Manager successfully by inspecting the destination directory of your application for completeness.
- Browse to the destination location of your LRM application.
- Inspect the directory to confirm that it contains the following folders:
- Inspect the directory to confirm that it contains the following files:
- JavaServerStarter.ini
- lrmserver.jar
- lrmservice.exe
- startServer.bat
You can now start License Reporting Manager.
Important
If the system has more than 50,000 agents, LRM requires additional Java Heap space to load the agent information from the Configuration Server.
In the LRM installation directory, add the following line to the JavaServerStarter.ini file under [JavaArgs]:
-Xms2048m
Tip
To uninstall LRM, remove all of the files from the folder in which LRM is installed.
|-|
Create the Entitlement File=
The entitlement file provides the reference entitled quantity on customer usage reports, provides the reference for calculating overuse, and adds the overuse flag to LRM reports. LRM uses the entitlement file as a reporting reference for a current list of valid customer-ordered sellable items. It does not control or restrict product use. For more information, see the Entitlement File overview on What is LRM?.
Creating an entitlement file using a template
Create a specific customer’s entitlement file using the templates provided in this procedure, which include all of the available LRM sellable items.
To create the entitlement file:
- Select the template below according to the customer’s license type:
[+] Concurrent seat entitlement file template
<?xml version="1.0" encoding="iso-8859-1" ?>
 <entitlement_data_file issue_date="YYYY-MM-DD" valid_from="YYYY-MM-DD" valid_to="YYYY-MM-DD" id="1">
 <header>
  <customer_id>12435</customer_id>
  <customer_name>Customer Name</customer_name>
  <customer_site_id>site-##</customer_site_id>
  <customer_site_address>Customer Site Address</customer_site_address>
  <customer_site_type type="MS" />
 </header>
 <entitlement_data item="genesys_inbound_voice">
  <license_type>concurrent_seat</license_type>
  <order_number>12345</order_number>
  <item_number>10000</item_number>
  <item_description>Genesys Inbound Voice 8.0.0</item_description>
  <quantity_purchased>0000</quantity_purchased>
  <burst_limit>00</burst_limit>
 </entitlement_data>
 <entitlement_data item="sip_server">
  <license_type>concurrent_seat</license_type>
  <order_number>12345</order_number>
  <item_number>10001</item_number>
  <item_description>SIP Server 8.0.0</item_description>
  <quantity_purchased>0000</quantity_purchased>
  <burst_limit>00</burst_limit>
 </entitlement_data>
 <entitlement_data item="genesys_outbound_contact_ms">
  <license_type>concurrent_seat</license_type>
  <order_number>12345</order_number>
  <item_number>10002</item_number>
  <item_description>Genesys Outbound Contact - MS 8.0.0</item_description>
  <quantity_purchased>0000</quantity_purchased>
  <burst_limit>00</burst_limit>
 </entitlement_data>
 <entitlement_data item="genesys_email">
  <license_type>concurrent_seat</license_type>
  <order_number>12345</order_number>
  <item_number>10003</item_number>
  <item_description>Genesys E-Mail 8.0.0</item_description>
  <quantity_purchased>0000</quantity_purchased>
  <burst_limit>00</burst_limit>
 </entitlement_data>
 <entitlement_data item="genesys_web_media">
  <license_type>concurrent_seat</license_type>
  <order_number>12345</order_number>
  <item_number>10004</item_number>
  <item_description>Genesys Web Media 8.0.0</item_description>
  <quantity_purchased>0000</quantity_purchased>
  <burst_limit>00</burst_limit>
 </entitlement_data>
 <entitlement_data item="third_part_work_items">
  <license_type>concurrent_seat</license_type>
  <order_number>12345</order_number>
  <item_number>10005</item_number>
  <item_description>Third-Party Work Items 8.0.0</item_description>
  <quantity_purchased>0000</quantity_purchased>
  <burst_limit>00</burst_limit>
 </entitlement_data>
 <entitlement_data item="genesys_cim_platform_ss">
  <license_type>concurrent_seat</license_type>
  <order_number>12345</order_number>
  <item_number>10006</item_number>
  <item_description>Genesys CIM Platform - SS 8.0.0</item_description>
  <quantity_purchased>0000</quantity_purchased>
  <burst_limit>00</burst_limit>
 </entitlement_data>
 <entitlement_data item="genesys_cim_platform_ms">
  <license_type>concurrent_seat</license_type>
  <order_number>12345</order_number>
  <item_number>10007</item_number>
  <item_description>Genesys CIM Platform - MS 8.0.0</item_description>
  <quantity_purchased>0000</quantity_purchased>
  <burst_limit>00</burst_limit>
 </entitlement_data>
 <entitlement_data item="genesys_network_voice">
  <license_type>concurrent_seat</license_type>
  <order_number>12345</order_number>
  <item_number>10008</item_number>
  <item_description>Network Voice 8.0.0</item_description>
  <quantity_purchased>0000</quantity_purchased>
  <burst_limit>00</burst_limit>
 </entitlement_data>
 <entitlement_data item="genesys_workforce_management">
  <license_type>concurrent_seat</license_type>
  <order_number>12345</order_number>
  <item_number>10010</item_number>
  <item_description>WFM seat 8.0.0</item_description>
  <quantity_purchased>0000</quantity_purchased>
  <burst_limit>00</burst_limit>
 </entitlement_data>
 <entitlement_data item="genesys_agent_desktop">
  <license_type>concurrent_seat</license_type>
  <order_number>12345</order_number>
  <item_number>10012</item_number>
  <item_description>Genesys Agent Desktop 8.0.0</item_description>
  <quantity_purchased>0000</quantity_purchased>
  <burst_limit>00</burst_limit>
 </entitlement_data>
 <entitlement_data item="genesys_supervisor_desktop">
  <license_type>concurrent_seat</license_type>
  <order_number>12345</order_number>
  <item_number>10013</item_number>
  <item_description>Genesys Supervisor Desktop 8.0.0</item_description>
  <quantity_purchased>0000</quantity_purchased>
  <burst_limit>00</burst_limit>
 </entitlement_data>
 <entitlement_data item="genesys_interaction_workspace">
  <license_type>concurrent_seat</license_type>
  <order_number>12345</order_number>
  <item_number>10014</item_number>
  <item_description>Genesys Interaction Workspace 8.0.0</item_description>
  <quantity_purchased>0000</quantity_purchased>
  <burst_limit>00</burst_limit>
 </entitlement_data>
 <entitlement_data item="gvp_asr_ports">
  <license_type>concurrent_port</license_type>
  <order_number>12345</order_number>
  <item_number>10015</item_number>
  <item_description>Genesys Voice Platform ASR Ports 8.0.0</item_description>
  <quantity_purchased>0000</quantity_purchased>
  <burst_limit>00</burst_limit>
 </entitlement_data>
 <entitlement_data item="gvp_tts_ports">
  <license_type>concurrent_port</license_type>
  <order_number>12345</order_number>
  <item_number>10016</item_number>
  <item_description>Genesys Voice Platform TTS Ports 8.0.0</item_description>
  <quantity_purchased>0000</quantity_purchased>
  <burst_limit>00</burst_limit>
 </entitlement_data>
 <entitlement_data item="genesys_saas_email">
  <license_type>concurrent_seat</license_type>
  <order_number>12345</order_number>
  <item_number>10017</item_number>
  <item_description>Voicemail 8.0.0</item_description>
  <quantity_purchased>0000</quantity_purchased>
  <burst_limit>00</burst_limit>
 </entitlement_data>
 <entitlement_data item="gvp_ports">
  <license_type>concurrent_port</license_type>
  <order_number>12345</order_number>
  <item_number>10018</item_number>
  <item_description>GVP Ports 8.0.0</item_description>
  <quantity_purchased>0000</quantity_purchased>
  <burst_limit>00</burst_limit>
 </entitlement_data>
 <entitlement_data item="call_qualification_parking">
  <license_type>concurrent_port</license_type>
  <order_number>12345</order_number>
  <item_number>10019</item_number>
  <item_description>Call Qualification Parking 8.0.0</item_description>
  <quantity_purchased>0000</quantity_purchased>
  <burst_limit>00</burst_limit>
 </entitlement_data>
 <entitlement_data item="high_availability">
  <license_type>concurrent_seat</license_type>
  <order_number>12345</order_number>
  <item_number>10020</item_number>
  <item_description>High Availability 8.0.0</item_description>
  <quantity_purchased>0000</quantity_purchased>
  <burst_limit>00</burst_limit>
 </entitlement_data>
 <entitlement_data item="genesys_info_mart_server">
  <license_type>concurrent_seat</license_type>
  <order_number>12345</order_number>
  <item_number>10021</item_number>
  <item_description>Genesys Info Mart Server 8.0.0</item_description>
  <quantity_purchased>0000</quantity_purchased>
  <burst_limit>00</burst_limit>
 </entitlement_data>
 <entitlement_data item="genesys_interactive_insights">
  <license_type>concurrent_seat</license_type>
  <order_number>12345</order_number>
  <item_number>10022</item_number>
  <item_description>Genesys Interactive Insights 8.0.0</item_description>
  <quantity_purchased>0000</quantity_purchased>
  <burst_limit>00</burst_limit>
 </entitlement_data>
 <entitlement_data item="genesys_social_engagement">
  <license_type>concurrent_seat</license_type>
  <order_number>12345</order_number>
  <item_number>10023</item_number>
  <item_description>Genesys Social Engagement 8.0.0</item_description>
  <quantity_purchased>0000</quantity_purchased>
  <burst_limit>00</burst_limit>
 </entitlement_data>
 <entitlement_data item="ivr_connector">
  <license_type>enabled_seat</license_type>
  <order_number>12345</order_number>
  <item_number>10024</item_number>
  <item_description>IVR Connector 8.0.0</item_description>
  <quantity_purchased>0000</quantity_purchased>
  <burst_limit>00</burst_limit>
 </entitlement_data>
 <entitlement_data item="agent_connector">
  <license_type>concurrent_seat</license_type>
  <order_number>12345</order_number>
  <item_number>10025</item_number>
  <item_description>Agent Connector 8.0.0</item_description>
  <quantity_purchased>0000</quantity_purchased>
  <burst_limit>00</burst_limit>
 </entitlement_data>
 <entitlement_data item="genesys_qm_call_recording">
  <license_type>concurrent_seat</license_type>
  <order_number>12345</order_number>
  <item_number>10026</item_number>
  <item_description>QM Call Recording 8.0.0</item_description>
  <quantity_purchased>0000</quantity_purchased>
  <burst_limit>00</burst_limit>
 </entitlement_data>
</entitlement_data_file>
- Copy and paste the entire entitlement file template into an xml editor.
- For the general and customer information, fill in the items following the format shown as highlighted in the samples below.
- For customer_site_type, enter either SS or MS (single-site or multi-site, by means of the CIM Platform sellable).
- For id, create a new unique id by incrementing the value id by one for each new entitlement file. For example, set the value of id to 2 for the second version of the entitlement file.
[+] General and customer information sample code
 <entitlement_data_file issue_date="YYYY-MM-DD"  valid_from="YYYY-MM-DD" valid_to="YYYY-MM-DD" id="1">
 <header>
  <customer_id>12435 </customer_id>
  <customer_name>Customer Name</customer_name>
  <customer_site_id>site-## </customer_site_id>
  <customer_site_address>Customer Site Address </customer_site_address>
  <customer_site_type type="MS" />
 </header>
- For each product the customer has purchased, fill in the quantity purchased as highlighted in the sample below for each sellable item (each sellable item section starts with <entitlement_data item= and ends with </entitlement_data> from the customer’s order information). The remaining fields do not need to be changed in the sellable item section.
[+] Concurrent seat sample code
 <entitlement_data item="genesys_inbound_voice">
  <license_type>concurrent_seat </license_type>
  <order_number>12345 </order_number>
  <item_number>10000 </item_number>
  <item_description>Genesys Inbound Voice 8.0.0 </item_description>
  <quantity_purchased>0000 </quantity_purchased>
  <burst_limit>00 </burst_limit>
 </entitlement_data>
- Delete all sellable item sections that the customer does not use or has not purchased.
- Save the file as type .xml. This should be the complete entitlement file.
- To upload the Entitlement file to the Configuration Server using the GAX interface, select Configuration > Entitlements.
Once the file is uploaded, LRM creates a transaction object on the Configuration Server under Environment > Transactions > lrm-entitlement-<random id>, where the random id is an autogenerated string (for example, 19a048ecb6fde21746d6ee25643059621).
Example of an entitlement file
[+] Example of an entitlement file
<?xml version="1.0" encoding="UTF-8"?>
 <entitlement_data_file id="1" valid_to="2013-12-31" valid_from="2013-10-01"  issue_date="2013-10-01">
 <header>
  <customer_id>12435</customer_id>
  <customer_name>Technology Group LLC</customer_name>
  <customer_site_id>site-01</customer_site_id>
  <customer_site_address>999 Serra Blvd, Daly City, CA 94014</customer_site_address>
  <customer_site_type type="MS"/>
 </header>
 <entitlement_data item="sip_server">
  <license_type>concurrent_seat</license_type>
  <order_number>12345</order_number>
  <item_number>3GP08834ACAA</item_number>
  <item_description>v8.1 - SIP Server</item_description>
  <quantity_purchased>985</quantity_purchased>
  <burst_limit>985</burst_limit>
 </entitlement_data>
 <entitlement_data item="genesys_outbound_contact_ms">
  <license_type>concurrent_seat</license_type>
  <order_number>12345</order_number>
  <item_number>3GP08807ACAA</item_number>
  <item_description>v8.1 - Genesys Outbound Preview</item_description>
  <quantity_purchased>700</quantity_purchased>
  <burst_limit>700</burst_limit>
 </entitlement_data>
 <entitlement_data item="genesys_email">
  <license_type>concurrent_seat</license_type>
  <order_number>12345</order_number>
  <item_number>3GP08892ACAA</item_number>
  <item_description>v8.1 - Genesys E-mail</item_description>
  <quantity_purchased>1000</quantity_purchased>
  <burst_limit>1000</burst_limit>
 </entitlement_data>
 <entitlement_data item="genesys_web_media">
  <license_type>concurrent_seat</license_type>
  <order_number>12345</order_number>
  <item_number>3GP08891ACAA</item_number>
  <item_description>v8.1 - Genesys Chat</item_description>
  <quantity_purchased>310</quantity_purchased>
  <burst_limit>310</burst_limit>
 </entitlement_data>
 <entitlement_data item="genesys_cim_platform_ms">
  <license_type>concurrent_seat</license_type>
  <order_number>12345</order_number>
  <item_number>3GP08803ACAA</item_number>
  <item_description>v8.1 - Genesys CIM Platform - MS</item_description>
  <quantity_purchased>985</quantity_purchased>
  <burst_limit>985</burst_limit>
 </entitlement_data>
 <entitlement_data item="genesys_workforce_management">
  <license_type>concurrent_seat</license_type>
  <order_number>12345</order_number>
  <item_number>3GP08781ACAA</item_number>
  <item_description>v8.1 - Genesys Workforce Management</item_description>
  <quantity_purchased>985</quantity_purchased>
  <burst_limit>985</burst_limit>
 </entitlement_data>
 <entitlement_data item="genesys_interaction_workspace">
  <license_type>concurrent_seat</license_type>
  <order_number>12345</order_number>
  <item_number>3GP08730ACAA</item_number>
  <item_description>v8.1 - Interaction Workspace</item_description>
  <quantity_purchased>985</quantity_purchased>
  <burst_limit>985</burst_limit>
 </entitlement_data>
 <entitlement_data item="gvp_ports">
  <license_type>concurrent_port</license_type>
  <order_number>12345</order_number>
  <item_number>3GP08375ACAA</item_number>
  <item_description>v8.1 - Genesys Voice Platform</item_description>
  <quantity_purchased>200</quantity_purchased>
  <burst_limit>200</burst_limit>
 </entitlement_data>
 <entitlement_data item="call_qualification_parking">
  <license_type>concurrent_port</license_type>
  <order_number>12345</order_number>
  <item_number>3GP08769ACAA</item_number>
  <item_description>v8.1 - Call Qualification Parking</item_description>
  <quantity_purchased>985</quantity_purchased>
  <burst_limit>985</burst_limit>
 </entitlement_data>
 <entitlement_data item="high_availability">
  <license_type>concurrent_seat</license_type>
  <order_number>12345</order_number>
  <item_number>3GP08812ACAA</item_number>
  <item_description>v8.1 - HA - CIM Platform</item_description>
  <quantity_purchased>985</quantity_purchased>
  <burst_limit>985</burst_limit>
 </entitlement_data>
 <entitlement_data item="genesys_info_mart_server">
  <license_type>concurrent_seat</license_type>
  <order_number>12345</order_number>
  <item_number>3GP08843ACAA</item_number>
  <item_description>v8.1 - Genesys Info Mart</item_description>
  <quantity_purchased>985</quantity_purchased>
  <burst_limit>985</burst_limit>
 </entitlement_data>
 <entitlement_data item="genesys_interactive_insights">
  <license_type>concurrent_seat</license_type>
  <order_number>12345</order_number>
  <item_number>3GP08845ACAA</item_number>
  <item_description>v8.1 - Genesys Interactive Insights</item_description>
  <quantity_purchased>985</quantity_purchased>
  <burst_limit>985</burst_limit>
 </entitlement_data>
 <entitlement_data item="genesys_social_engagement">
  <license_type>concurrent_seat</license_type>
  <order_number>12345</order_number>
  <item_number>3GP08896ACAA</item_number>
  <item_description>v8.1 - Genesys Social Engagement - Seat</item_description>
  <quantity_purchased>1</quantity_purchased>
  <burst_limit>1</burst_limit>
 </entitlement_data>
 <entitlement_data item="genesys_saas_email">
  <license_type>concurrent_seat</license_type>
  <order_number>12345</order_number>
  <item_number>3GP09067ACAA</item_number>
  <item_description>v8.1 - Genesys SIP Voicemail</item_description>
  <quantity_purchased>12800</quantity_purchased>
  <burst_limit>12800</burst_limit></entitlement_data>
</entitlement_data_file>
|-|
Set the timezone to GMT=
You must configure LRM server and GVP Reporting Server to use the GMT timezone, because LRM uses the GMT time zone to keep track of the days in the system.
|-|
Schedule the statistics gathering job=
Schedule the nightly statistics gathering job to run at the time each day when
there is a low volume of interactions in the contact center (for example, at night).
Set the schedule option in the [lrm] section to an appropriate value for your contact center. The default value is 01:00 (1am GMT).
|-|
Plan data backup=
It is important to regularly backup the data in your License Reporting Manager database to prevent data loss. Backup of the LRM database is the responsibility of the Database Administrator. The following LRM tables can be backed up using the tools in your particular RDBMS:
LRM_CONCURRENT_SEAT
LRM_ENABLED_SEAT
LRM_CONCURRENT_GROUP_USAGE
LRM_ENABLED_GROUP_DETAILS
LRM_ENABLED_GROUP_SUMMARY
LRM_JOURNAL
|-|
Configure LRM High Availability (Optional)=
You can set up LRM as a pair of primary-backup applications. Both applications must be installed, configured, and started. If both of these applications are up and running, the Solution Control Server determines which of the applications act as the Primary, while the other acts as the backup.
To configure the system, the system administrator must:
- Install and configure two separate instances of LRM.
- Select the Server Info tab in the Application object for the primary LRM application.
- Click the open folder icon next to the Backup Server field to choose the LRM application which is to serve as the backup.
|-|
Enable Secure Connection Features (Optional)=
You can secure connections from LRM to Configuration Server. All of the security features are optional.
- Enable Transport Layer Security (TLS) protocol.
- UNIX only: Install the Genesys Security Pack on the LRM server host, and set the applicable environment variable to specify the path to the Security Pack libraries. See "Security Pack Installation" in the
Genesys 8.1 Security Deployment Guide.
- Create and install certificates on the LRM server host and Configuration Server host. See "Certificate Generation and Installation" in the
Genesys 8.1 Security Deployment Guide.
- If required, change the configurations of the Configuration Server applications:
- Add a new port for secure connections. On the Configuration Server Application object, select the Auto Detect mode.
- Use a host certificate.
See "Genesys TLS Configuration" in the
Genesys 8.1 Security Deployment Guide.
- On the LRM Application object, add connections to Configuration Server. When you add the connection(s), you must use the port that you created in the previous step.
- Enable client-side port definition.
- When you install LRM, select the connection parameters that LRM will use for the initial connection to Configuration Server. See "Client-Side Port Definition" in the
Genesys 8.1 Security Deployment Guide.
- In the LRM Application object, add or modify the connection to Configuration Server, to specify the connection parameters (port number and, optionally, IP address) that LRM uses to reconnect to Configuration Server after a switchover or disconnection. Configure the parameters in the Transport Protocol Parameters text box on the Advanced tab of the connection properties. See "Client-Side Port Definition" in the
Genesys 8.1 Security Deployment Guide.
- Enable the SSL protocol on the JDBC connections between LRM and its source and target databases. When you configure the extraction DAP(s) and the LRM DAP, use the jdbc-url option to specify the URL information as required by your RDBMS to implement JDBC over SSL.
|-|
Configure ICON and Interaction Workspace options=
In order for LRM to calculate statistics it is important that certain Interaction Concentrator and Interaction Workspace options be set correctly.
callconcentrator Section
- [role]—This option specifies the type of data that the Interaction Concentrator instance processes and stores in the Interaction Concentrator database.
For Interaction Concentrator release 8.1 and later, the ICON instance can be configured to store your LRM-specific data. You must set the role option to lrm. Do not combine the lrm role with any other in the same instance of ICON.
See the Interaction Concentrator 8.1 Deployment Guide for more information about using ICON for License Reporting Data.
- [use-dss-monitor]—This option must be used with LRM for the usage data gap processing. Set this option to 1 to populate the G_DSS_GLS_PROVIDER and G_DSS_GOS_PROVIDER tables with Interaction Concentrator release 8.0.000.25 or later.
See the Interaction Concentrator 8.1 Deployment Guide for more information on the use-dss-monitor option.
- [dss-no-data-tout]— This option must be used with LRM for the usage data gap processing. Set this option to the preferred value. This option enables you to set the time interval after which Interaction Concentrator provides the NoData indication in the G_DSS_GLS_PROVIDER and G_DSS_GOS_PROVIDER tables. The NoData indication enables you to distinguish cases in which there was no data from those in which a connection problem prevented the data from being properly recorded.
See the Interaction Concentrator 8.1 Deployment Guide for the default and valid values for the dss-no-data-tout option.
filter-data Section
Make sure that the gls data options are set to their default values (equal to 0).
- [gls-all]
- [gls-ivr]
- [gls-no-person]
- [gls-queue]
See the Interaction Concentrator 8.1 Deployment Guide for the full description of the filter-data options.
interaction-workspace Section
- [license.lrm-enabled]—This option must be added and set to true to enable Interaction Workspace to support LRM. This feature might not work if Interaction Workspace is customized. Changes take effect after you restart Interaction Workspace.
|-|
Install ICON=
Install ICON and create a database for ICON if necessary. See the ICON Deployment Guide on the Interaction Concentrator page
Important
You can reuse ICON from other parts of your deployment.
|-|
Add a DAP object for ICON=
To configure the LRM solution properly, you must define Database Access Point (DAP)objects that describe the databases to which LRM has access. Create a DAP object for each ICON to which you connect, and you cannot reuse the corresponding DAP object already in use by ICON, because LRM uses the JDBC options to configure the connection to the databases. The LRM application extracts data from these ICON databases used to prepare the reporting data.
- Configure the DAP object on the General tab as a JDBC connection with the correct database server credentials for the DAP object.
- Set the role configuration option in the [lrm] section to icon.
Important
Exactly one of your DAPs must have the
role value set to
main for the LRM DAP. At least one of your DAPs must have the
role value set to
icon.
|-|
Create a cron job to clean up old ICON data=
Create a cron job to clean up old ICON data by using the DB purge script. See the ICON User's Guide on the Interaction Concentrator page for details.
|-|
Configure GVP Reporting Server for LRM=
Important
- Historical reporting must be enabled on the GVP Reporting Server for LRM and GVP to work together. To enable historical reporting on GVP Reporting Server, do not run GVP Reporting Server in nodb mode; that is, set the [persistence] rs.nodb.enabled option to false (the default value).
- GVP Reporting Server must be running for LRM to collect data.
- Select the Connections tab. Right-click and select New. In the Server field, enter the name of the GVP Reporting Server. LRM uses the preliminary GVP data and might have an instance of GVP Reporting Server on the Connections tab. The LRM application must connect to the configured GVP Reporting Server that transfers GVP data to the LRM database. If your GVP Reporting Server is set up as an HA pair, add only the primary instance and not the backup GVP Reporting Server.
|-|
Start LRM=
When the installation of License Reporting Manager (LRM) is verified, and the LRM databases have been initialized, you can start LRM by using Genesys Administrator.
- Select Operations > Applications > <LRM Application>.
- Right click on the LRM application name and select Start applications.
|-|
</multistep>

