Configuring WFM Task Sequence
This topic presents information about how to configure task sequences. It supplements the information found in
Workforce Management 8.1 Configuration Utility Help and includes the following sections:
Definitions
Within Genesys Workforce Management, a task sequence is a defined period of time during that agents can work only on one task or a specified set of tasks, called an activity set. You could also think of a task sequence as an activity sequence.
Activities
Activities (tasks) are work that is tracked and managed using Workforce Management. For example, a business might define the following activities in WFM Configuration Utility for product A:
- Answering inbound calls
- Responding to e-mail
- Completing after-call work
- Performing scheduled callbacks
- Participating in chat sessions
These same activities might also be defined for products B and C.
Back to Top
Purpose of Task Sequencing
Task sequences enable you to control how much the nature of an agent’s work changes during part of a day. You can avoid asking agents to jump constantly from activity to activity—a situation that can result in agent confusion and fatigue and lower productivity. You do this by configuring task sequences. Once configured, you can assign a task sequence to any compatible shift in the same site.
Creating Task Sequences
You create task sequences in the WFM Configuration Utility, Shifts window, Task Sequence dialog box. The Task Sequence dialog box is also where you will use the information given in this appendix. To provide context for the examples presented later on, see a quick overview of task sequence configuration in Creating a Task Sequence.
How Task Sequences Appear in WFM
After you configure task sequences and assign them to shifts (which are then assigned to agents), task sequences appear in the Intra-Day and Agent-Extended views. Task sequences appear as yellow areas on the color-coded bar (unless you changed the color in the Configuration module in WFM Web Supervisor), where each type of schedule item is represented by a different color. For an example, see the figure below.

Figure: End-Anchored Task in Schedule
In the above example, the task (in yellow) is anchored to the end of the shift, but the Task Sequence (Add) dialog, Type drop-down menu displays various anchoring choices:
- Not Anchored
- Start Anchored
- End Anchored
- Start/End Anchored
The anchoring type selected indicates when a task can happen during the day.
Back to Top
Anchoring Task Sequences
This section describes when to use the various anchoring types available from the Type drop-down menu in Task Sequence (Add) Dialog (see Procedure: Creating a Task Sequence). Assume that the shift and meals are flexible. See examples.. [+]
Task A Ends the Day
Task Sequence (Add) dialog in the configuration: Only Task A is configured. Task Type is End Anchored (see the figure below).

Figure: End-Anchored Task
Task A Starts the Day
Task Sequence (Add) dialog configuration: Only Task A is configured. Task Type is Start Anchored (see the figure below).

Figure: Start Anchored Task
Task A Can Happen Anytime During the Day
Task Sequence (Add) dialog configuration: Only Task A is configured. Task Type is Not Anchored (see the figure below).

Figure: Not Anchored Task
Back to Top
Task A and Task B Can Happen Anytime During the Shift
In this diagram, A is followed by B, but the order does not matter. Task Sequence (Add) dialog configuration: Two task sequences must be configured:
- Task A (Not Anchored) followed by Task B (Not Anchored)
- Task B (Not Anchored) followed by Task A (Not Anchored)
See the figure below.

Figure: Not Anchored Task (A&B)
Task A Starts the Day; Task B Can Happen Anytime During the Day
Task Sequence (Add) dialog configuration: Task sequence contains Task A Start Anchored. Task B is the second task in the sequence. Task B is Not Anchored (see the figure below).

Figure: Start Anchored and Not Anchored Tasks
Task A Starts the Day; Task B Ends the Day
Task Sequence (Add) dialog configuration: Task A is Start Anchored. The next task is Task B, which is End Anchored (see the figure below).

Figure: Start and End Anchored Tasks
Back to Top
Task A and B Can Start Anytime During the Day and Are Consecutive
Task Sequence (Add) dialog configuration: Task A is End Anchored. The next task is Task B which is Start Anchored (see the figure below).

Figure: End Anchored and Start Anchored
Task A and B Start the Day and Are Consecutive
Task Sequence (Add) dialog configuration: Task A is Start/End Anchored.
The next task is B, which is Start Anchored (see the figure below).

Figure: Start/End Anchored and Start Anchored
Task A and B Finish the Day and Are Consecutive
Task Sequence (Add) dialog configuration: Task A is End Anchored. The next task is Task B which is Start/End Anchored (see the figure below).

Figure: End Anchored and Start/End Anchored
Task A is Full-Morning (or Full-Afternoon)
Task Sequence (Add) dialog Full morning configuration: Task A is Start Anchored. Minimum and maximum task duration must be set to fill the entire shift duration before the meal. The Activity Set used for task can be strict to prevent the task and meal from overlapping.
Full afternoon configuration: Task A is End Anchored. Minimum and maximum task duration must be set to fill the entire shift duration after the meal. The Activity Set used for task can be strict in order to prevent the task and meal from overlapping (see the figure below).

Figure: Start Anchored and End Anchored (A)
Back to Top
All Work Must Belong to Tasks
A is full morning. B is full afternoon. The order of the tasks does not matter. Task Sequence (Add) dialog box configuration: Task A is Start/End Anchored. Task B is Start/End Anchored (see the figure below).

Figure: Start/End Anchored, Start/End Anchored
Minimum and maximum durations of tasks must be set to fill the entire shift duration. In this case it is highly recommended to use non-strict Activity Sets. Without these settings the meal cannot be scheduled
All Work Must Belong to Tasks—Order Does Not Matter
The order does not matter, but A, B, C and D must be scheduled once. Possibly, A=C and / or B=D and but you want to insure a succession of tasks. Task Sequence (Add) dialog configuration: All tasks are set to be
Start/End Anchored. The order of tasks is ABCD (see the figure below).

Figure: All Start/End Anchored
Either all Activity Sets used by tasks should be non-strict (to allow for the meal) or at least the tasks around the potential meal time must be non-strict.
Task A Starts the Shift. B is Free of Constraints—C and D Are Consecutive
Sequence (Add) dialog configuration: Task A is Start Anchored. Task B is Not Anchored. Task C is End Anchored. Task D is Start Anchored. Placement of the meal after Task B can not be guaranteed in this case (see the figure below).

Figure: Start Anchored, Not Anchored, End Anchored, Start Anchored
Back to Top
Procedure: Creating a Task Sequence
Purpose: To open the dialog box for creating a task sequence.
Start of Procedure
- In Configuration Utility , on the Modules pane, click Shifts.
- In the Objects pane, select a shift.
- Click the Task Sequences tab.
- To create a new task sequence, click Add.
The Task Sequence (Add) dialog opens (see the figure 5 below).
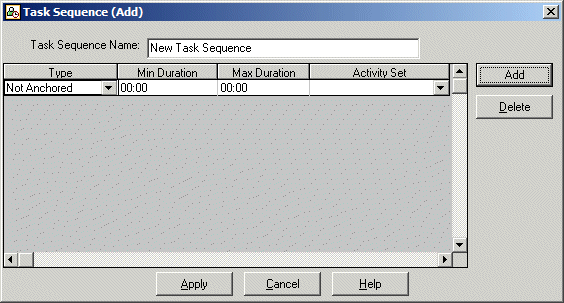
Figure: Task Sequence (Add) Dialog
- Enter a task sequence name to replace the default name.
The name must be unique within the site.
- Create a new row in the task sequence list; Click Add.
- Ffrom the Type drop-down list, select an anchor type.
Read the section How Task Sequences Appear in WFM and review the examples in Anchoring Task Sequences to understand the various anchoring types.
- Configure the task sequence, as described in
Workforce Management 8.1 Configuration Utility Help.
The figure 6 below shows an example of the dialog after a single task has been configured.
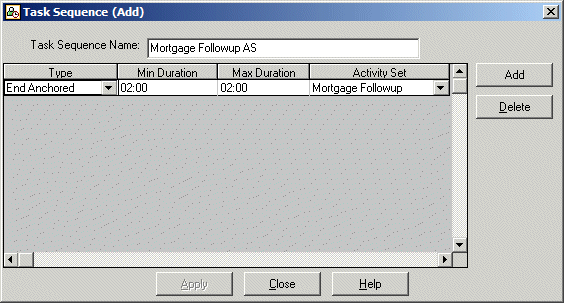
Figure: Example Task Sequence
Tip
While the above example shows only one task, you can add as many rows as you need to create a sequence of tasks.
- After completing the configuration of your task sequence, click Apply.
You can now assign a task sequence to any compatible shift in the same site.
End of Procedure
Back to Top


