
Contents
Chat Widget JS API
Deprecation notice
Starting with the 8.5.000.38 release of Genesys Web Engagement, Genesys is deprecating the Native Chat and Callback Widgets—and the associated APIs (the Common Component Library)—in preparation for discontinuing them in the Genesys Engagement Manager 9.0 release.
This functionality is now available through a single set of consumer-facing digital channel APIs that are part of Genesys Mobile Services (GMS), and through Genesys Widgets, a set of productized widgets that are optimized for use with desktop and mobile web clients, and which are based on the GMS APIs.
Genesys Widgets provide for an easy integration with Web Engagement (which will become Genesys Engagement Manager in the 9.0 release), allowing you to proactively serve these widgets to your web-based customers.
ImportantAlthough the deprecated APIs and widgets will be supported for the life of the 8.5 release of Web Engagement, Genesys recommends that you move as soon as you can to the new APIs and to Genesys Widgets to ensure that your functionality is not affected when you migrate to the 9.0 release.- Note that this support for the Native Chat and Callback Widgets and the associated APIs will not include the addition of new features and that bug fixes will be limited to those that affect critical functionality.
- As mentioned above, all support for the deprecated widgets and APIs will be dropped as of the 9.0 release of Genesys Engagement Manager.
How the API is Structured
The Chat Widget JS API is made up of the three main methods:
- startChat—Use this method as the entry point for starting a chat session.
- restoreChat—Use this method to restore the chat widget after page reload when working in "embedded" mode (the chat window is rendered on a website's page, not in a separate brower window)
- startChatInThisWindow—Use this method for chat sessions appearing in a separate dedicated HTML page. For cases where chat is started in "popup" mode (chat is rendered in a separate browser window).
Additional methods are also available since chat version 850.6.0, see Additional Methods.
Browser Support and Cookies
Browser Support
Chat widget fully supports IE8+, Firefox, Safari and Chrome desktop browsers. On mobile, Safari on iOS 7 and Google Chrome on latest Android are officially supported, though chat may properly function in other browsers / OSes. Notes on IE7 support:
- Chat widget depends on JSON parsing functionality. To enable it in IE7, you have to use a third-party library (for example, json2.js by JSON creator Douglas Crockford). Note that this kind of library might be already included if you use chat as part of another product (like Web Engagement).
- Built-in UI uses data:uri technology for images, which is not supported by IE7. This is why the minimize and close buttons and the Genesys logo are not visible in this browser. You have to customize the CSS if you need chat support in IE7.
Note on cookies
The Chat Widget uses a few cookies that allow it to function properly across multiple pages / browser windows. Also, to function properly across different subdomains, chat widget writes cookies to the "root" domain of your site. For example, if your site's domain is www.example.com.au, the cookies are written to the .example.com.au domain, which makes them available to all other subdomains of your site.
Getting Access to Chat Session API
Getting access to the Chat Session API in embedded mode
If you want to ensure consistent access to theChat Session API in "embedded" mode, you need to accommodate two done callbacks: one for startChat and restoreChat.
For example,
function handleChatSession(session) {
    // Use session API here to send messages, subscribe to events etc.
}

chat.restoreChat(options).done(handleSession)
    .fail(function() {
        chat.startChat(options).done(handleSession);
    });
// Example is artificial in that it starts new chat unconditionally, if it has not been started yet.
// See documentation below for more elaborate examples of working with chat start/restoration.
Getting access to the Chat Session API in popup mode
To get access to the Chat Session API in "popup" mode, you have to accommodate the done callback for the startChatInThisWindow method in the separate HTML page for the widget.
For example,
| myChatWidget.html |
|---|
<!DOCTYPE html>
<html lang="en">
<head>
  <meta charset="utf-8">
  <meta http-equiv="X-UA-Compatible" content="IE=edge">
  <meta name="viewport" content="width=device-width, initial-scale=1">
  <title>Genesys Chat</title>
</head>
<body>
<script src="js/chatWidget.js"></script>
<script>
  chat.startChatInThisWindow().done(function(session) {
    // Use session API here
  });
</script>
</body>
</html> |
...and then pass the URL of this HTML page to the startChat method on your website's page:
chat.startChat({
    embedded: false,
    widgetUrl: 'http://example.com/myChatWidget.html',
    // ...
});
Customizing the User Interface
There are different options for customizing the chat widget UI — from style modifications via CSS to complete disabling, with JavaScript-based customization in between.
Template-based Customization
You can use a template-based customization approach, which boils down to editing plain HTML, if any of the following are true:
- You want to modify the structure of the widget.
- You want to add content or CSS classes to the widget.
- You do not want to use JavaScript to work with the DOM.
The basic algorithm for template-based customization is to do the following:
- Get the HTML with default templates. You can get the default templates from:
- Web Engagement Server 8.5 at http(s)://<WE_HOST>[:<WE_PORT>]/server/resources/chatTemplates.html.
- Web Engagement Frontend Server 8.1.3 at http(s)://<FRONTEND_HOST>[:<FRONTEND_PORT>]/frontend/resources/chatTemplates.html.
- Co-browse server at http(s)://<COBROWSE_HOST>[:<COBROWSE_PORT>]/cobrowse/chatTemplates.html
- Modify the templates.
TipAll localization data is available inside your templates as a data.nls object.ImportantTo keep all functionality intact, Genesys recommends you do not remove elements or CSS classes when editing the chat templates.
- Insert the modified template(s) into your page's HTML code somewhere between the <body> and </body> tags.
- Another option is to host the modified HTML templates somewhere accessible using HTTP. If you choose to download templates over the network, configure chat to use downloaded templates by passing the URL of your HTML file to the templates option of your chat configuration.
ImportantIf you use both in-page templates and downloaded templates, the downloaded templates take priority.TipYou can use the Web Engagement Server or Co-browse server to host static resources. This is especially useful for resources like chat templates because the server is configured with JSONP support. For details, see Hosting Static Resources - JSONP or Co-browse—Serving JSONP.
Example HTML page:
<!DOCTYPE html>
<html lang="en">
<head>
  <title>My Page</title>
  [GENESYS INSTRUMENTATION]
</head>
<body>
<h1>This is my page.</h1>
<p>It has some content.</p>

<script type="text/html" data-gwc-template="embeddedWindow">
  [MODIFIED TEMPLATE CONTENT]
</script>
<script type="text/html" data-gwc-template="chatMessage">
  [MODIFIED TEMPLATE CONTENT]
</script>
</body>
Starting with chat versions 850.6.0, chat automatically recognizes and uses the template from the data-gwc-template attribute. If using an earlier version, see the next step.
Chat Widget Template System
The chat widget temlplates are included in the chatTemplates.html file. This file is not a static HTML file, but a collection of small client-side templates wrapped in <script>tags. To learn more about this templating technique, see http://en.wikipedia.org/wiki/JavaScript_templating. The chat widget template system is based on the popular lodash/underscore templates: http://lodash.com/docs#template, http://underscorejs.org/#template.
The chat widget template uses 5 HTML-based templates:
- chatRegistration for the built-in registration form
- chatTyping for the "Agent is typing" message
- chatMessage for all other messages in a chat
- chatView for the basic structure of the chat widget
- embeddedWindow for the "chat window" wrapper in "embedded" mode
These templates are included in the chatTemplates.html file, which has the following structure:
<!-- embeddedWindow.html -->
<script type="text/html" data-gwc-template="embeddedWindow">
    ...
</script>

<!-- chatRegistration.html -->
<script type="text/html" data-gwc-template="chatRegistration">
    ...
</script>

<!-- chatView.html -->
<script type="text/html" data-gwc-template="chatView">
    ...
</script>

<!-- chatMessage.html -->
<script type="text/html" data-gwc-template="chatMessage">
    ...
</script>

<!-- chatTyping.html -->
<script type="text/html" data-gwc-template="chatTyping">
    ...
</script>Customization Examples
CSS-based Customization
The chat widget JavaScript contains all of the CSS needed to render chat, which is automatically added to the <head> section of the web page when chat is initialized.
You can override any of the default styles by adding a <link> or <style> tag with CSS rules for the chat widget (since the default CSS is added to the beginning of <head>, your custom styles will always take higher priority).
Customization Examples
JS-based Customization
In case you want to modify more than just the style (look and feel) of the chat, but also the logic of the widget, you can use "hooks" for customizing the built-in UI. See the ui option for details.
Most of the time, you can make additions or modifications to the chat widget layout using the template-based customization. You might choose JavaScript-based customization over template-based if:
- The customization is small enough so that the DOM-related work can be easily done with JavaScript (provided you are experienced with JavaScript).
- The customization impacts not only the layout, but also the logic (for example, if you need additional event handlers).
Complete override
It is possible to disable the built-in UI and implement your own based on the session API:
startChat({
  //...
  ui: false,
}).done(function(session, options) {
  // Implement your own UI using session API
});Customization Examples
- Using the ui.onBeforeMessage Hook to Add Desktop Modifications
- Using the ui.onBeforeMessage Hook for Agent-initiated Co-browse
- Displaying a confirmation alert when users close the chat widget
- Implementing a client-side chat session timer
- Inserting a line break with Shift+Enter
- Automatically opening a URL pushed by an agent
- Showing the number of unread messages in a minimized chat widget
- Showing an agent typing notification in the minimized chat widget
- Displaying a character counter in the message area
- Replace Skip Registration button with Exit button
- Automatically expand text area based on user input
Localization
The Chat Session API (startChat and restoreChat methods particularly) includes an optional localization parameter that accepts one of the following:
- JavaScript object with localization data
- Function that returns an object with localization data
- Function that accepts a callback and calls that callback with an object containing localization data
- URL of and external JSON file with the localization data
Localization data is fetched or passed before chat initialization and merged with the default localization.
For more details on providing localization, note the configuration difference below and see Localizing the Master Co-browse and Chat Widget UIs.
For example, instead of using
_genesys = {
    chat: {
        localization: <...>
    }
}
you will pass the localization option directly to a method call:
chat.startChat({
  localization: <...>
});
In "embedded" mode, the localization data is always fetched using JSONP. This lets you host the data on another domain, separate from the site itself. You can use Web Engagement and Co-browse servers to host the content for you, as they both support JSONP out-of-the-box. See GWE Architecture—Hosting Static Resources and Co-browse—Serving JSONP.
// This will work: widget and l18n are on same domain: example.com
chat.startChat({
  widgetUrl: 'http://example.com/chatWidget.html',
  localization: 'http://example.com/chatLocalization.json',
  embedded: false
});

// This won't work: they are on different domains
chat.startChat({
  widgetUrl: 'http://example.com/chatWidget.html',
  localization: 'http://another-domain.com/chatLocalization.json',
  embedded: false
});

// This will work: files are on different domains, but chat is started in embedded mode,
// so JSONP is used (here we use Genesys Web Engagement server for JSONP)
chat.startChat({
  widgetUrl: 'http://example.com/chatWidget.html',
  localization: 'http://<GWE_SERVER>/server/resources/chatLocalization.json',
  embedded: true
});
The passed localization object or external JSON file may contain any of the fields listed below. Fields that are not present will be taken from built-in default localization.
| Built-in localization |
|---|
{
  "chatTitle": "Genesys Chat",
  "chatWelcome": "Hello! Next available customer representative will be with you shortly.",
  "defaultUsername": "User",
  "defaultAgentName": "Representative",
  "ownUsername": "You",
  "chatEnded": "Chat session ended",
  "agentJoined": "Representative {name} has joined the session",
  "agentLeft": "Representative {name} has left the session",
  "agentTyping": "{agentName} is typing...",
  "serverStopped": "Connection to chat has been interrupted. Trying to restore...",
  "serverUnreachable": "Chat is unavailable now. Please try again later.",
  "networkInterrupted": "Connection to chat has been interrupted. Trying to restore...",
  "networkRestored": "Connection restored.",
  "unknownServerError": "Chat is unavailable now. Please try again later.",
  "chatSessionExpired": "Chat session has expired.",
  "regFirstName": "First Name:",
  "regLastName": "Last Name:",
  "regEmail": "Email:",
  "regSubmit": "Start Chat",
  "regSkip": "Skip Registration",
  "regWelcomePart1": "Please enter few details about you, and press Start Chat button.",
  "regWelcomePart2": "Next available customer representative will be with you shortly.",
  "regErrorRequiredField": "\"{field}\" is a required field",
  "regErrorInvalidEmail": "Please enter a valid email address",
  "leaveSessionPrompt": "You are going to leave chat session."
} |
Procedure: Step-by-step instruction for using an external localization file
Steps
- Create a localization file with all / some of the fields overriden.
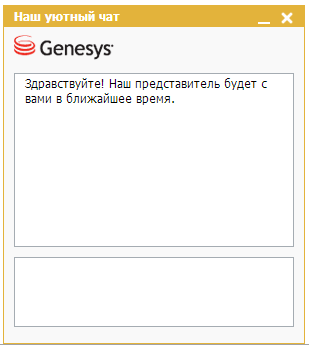
For example suppose you want to have chat title and welcome message in Russian:Copy and paste the code above (or craft your own) and save it as .json file.{ "chatTitle": "Наш уютный чат", "chatWelcome": "Здравствуйте! Наш представитель будет с вами в ближайшее время." } - We recommend that you check to make sure that the syntax of the JSON file is correct. You can do this online, using this service: http://jsonlint.com/
- Host the file on any server. If you want to support localization for chat in "embedded" mode, you have to configure
JSONP support on the server.
ImportantGenesys Web Engagement and Co-browser servers both support serving JSONP. See GWE Architecture—Hosting Static Resources and Co-browse—Serving JSONP.
- Use the URL for this file as the value of the localization option in startChat.
chat.startChat({ localization: 'http://my-server.com/my-chat-localization.json', // other parameters })ImportantThe exact method for passing parameters to the chat session might be different if you use chat as part of another product, like Co-Browse or Web Engagement. For more information, see the documentation for those products. - After starting the chat, you should see something like this (sample is in "embedded" mode):
- Troubleshooting
If localization fails to load or parse, the chat will not start, signaling that something went wrong. To see what went wrong you will have to:- Enable "debug" mode:
chat.startChat({ localization: 'http://my-server.com/my-chat-localization.json', debug: true, // other parameters }); - Enable browser developer tools (for example, in Chrome and most of other browser you can press F12 to launch).
- You should see something like this:
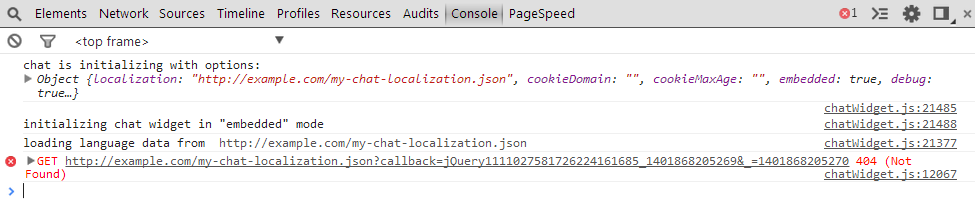
Here you can see that localization was not found on the server (response 404).
And here is another example of what you can see if JSON is either invalid or improperly configured:
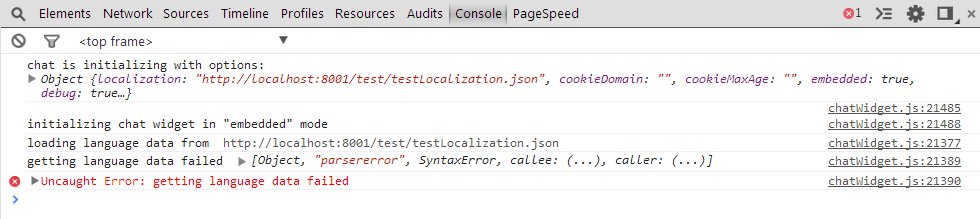
- Enable "debug" mode:


