
Managing CEP Rule Templates
Contents
Overview
The Complex Event Processing (CEP) Rule Templates define the actions and conditions you can use when you create your business rules in Genesys Rules Authoring Tool.
You use Genesys Rules Authoring Tool (GRAT) to develop, author, and evaluate these business rules. A business rule is a piece of logic defined by a business analyst. These rules are evaluated in a Rules Engine based upon requests received from client applications such as Genesys Web Engagement. GWE provides an out-of-the-box CEP (Complex Event Processing) Rules template. This template type enables rule developers to build templates that rule authors then use to create rules and packages. These rules use customized event types and rule conditions and actions. Each rule condition and action includes the plain-language label that the business rules author will see, as well as the rule language mapping that defines how the underlying data will be retrieved or updated.
The out-of-the-box rule templates created with your Web Engagement application are represented as a GRDT project, which is located at \apps\application name\resources\_composer-projects\WebEngagement_CEPRule_Templates.

In order to use these templates to define rules, you must first publish them — see Publishing the CEP Rule Templates for details about when the templates should be published in the Web Engagement application development workflow.
Before you publish the templates, you can edit them to suit your business needs using the the Genesys Rules Development Tool. For more information about rule templates, refer to the Genesys Rules System documentation.
Actions
The list of actions available in the template is listed in WebEngagement_CEPRule_Templates > Actions. You can edit, add, or remove these actions. In the Genesys Rules Authoring Tool (GRAT), when you create a rule based on the template, you can add an action by clicking Add action; GRAT displays all the actions defined in the template. You'll see how actions are implemented once you start creating rules. The default actions are:
- Generate Actionable Event
- Generate Actionable Event Predefined
Enums
The enumerations available in the template are listed in WebEngagement_CEPRule_Templates > Enums. You can edit, add, or remove these enumerations. When you create a rule based on the template, you can specify a Phase by clicking Add Linear Rule; GRAT displays all the enumerates available in the template. In the default template, no specific enumeration is available.
Conditions
The conditions are listed in WebEngagement_CEPRule_Templates > Conditions.

You can edit, add, or remove these conditions. Each condition associates a name with an expression. When you create a rule based on the template, you can add one or more condition to this rule by clicking Add condition; GRAT displays all the condition expressions available in the template. For complex templates, you need several conditions to implement a rule.
| Condition Name | Expression | Condition details |
|---|---|---|
| Check search string | event searches {searchString} | Returns true if the event Search occurs and if the {searchString} label is found, this event's result is saved in the {event} label. |
| Following event with category | AND event following {prevEvent} with category {category} save as {event} | If the event follows {prevEvent} and contains the {category} label, this event's result is saved in the {event} label. |
| Following event with name | AND event following {prevEvent} with name {eventName} save as {event} | If the {eventName} follows {prevEvent} in parameter, this event's result is saved in the {event} label. |
| Has Category | page transition event occurs that belongs to category {category} save as {event} | If the event is a page transition for the given category, this event's result is saved in the {event} label. |
| Has Category without save | page transition event occurs that belongs to category {category} | Returns true if the event is a transition to the given category's page. |
| Has Name | event with name {eventName} save as {event} | If the {eventName} occurs, this event's result is saved in the {event} label. |
| Has Name without save | AND event with name {eventName} | Returns true if {eventName} occurs. |
| Remember last event | Precondition: save last event | Saves the last event. |
| Save category as event | category is {category} save as {event} | If the event contains the given category, this event's result is saved in the {event} label. |
| Timeout on category | Timeout event occurs with category {category} | Returns true if the Timeout event occurs for the given category. |
Importing the CEP Rule Templates in GRDT
Complete this procedure to import the CEP rule templates in the Genesys Rules Development Tool. Even if you do not plan to customize the templates, your rule template must be published in the Rules System Repository before you try to create rules.
Prerequisites
Start
- Navigate to Window > Open Perspective > Other > Template Development to switch to the Template Development perspective of the Genesys Rules Development Tool.
- Select File > Import....
- In the Import dialog window, navigate to General > Existing Projects into Workspace. Click Next.
- Select Select Root Directory:, then click Browse.
- Import your project. Your newly created Genesys Web Engagement application includes a GRDT project with rules templates located at \apps\application name\resources\_composer-projects\WebEngagement_CEPRule_Templates. Select the rules template project to import:
- Browse to the \apps\application name\resources\_composer-projects folder in the Genesys Web Engagement installation directory and select a project.
- Click OK. WebEngagement_CEPRule_Templates_application name is added to the Projects list.
- Select the WebEngagement_CEPRule_Templates_application name project.
- Warning: Do not enable the option Copy projects into workspace.
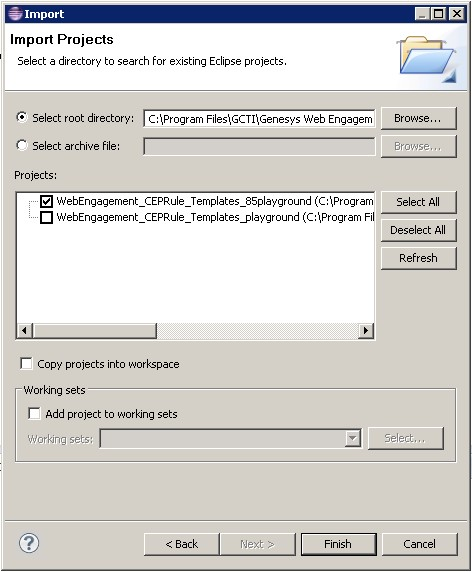 Import the default templates by clicking Finish.
 - Click Finish to import the project. WebEngagement_CEP_Rule_Templates_application name is added to the Project Explorer.
 WebEngagement_CEP_Rule_Templates_playground is added to the Project Explorer.


End
Configuring the CEP Rule Templates
Prerequisites
- The Web Engagement Categories business attribute is defined in Genesys Administrator.
Start
- In the GRDT Project Explorer, right-click on the WebEngagement_CEPRule_Templates project. Click Properties.
- In the Properties dialog window, navigate to Template Properties. In Publishing Data, set Type to web_engagement.
 Set the type to web_engagement.
 - Navigate to Template Properties > Imports. The Imports panel opens.
- Select the Enable global imports option.
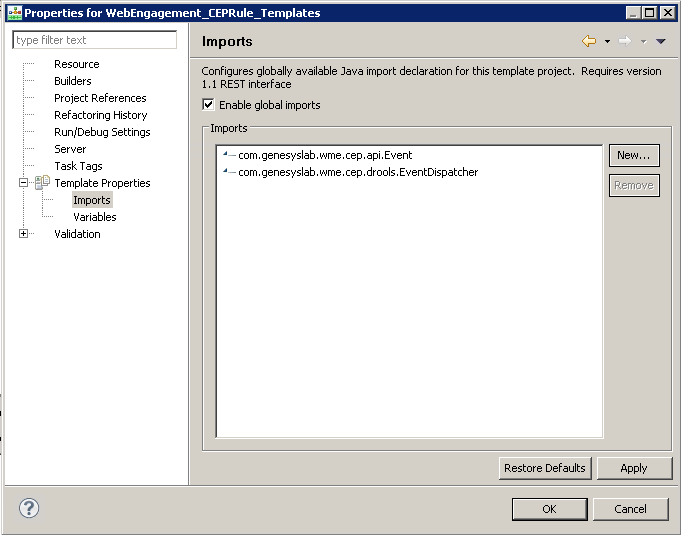 Enabling global imports.
Note: The com.genesyslab.wme.cep.api.Event and com.genesyslab.wme.cep.drools.EventDispatcher packages must be present. - Click OK.
- In the Project Explorer, navigate to WebEngagement_CEPRule_Templates > Parameters > category.
- In the Parameters Editor panel, set Attribute Name to Web Engagement Categories.
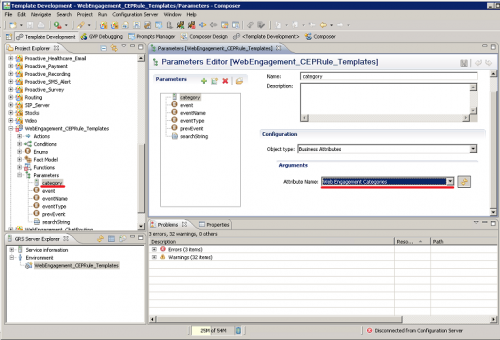
- Click Save.


End
Customizing the CEP Rule Templates (Optional)
Start
- Open the CEP rule template project with GRDT and navigate to the Conditions item.
- Expand Conditions to open the Conditions editor.
- In the Conditions tab, click +. The Add Condition window opens.
 Add a condition
 - Enter a name and click OK. The condition is added and selected in the condition list; the condition detail panel opens.
- Insert the Language Expressions and Rule Language Mapping:
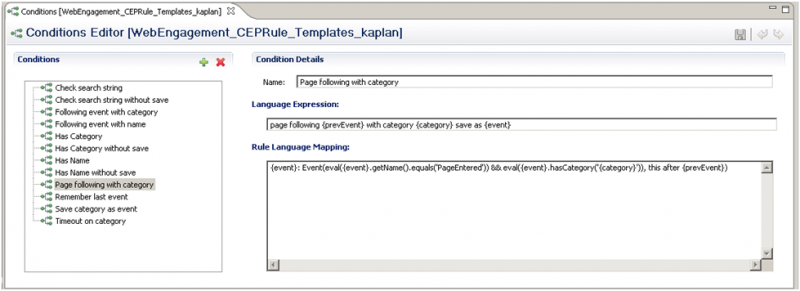
- Click Save Now when the rule template is published, the rule will be available in GRAT:


End
Publishing the CEP Rule Templates in the Rules Repository
Prerequisites
- Your user has the correct permissions to manage rules in GRAT, as detailed in the Genesys Rules System Deployment Guide.
- You configured GRDT to enable a connection to Configuration Server and Rules Repository Server.
Start
- In Project Explorer, right click WebEngagement_CEPRule_Templates.
- Select Publish. The Publish Template Wizard opens.
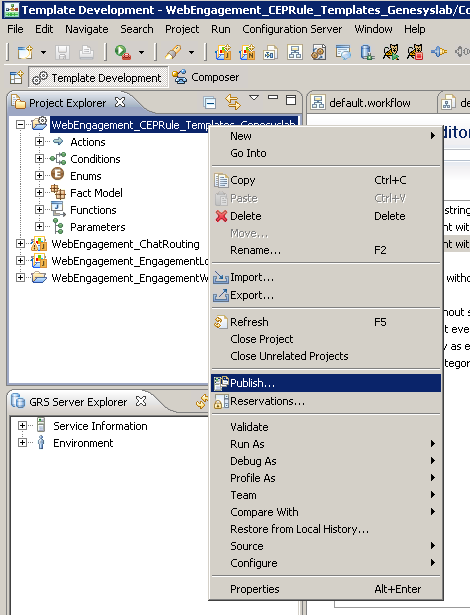 The Publish Template Wizard.
 - Select WebEngagement_CEP_Rule_Templates.
 Select WebEngagement_CEP_Rule_Templates.
 - Click Finish.


End