
Working with Categories
Contents
About Categories
When we think about things, or talk about them with our friends, we often categorize them. This can help us tell these things apart from other things that are similar to them, which means that these categories can guide us towards better decisions.
As it happens, Web Engagement needs to do some serious decision-making. Because of this, we have set up ways for you to categorize things within Web Engagement, so it can make those decisions for you as you try to help your customers in real time.
In addition to its value as a real-time analysis tool, this categorization provides a valuable way of grouping the monitoring and engagement data that goes into your reporting.
How Categories Differ from Events
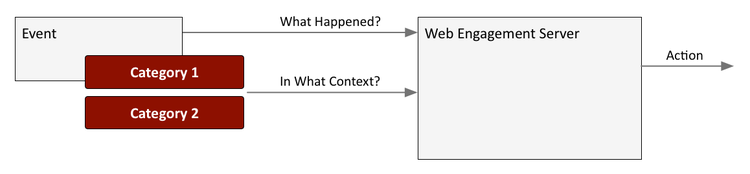
You can think of a Web Engagement category as a special kind of non-hierarchical label that is assigned to an event, based on some particular characteristic of the event's data.
You can use things like the URL, the language code, the page title—or other data passed along with the event—to figure out whether that specific event fits into a particular categorization. This allows you to combine similar events into a single customer business context so you can answer questions like What happened?—which you will mainly learn from the event itself—and In what context?—which will be clarified by the categories associated with one or more events.
By combining two sets of information like this, you get an additional layer of meaning within which to bucket your events, which allows you to simplify your rules.
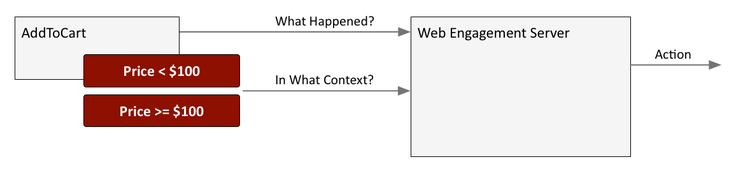
In the following example, we have set up categories based on the price of an item added to the user's cart. We might want to send engagement invitations to anyone who is buying the higher-priced items, while being more selective towards people with lower-end transactions.
Another big benefit of categories is that they are really easy to configure—all you have to do is create the categories, and they are ready to use!
How Categories Make Events More Useful
Much of the time, the name and type of an event are enough to tell you What happened?
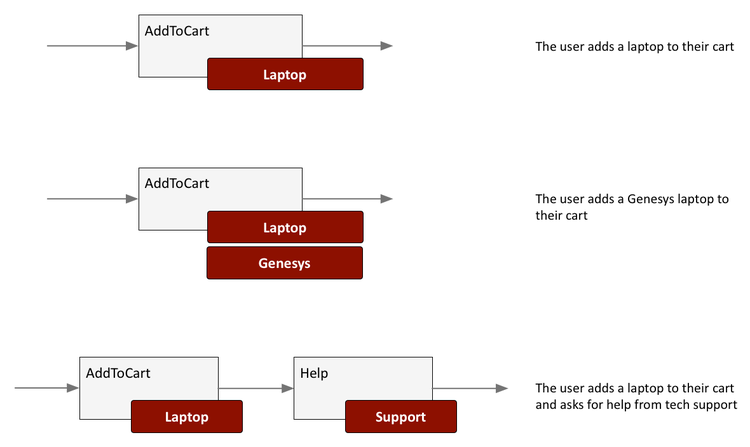
For example, an AddToCart event lets you know that the customer has added something to their shopping cart. But if you only rely on this, you'll have to create specific events for a lot of different actions if you want to get a good idea of what your customers are doing.
By assigning categories, you add another dimension to how you can group events, thereby cutting down on the number of events you need to set up if you want to understand your most important business criteria.
For example, in the case of an online store, an AddToCart event can be categorized by what kind of thing the customer wants to buy, such as a Phone or a TV or a Laptop, or by other important characteristics, such as the price of the item. You can also add categories that let you know when a customer is Waiting For Support, or wants to Stop Shopping.
Any and all of these categories can be a factor in triggering actions that generate a proactive engagement request—a request which could make the difference between a sale and an abandonment.
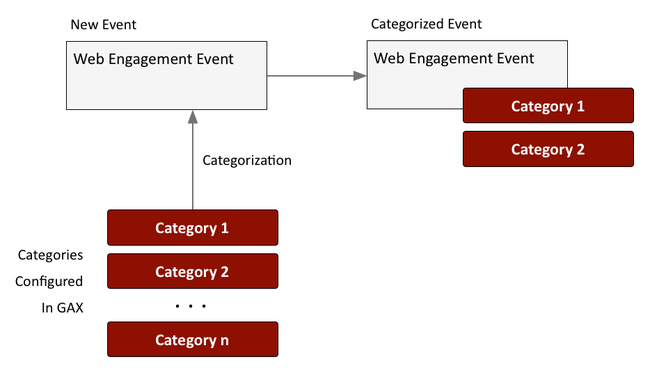
Assigning Categories to New Events
Every time the Genesys Tracker application—which is resident in the visitor's browser—generates an event, it tries to categorize it based on the category information received from the Web Engagement Server.
Workflow
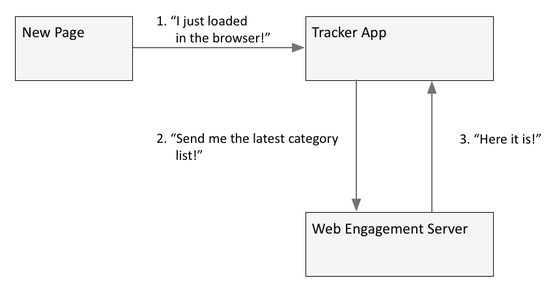
Let's take a look at how these things come together when a customer is visiting your online store.
The Genesys Tracker application is constantly monitoring the pages on your website. As soon as a new page is loaded in the customer's browser—as shown in Step 1, below—the Tracker application asks for the current list of categories from Web Engagement Server (Step 2), which sends it to the Tracker (Step 3).
Here's what happens when a customer adds a laptop on an online store page, as shown in the following diagram.
Tracker is still monitoring the events associated with the new page, as shown in Step 1. When the customer adds the item to their cart, the Tracker app creates an AddToCart event (Step 2) and categorizes it by purchase category (Step 3). (Notice that the event is categorized on the browser side.)
The Tracker app then posts the categorized event to the Web Engagement Server (Step 4). At this point (Step 5), Web Engagement Server can apply its rules to all of the information that is available from the event, in order to determine whether to engage with the customer. This information can include:
- The event name and type
- The specific combination of categories that were applied to the event
- The specific combination of events and categories associated with the recent customer activity
The outcome from this activity could be a decision to provide assistance via chat, callback, or other channels (Step 6), or the server could simply decide to let the Tracker app continue monitoring.

Simple and Advanced Engagement Models
Web Engagement supports two types of events. Out of the box, you have access to several different system events, which are used in the Simple Engagement Model. You can also create your own events, known as business events, in which case you are using what we call the Advanced Engagement Model.
You can use categories with both types of event.
About the Genesys Web Engagement Management tool
You can view and manage categories with the Genesys Web Engagement Management tool.
Note: You must enable the Access to Web Engagement Categories privilege for any users who need to control category settings.
You create these categories during the Application Development process if you use the Simple Engagement Model when you Create Business Information. Each category is compliant with the category definition and includes tags to define business information related to your website.
To access the Genesys Web Engagement Management tool, open a browser and go to:
http(s)://<GWE Load Balancer host>:<GWE Load Balancer port>/server
The load balancer will redirect requests from <GWE Load Balancer port> to the port with the ID ui, as defined in the Genesys application (see Configuring the Cluster Application in the Genesys Web Engagement Deployment Guide).
You'll be prompted for a user ID and password. After you log in, you can select Category to view and manage categories.
Creating a Category
To create a new category, click New category. Required fields are marked with an asterisk (*).

Enter a Name for the category. Optionally, you can also add a Description.
- If you like, you can Save the category with just a Name and edit it later to fill in the remaining details (such as matching tags).
- You can use the Save as option to save the category (and its properties) with a different name.
- At any point during the category setup, you can click Cancel if you want to clear all settings and reset all fields to their defaults.
You can proceed to the next sections to continue filling in additional details for the new category. When you are finished, click Save.
Tags setup
Each category should have at least one Matching tag, which contains an expression to search in the URLs and titles submitted with the events of the browser. For instance, you could identify an inbound voice–related page, such as http://www.genesys.com/products/genesys-inbound-voice/overview.aspx by using plain text, such as genesys-inbound-voice.
Enter a display Name and an Expression for the tag. If you want the tag expression to be case-sensitive, enable the case-sensitive option:

For the Expression Type, you can choose from the following options:
- Plain Text — a substring search (default).
- Search Expression — select this type if your expression uses search operators similar to those used by Google (for examples, see Search Request Patterns).
Choose the Language for the tag. This allows you to make the search expression specific to the localization of the browser.
When you are finished adding the details for the tag, click Add. The tag is then added to the Matching tags list.
Reveal category in Agent Portal
To specify the category name that is displayed for the agent in Agent Portal, enable the slider:
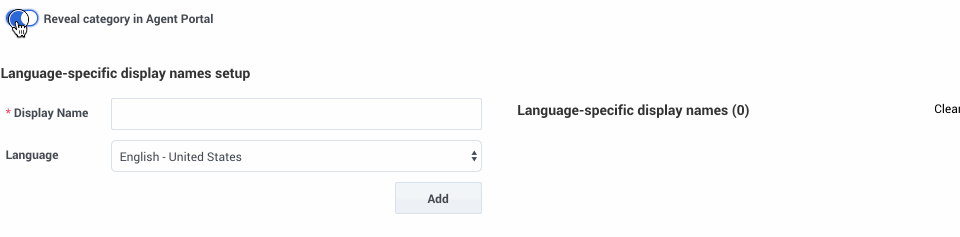

If you enable this option, you can then add Language-specific details for the category, such as the Display Name and Language. Click Add to add it to the Language-specific display names list.
When you are finished, click Save to save the category (or select Save as if you want to save the category with a different name). Click Cancel if you want to clear all settings and reset all fields to their defaults.
Sorting and filtering categories
You can sort the list of categories alphabetically, or use the search button to find a specific category in the list:

Deleting a category
If you hover your mouse over a category, a trash icon appears, which you can click to delete the category:

After you click the trash icon, you'll be asked to confirm the deletion. Click Delete to remove the selected category.
Editing a category
Selecting a category enables you to view or make changes to its properties:

You can update the Description for the category, but the Name cannot be changed (you can, however, use the Save as option to save the category with a different name).
If you want to make changes to the Tags setup or Language-specific display names sections, select the item from its list to view the properties. The Add button is replaced by an Update button, which you can use to update the properties for the selected item:

If you don't want to commit the changes you've made, click the selected item again to exit editing mode and restore the properties back to their original settings:

To remove a Matching tag or Language-specific display name item from the list, click its delete icon (x). If you want to delete all items from the list, click Clear all.
Remember: You must go back to the top of the page and click Save to apply any updates you've made to the category properties.
Search Request Patterns (Google Like Expression)
The following table describes the patterns in search requests.
| Search Options | Description |
|---|---|
| Search for all exact words in any order. search query |
The result must include all the words. These words can be substrings attached to other words—for example, [Web-search query1]. |
| Search for an exact word or phrase. "search query" |
Use quotes to search for an exact word or set of words in a specific order without normal improvements such as spelling corrections and synonyms. This option is handy when searching for song lyrics or a line from literature—for example, ["imagine all the people"]. |
| Exclude a word. -query |
Add a dash (-) before a word to exclude all results that include that word. This is especially useful for synonyms like Jaguar the car brand and jaguar the animal. For example, [jaguar speed -car]. |
| Include "fill in the blank". query *query |
Use an asterisk (*) within a query as a placeholder for any terms. Use with quotation marks to find variations of that exact phrase or to remember words in the middle of a phrase. For example, ["a * saved is a * earned"]. |