
Additional Configurations
The following configurations are recommended for the successful completion of the SpeechMiner configuration process:
Configuring the Browser
End users of SpeechMiner access its browser-based interface from Internet Explorer or Google Chrome, which connects to the SpeechMiner Web server through the local network. In order for the SpeechMiner interface to work properly, you must configure each user's browser as explained below. The configuration changes that must be implemented are to allow pop-ups from the SpeechMiner domain, to treat the SpeechMiner domain as part of the local intranet (or as a trusted site), and to enable automatic updating of cached web pages.
In addition, if Internet Explorer is running on a Windows Server 2008 machine or Windows Server 2012 machine, the Enhanced Security Configuration feature should be turned off.
Refer to the Turning Off the Enhanced Security Configuration Feature on Windows Server 2008 / Windows Server 2012 section below.
Configuring Internet Explorer
- In the Internet Options dialog box, in the Security tab, select Local Intranet.
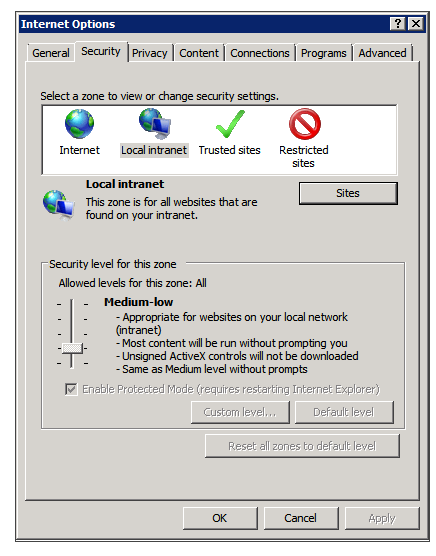
- Add the SpeechMiner domain to the list of web sites in the Local Intranet zone.
- Click Sites > Advanced and add *.genesyscloud.com to the list of safe websites.
- Click Custom Level to customize the local intranet zone security.
- Under Miscellaneous > Access data sources across domains, select Enable.
- In the Privacy tab, add the SpeechMiner domain to the list of web sites that are permitted to open pop-ups.
- In the General tab, under Browsing history, select Settings.
- Under Check for newer versions of stored pages, select Automatically.
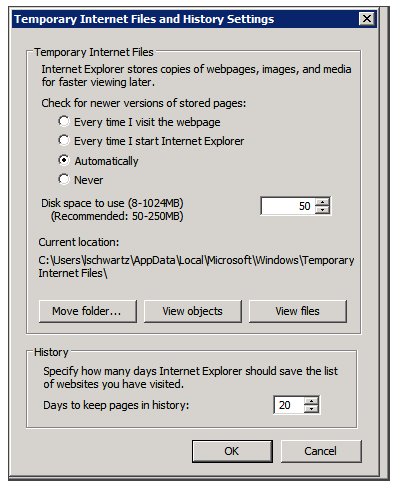
- Click OK to save the changes.

Selecting Enable makes Screen Recording playback possible because it allows access from the browser to HTCC.


Turning Off the Enhanced Security Configuration Feature on Windows Server 2008 / Windows Server 2012
- In the Server Manager, in the home page (the top level), expand the Security Information section. The current settings for the Enhanced Security Configuration feature appear under IE Enhanced Security Configuration (ESC).

- If the current settings are not Off for Administrators and Off for Users, click Configure IE ESC. The Internet Explorer Advanced Security Configuration dialog box opens.
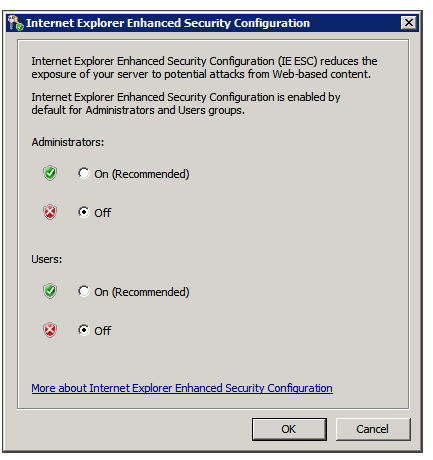
- For both Administrators and Users, select Off.
- Click OK to save the changes.


Configuring Chrome
- In the Chrome browser, click the Chrome menu
 , and select Settings.
 - Under Privacy, click Content Settings....
- Under Pop-ups, verify that Allow all sites to show pop-ups is selected. If it is not selected perform the following:
- Click Manage exceptions....
- In the field provided, type *.genesyscloud.com and select the Allow behavior.
- Press Enter and click Done.
Verify that Java Script is Enabled
- In the Chrome Browser, navigate to Chrome Settings > Show Advanced Settings > Privacy > Content Settings.
- Under Java Script, select Allow all sites to run Java Script (recommended).
For more information about enabling Java Script, see the following example https://support.google.com/adsense/answer/12654.
Setting the Date and Time
The webServiceParam table has two fields for configuring the date and time display:
- globalDateFormat which configures the date format, for example: MM/dd/yy
- globalDateTimeFormat which configures the time format, for example: hh:mm tt
For additional information about the options available, see http://www.w3.org/TR/NOTE-datetime.
When SpeechMiner's Spanish interface is used for the Web interface, the only formats supported for globalDateTimeFormat are the following 24-hour formats: H:mm:ss or H:mm.
Set the Forget Password Login Option
When configuring SpeechMiner you can give users the option of recovering forgotten passwords.
If you choose to enable users to recover their forgotten passwords, the SpeechMiner log in screen will contain a Forget Password? link.
When the user clicks the Forget Password? link, the user will be required to enter his email address.
The user will then receive an email with a Reset Password link.
By default the Reset Password link is only available for 4 hours. This default number can be changed.
To enable a user to recover his password perform the following:
- Access the webServiceParam table.
- Change the PasswordRecovery field from false to true.
To change the Reset Password link default:
- Access the webServiceParam table.
- Change the resetPasswordTokenExpirationTime field from 4 hours to the amount you prefer.
To change the email message the user receives:
- Access the webServiceParam table.
- Change the resetPasswordMailBody field to the content you prefer the user to receive.
The email message content should contain <resetLink>.
<resetLink> represents the Reset Password link. - Change the resetPasswordMailSubject field to the subject you prefer the user to receive.
Setting the Resource Type
The resourceTypeId table contains a list of all the possible resource types.
To enable/disable a resource type in SpeechMiner, update the isEnabled field in the resourceTypeId table with the relevant status.
Configuring a VMWare Server
If you are installing SpeechMiner on virtual machines and using VMWare Server VSphere4, it is recommended to use the Scheduling Affinity feature, which dedicates specific logical CPUs for the virtual CPUs of particular VMs. Doing this can improve Recognition performance.
To use the VMWare Scheduling Affinity feature:
- For each active Virtual Machine, check the VM Settings to see how many CPUs are configured for the machine.
- In Setting\Resources tab\Advanced CPU\Scheduling Affinity, enter the serial numbers of the VMWare server's logical CPUs.
Enable HTTPS for SpeechMiner
- Create a self signed server certificate to enable the https protocol:
- Open the Microsoft Management Console (MMC).
- Select File > Add / Remove Snap-in.
- Select Certificate and click Add.
- Click OK.
- Select Computer account and click Next.
- Selelct Local computer and click Finish and OK.
- Under Certificates (Local Computer), right-click Personal, All Tasks, Request New Certificates
- Click Next
- Under Active Directory Enrollment Policy, Select Computer.
- Click Enroll and Finish.
- Configure the Report Server:
- Open the Reporting Services Configuration Manager.
- Select Web Service URL.
- Select Advanced.
- Under Multiple SLL Identities, click Add and select the certificate you created.
- Click OK and select the https URL.
- Under Multiple SSL Identities, click Add and select the certificate you created.
- Click OK and select the Report Manager URL.
- Create an SSL Binding:
- Open IIS Manager.
- Select Default Web Site and in the right Action pane click Bindings.
- Click Add.
- In the Type list select https.
- In the IP address list select All Unassigned.
- In the Port field enter the relevant port number.
- In the SSL Certificate list select the relevant SSL Certificate.
- Configure SSL settings:
- In the IIS Manager, click Default Web Site.
- Under IIS, select SSL Settings.
- Select Require SSL and click Apply.
- Restart the IIS Server.
The following Certificate Enrollment window appears:
IIS Manager Error: The process cannot access the file because it is being used by another process. (Exception from HRESULT: 0x80070020)
Additional information abouat SSL on IIS 7 can be found here: http://learn.iis.net/page.aspx/144/how-to-set-up-ssl-on-iis-7/
Additional Configuration for Recording Modes
- Create a new application for SpeechMiner with a Genesys Generic Server template in the Genesys Administration Extension:
- Follow the Creating Applications Objects procedure in the Procedures tab of the Applications page in the Genesys Administration Extension document.
- Verify that the name of the application that you create is the same as the ApplicationName field in the configServer table of the SpeechMiner database.
- Creating a SpeechMiner application does not require configuring connections or options and is not integrated with LCA.
Configuring a SpeechMiner Web Application
Configure a new SpeechMiner Web application when your default web site is not sufficient for your systems demands.
- Open the IIS Manager.
- Under Connections, select Sites > Default Web Sites and right-click SpeechMiner.
- Click Remove to remove the existing SpeechMiner Web Application.
- Under Connections right-click the web site to which you want to add the SpeechMiner Web Application.
- Select Add Application.
- In the Application Name field enter SpeechMiner for the new web application.
- Click Select.
- Open the Application Pool list and select SpeechMiner.
- Click OK.
- In the Physical Path click the Browse button and select the Installation > Web folder. The default folder is c:\Program Files (x86)\Genesys\Software\utopy\product\web.
- Click OK. The SpeechMiner Web Application appears under the web site to which you selected to add the SpeechMiner Web Application.
Configuring Command Line availability for SMART
To update the database configuration perform one of the procedures:
SMConfig
- Log into SMConfig.
- Select Services.
- In the Services window, select Update config files.
- Click Save.
SMART
- Manually log into SMART.
- Go to C:\Program Files (x86)\Genesys\Software\utopy\product\bin\release.
- Make a copy of smart.exe.config and name the copy smartc.exe.config.
- When asked to replace a file with the same name click Yes.
Defining Caching Reports
All Caching tasks are listed in the Report Caching Params table.
In the default database there is one Caching task that caches all the reports in the expanded widgets for all the active partition sets during the last 30 days.
You can select different reports to cache then those defined by default. You can also delete the existing cache and create a new cache.
To define a new cache report:
- Access the Report Cache Params table in the database and insert a new row.
- Define the following parameters:
Parameter Description Enable True Report Query The query that retrieves the report id’s and the partition strings associated with the report you want to cache. Within the Report Query you can use the following parameters:
Parameter Description @templatesToExclude The templates to exclude from caching. @usersToExclude The users to exclude from caching. @daysUserIsActive The users that should be cached. For example, if this is 7, then only users that are active in the last 7 days should be cached. numberOfProcesses The number of parallel threads that should be cached (at the same time). keepLogMessages The number of days log messages associated with caching tasks be should be kept. NotificationMail The email address belonging to the users to whom the caching task report should be sent when the caching is complete. webComputerName The name of the web server to which the reports are cached. RunAtTime Defines when the caching task will run within 24hrs. The maximum is 1440 minutes for 24hrs. For example, if you want the cache task to run at 12 midnight and your UTC difference is +2, enter -120. It is the difference between UTC and the local time you want it to run in. The difference is in minutes. nextTimeToRun The next time the Caching task is set to run. Set this parameter to a low value. During the initial run the task automatically sets the correct value. - Log into SMConfig.
- Under Machines & Tasks, select one or more machines on which the Caching task will run.
- Click Edit.
- Select Report Caching.
- Click Ok.
- Click Save.
- Select the Report tab.
- In the Set reports caching time (minutes) field enter 1440 (this number represents 24 hours).
- Select all the report templates and click Save.
- Verify that the Caching task is running:
- Access the reportCachingLog table.
- Select the table records and verify that the Caching task ran.
- Access the ulogger and verify that it is caching the selected reports.
If you select more than one machine the Caching task will be divided equally between the machines that run simultaneously. The more machines the faster the Caching task will be completed.
The following Properties window appears:
300px
The following Report Deployment page is opened:
700px
Report Server Email Configuration
Configure the Report Server email as follows so that the report schedule and report deliverable functions operate as expected.
- Access the Report Server machine.
- Open Reporting Services Configuration Manager.
- Click Connect to connect to the Report Server.
- Select Service Account and define a user account with access to the SMTP server.
- Click Apply.
- Select E-mail Setting and define the SMTP Server and default Sender Address.
- Click Apply.
Integrated Windows Authentication
Integrated Windows Authentication enables you to ensure that your SpeechMiner users are not required to log into SpeechMiner every time they want to access the application.
- Open IIS Manager and navigate to the level you want to manage. For information about opening IIS Manager, see Open IIS Manager (IIS 7).
- In Features View, double-click Authentication.
- On the Authentication page, select Windows Authentication.
- In the Actions pane, click Enable to use Windows authentication and Disable to use Anonymous authentication.
- In your application's Web.config file or in the machine-level Web.config file, ensure that the authentication mode is set to Windows as shown here.
For information about navigating to locations in the UI, see Navigation in IIS Manager (IIS 7).
...
<system.web>
 ...
 <authentication mode="Windows"/>
 ...
</system.web>
...