Contents
- 1 Configuring OpenScape Voice
- 1.1 1. Check Minimum Functionality in OpenScape Voice
- 1.2 2. Configuring Numbering Plans
- 1.3 3. Configuring a SIP Server Endpoint Profile
- 1.4 4. Configuring a SIP Server Endpoint
- 1.5 5. Configuring SIP Server Destinations for Gateways
- 1.6 6. Configuring SIP Server Prefix Access Codes
- 1.7 7. Configuring SIP Server Destination Codes
- 1.8 8. Configuring an Agent Destination for SIP Server
- 1.9 9. Configuring Agent Prefix Access Codes and Destination Codes
- 1.10 10. (Optional) Configure Click-to-Answer
- 1.11 11. (Optional) Configure emergency call routing
Configuring OpenScape Voice
This page provides an overview of the main steps that are required to configure OpenScape Voice. Complete all steps in the order in which they are listed.
- Check that OpenScape Voice is working
- Configure Numbering Plans
- Configure the Endpoint Profile
- Configure the Endpoint
- Configure Gateway Destinations
- Configure Prefix Access Codes
- Configure Destination Codes
- Configure Agent Destinations
- Configure Agent Access and Destination Codes
- (Optional) Configure Click-to-Answer
- (Optional) Configure emergency call routing
1. Check Minimum Functionality in OpenScape Voice
The procedures in this topic assume that OpenScape Voice is functional and routing calls appropriately. There should already be at least one Numbering Plan that has gateways and nonagent subscribers in it. For more information, see Siemens OpenScape Voice-specific documentation.
2. Configuring Numbering Plans
The instructions in this topic assume that OpenScape Voice is functional and routing calls appropriately. There should already be at least one Numbering Plan with configured gateways and nonagent subscribers.
Purpose: To create the Numbering Plans that will contain the Agents and SIP Server.
Start
-
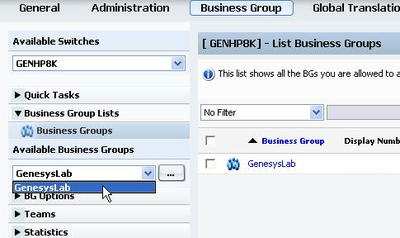
Log in to the HiPath Assistant, and navigate to the Business Group of the contact center that you want to configure--for example, GenesysLab.
- Click Private Numbering Plans.
- In the Private Numbering Plans dialog box, click Add.
-
Add two new Private Numbering Plans: one for your agents and one for SIP Server itself--for example, Agents and SIPServer, respectively.
When you are finished, the dialog box shown in the following figure appears.
End
3. Configuring a SIP Server Endpoint Profile
Start
-
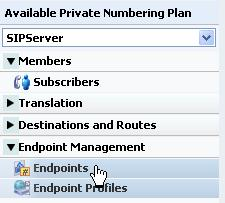
Click Private Numbering Plan, and then click the SIP Server Numbering Plan—for example, SIPServer.
-
Click Endpoint Management, and then click Endpoint Profiles.
-
In the Endpoint Profile: <Business Group> dialog box on the General tab, enter a name for this configured Endpoint Profile in the Name text box. This will associate the endpoint that uses it with the Numbering Plan in which the Endpoint Profile was created.
- (Optional) If there are existing dialing rules and conventions that require the use of Class of Service and Routing Areas, enter that information. As a general rule, give this Endpoint Profile the same calling access as you would give to your agents
- When you are finished, click Save.
-
In the Endpoint Profile: <Business Group> dialog box on the Services tab, enable the Call Transfer service, by selecting Yes from the drop-down menu.
End
4. Configuring a SIP Server Endpoint
Start
- Click Private Numbering Plan, and then click the SIP Server Numbering Plan—for example, SIPServer.
-
Click Endpoints, and then click Add.
-
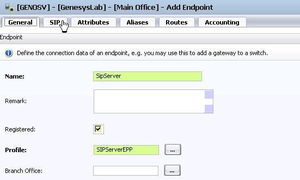
In the Endpoint: <Business Group> dialog box, click the General tab, and do the following:
- In the Name text box, enter a unique name for this configured Endpoint.
- Select the Registered check box.
- Set the Profile text box to the Endpoint Profile that you created for SIP Server, by clicking the browse (...) button.
-
In the Endpoint: <Business Group> dialog box, click the SIP tab, and do the following:
- Make sure that the Type text box is set to Static.
- In the Endpoint Address text box, enter the IP address of SIP Server.
- From the Transport protocol drop-down box, select UDP or TCP, depending on SIP Server.
-
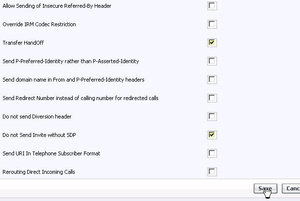
Click the Attributes tab, and do the following:
-
Select the Transfer HandOff check box.
There is a known limitation of the Transfer HandOff feature. The full number must be used to transfer a call when this feature is activated. - Select the Do not Send Invite without SDP check box.
- When you are done, click Save.
-
Select the Transfer HandOff check box.
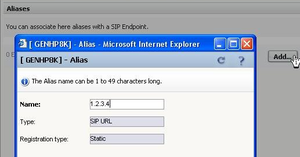
- Click the Aliases tab, and then click Add.
-
In the Alias dialog box, do the following:
- In the Name text box, enter the IP address that you entered in the Endpoint Address text box in Step 4.
- Unless you have OpenScape Voice version 5 and later, set the Type text box to SIP URL. (This is done automatically in version 5.)
-
Click OK.
- In the Endpoint dialog box, click Save.
- When the confirmation message box appears, informing you that the Endpoint was created successfully, click Close.
End
5. Configuring SIP Server Destinations for Gateways
Purpose: To create Gateway Destinations for SIP Server to route calls. The Endpoints of such Gateway Destinations must already be configured in OpenScape Voice. SIP Server routes calls to Gateways and to phones. Because calls to the phones are routed via the E.164 Numbering Plan, no Destinations have to be configured for them.
Start
- Click Private Numbering Plan, and then click the SIP Server Numbering Plan—for example, SIPServer.
- Click Destinations and Routes, then Destinations, and then click Add.
- In the Destination dialog box, on the General tab, do the following:
- In the Name text box, enter a unique name for the Destination—for example, SIPServerGWDEST. The name must be unique within the switch configuration database.
- Make sure that all check boxes are cleared.
- When you are finished, click Save.
- In the Destination - <Business Group> dialog box, click the Destination that you just created.
- Click the Routes tab, and then click Add.
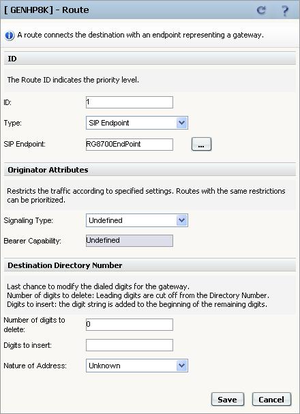
- In the Route dialog box, do the following:
- In the ID text box, enter 1 for this particular route.
- Set the Type text box to SIP Endpoint.
- Set the SIP Endpoint text box to the Endpoint that you created in Configuring a SIP Server Endpoint by clicking the browse (...) button, selecting the Numbering Plan that contains the Endpoint for the gateway to which you will be routing (for example, the general Numbering Plan), and then selecting the Endpoint.
- Do not modify the digit string for calls that are being routed from SIP Server. All modifications to the digit string should be completed before the calls arrive to SIP Server.
- When you are finished, click Save.
- When the confirmation message box appears, informing you that the Route was added successfully, click Close.
- In the Destination dialog box, click OK. You will now be able to view the Route that you just created in the Routes dialog box.
- Repeat Steps 2-9 to create other gateway Destinations for SIP Server, as necessary.
End
6. Configuring SIP Server Prefix Access Codes
Purpose: To configure Prefix Access Codes that SIP Server will dial to reach Subscribers and Gateways.
Start
- Click Private Numbering Plan, and then click the SIP Server Numbering Plan—for example, SIPServer.
- Click Translation, click Prefix Access Codes, and then click Add.
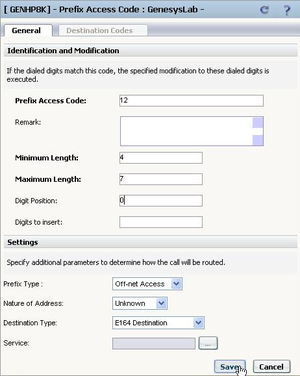
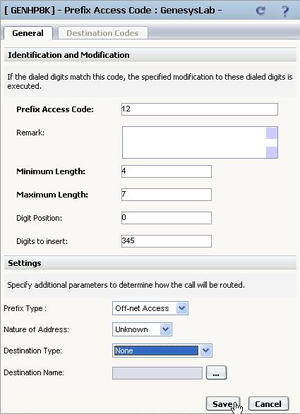
- For calls that are to be routed to Subscribers: In the Prefix Access Code: <Business Group> dialog box, do the following:
- In the Prefix Access Code text box, enter the digits you want to use to route calls to Subscribers.
Note: For the SIP Server Numbering Plan, minimal modifications should be required. Dialed numbers should be modified before they reach SIP Server. This convention should be followed at all sites, to simplify the solution as much as possible. - Set the Prefix Type text box to Off-net Access.
- Set the Nature of Address text box to Unknown.
- Set the Destination Type text box to E164 Destination.
- Click Save.
- When the confirmation message box appears, informing you that the Prefix Access Code was created successfully, click Close.
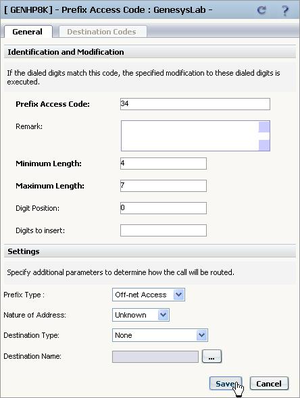
- If agents will be allowed to make external calls: In the Prefix Access Code dialog box, click Add again.
- In the Prefix Access Code dialog box, do the following:
- In the Prefix Access Code text box, enter the digits that you want to use to route calls to Gateways. The matched digits will be site-specific, and there should be minimal modification of the digit string.
- Set the Prefix Type text box to Off-net Access.
- Set the Nature of Address text box to Unknown.
- Set the Destination Type text box to None, so you will be able to route the call from a Destination Code.
- Click OK.
- When the confirmation message box appears, informing you that the Prefix Access Code was created successfully, click Close.
End
Next Steps
Continue with the following procedure, unless calls are routed only to Subscribers:
7. Configuring SIP Server Destination Codes
Purpose: To configure SIP Server Destination Codes to route calls to non-Subscriber devices.
Start
- Click Private Numbering Plan, and then click the SIP Server Numbering Plan—for example, SIPServer.
- Click Prefix Access Codes.
- Click the Prefix Access Code that you created for non-Subscriber devices.
- In the Prefix Access Code dialog box, click the Destination Codes tab.
- In the Destination Code dialog box, do the following:
- Set the Destination Type text box to Destination.
- Set the Destination Name text box to the Destination that you created for SIP Server in Configuring SIP Server Destinations for Gateways, by clicking the browse (...) button.
- Click Save.
- When the confirmation message box appears, informing you that the Destination Code was created successfully, click Close.
End
8. Configuring an Agent Destination for SIP Server
Purpose: To configure a Destination for the Agent Numbering Plan for SIP Server.
Start
- Click Private Numbering Plan, and then click the Agent Numbering plan—for example, Agents.
- Click Destinations and Routes, click Destinations, and then click Add.
- In the Destination - <Agent Numbering Plan> dialog box, click the General tab, and then do the following:
- In the Name text box, enter a unique name for the Destination.
- Make sure that all check boxes are cleared.
- When you are finished, click Save, and then close the dialog box.
- Click the Destination that you just created—for example, SIPServer.
- Click the Routes tab, and then click Add.
- In the Route dialog box, do the following:
- In the ID text box, enter 1.
- Set the Type text box to SIP Endpoint.
- Set the SIP Endpoint text box to the Endpoint that you created for SIP Server in Configuring a SIP Server Endpoint, by clicking the browse (...) button.
- When you are finished, click Save.
- When the confirmation message box appears, informing you that the Route was added successfully, click Close.
Note: Destinations must be unique within the switch configuration database, not just within the Numbering Plan and Business Group.
Note: The ID of the first Route must always be 1.
Note: Genesys recommends that you not modify the dialed-digit string that is passed on to SIP Server at this point.
End
9. Configuring Agent Prefix Access Codes and Destination Codes
In this section, you configure dialing patterns for the Agents. Every number that the agent dials must be configured. If an agent dials a four-digit extension, the Prefix Access Code should be configured to convert the dialed-digit string to the full E.164 code that OpenScape Voice expects. If the agent dials a number that must to be routed to an external gateway, make sure that the dialed-digit string is correct for that gateway before it reaches SIP Server.
As mentioned earlier, all calls must go to SIP Server first; otherwise, the calls will not be visible to SIP Server. In the Private Numbering Plan for agents, every Prefix Access Code must route the call to a Destination Code that points the call to SIP Server. It is best to copy the nonagent Prefix Access Codes from the General Numbering Plan; however, make sure that the destination is always SIP Server.
Start
- Click Private Numbering Plan, and then click the Agent Numbering Plan—for example, Agents.
- Click Translation, click Prefix Access Codes, and then click Add.
- In the Prefix Access Code dialog box, do the following:
- In the Prefix Access Code text box, enter the digits you that want to use for routing, and any modifications that OpenScape Voice will need to make in order to route the call properly.
- Set the Prefix Type text box to Off-net Access.
- Set the Nature of Address text box to Unknown.
- Set the Destination Type text box to None.
- Click Save, and close the dialog box.
- In the Prefix Access Code dialog box, click the Prefix Access Code that you just created, and then click the Destination Codes tab.
- In the Destination Code dialog box, click the General tab, and then do the following:
- Do not modify the Destination Code text box.
- Make sure that the Nature of Address text box is set to Unknown.
- Make sure that the Destination Type text box is set to Destination.
- Set the Destination Name text box to the Destination that you created for SIP Server in Configuring an Agent Destination for SIP Server—for example, SIPServer--by clicking the browse (...) button.
- When you are finished, click Save.
- When the confirmation message box appears, informing you that the Destination Code was created successfully, click Close.
- Repeat Steps 2-6 to create other Prefix Access Codes and Destination Codes, as necessary.
End
10. (Optional) Configure Click-to-Answer
This configuration is not required for the integration to work, however, some might be required by local laws, or make the solution easier to configure.
Purpose: The Click-to-Answer feature enables agents to click within Genesys Agent Desktop to answer the phone. The Click-to-Answer feature requires the referenced Patchset on OpenScape Voice and a device that supports it. The current procedure provides instructions for OpenStage phones.
Start
- On the phone that you have to configure, select Configuration.
- Click Incoming calls, and then click CTI calls.
- Select the Allow auto-answer check box, and click Submit.
- Repeat Steps 1-3 for every agent phone on the switch.
End
11. (Optional) Configure emergency call routing
This configuration is not required for the integration to work, however, some might be required by local laws, or make the solution easier to configure.
The emergency call routing feature provides alternate call routing in cases in which SIP Server is unavailable, if your local emergency (or 911) laws require some form of alternate routing for agents.
During the first 30 seconds after the emergency calling support is activated, calls will fail to route. After that, OpenScape Voice will route calls via the alternate route that you configure and the calls will work.
Start
- Log in to the HiPath Assistant, and navigate to the Business Group of the contact center that you want to configure—for example, GenesysLab.
- Click Private Numbering Plan, and then click the Agent Numbering Plan.
- Click Destinations and Routes, click Destinations, and then click Add.
- In the Destination dialog box, do the following:
- In the Name text box, enter a new destination for the gateway through which you want emergency calls to go—for example, EmergencyBypass.
- Make sure that all check boxes are cleared.
- Click Save.
- Click the Destination that you just created—for example, EmergencyBypass.
- Click the Routes tab, and then click Add. In this step you are adding a route that goes to SIP Server. This is necessary in order to prevent calls from bypassing SIP Server while it is working.
- In the Route dialog box, do the following:
- In the ID text box, enter 1. This route goes to SIP Server, just like all the others.
- Set the Type text box to SIP Endpoint.
- Set the SIP Endpoint text box to the Endpoint that you created in Configuring a SIP Server Endpoint.
- When you are finished, click Save.
- Click the Destination that you just created—for example, EmergencyBypass.
- Click the Routes tab, and then click Add again.
- In the Route dialog box, do the following:
- In the ID text box, enter 2.
- Set the Type text box to SIP Endpoint.
- Set the SIP Endpoint text box to the gateway for emergency calling.
- When you are finished, click Save.
- Click Prefix Access Codes, and then click Add.
- In the Prefix Access Code dialog box, do the following:
- In the Prefix Access Code text box, enter the digits for your emergency number.
- Set the Prefix Type text box to Off-net Access.
- Set the Nature of Address text box to Unknown.
- Set the Destination Type text box to None.
- Click Save, and close the dialog box.
- In the Prefix Access Code dialog box, click the Destination Codes tab.
- On the General tab, do the following:
- Make sure that the Destination Type text box is set to Destination.
- Set the Destination Name text box to the Destination that you created in Step 4—for example, EmergencyBypass—by clicking the browse (...) button.
- When you are finished, click OK.
End
Next Steps:
- Configuration of OpenScape Voice is now complete. Proceed with Configuring DN Objects.

