Contents
Cases
When you select Cases from the Home Screen or ≡ Menu of the Genesys Care Mobile App, you will see a list of your non-closed cases, including cases opened by other Designated Contacts at your company, and be able to perform other functions.
The following are the different functions that you can perform from the Cases window.
Designated Contacts and Case Management
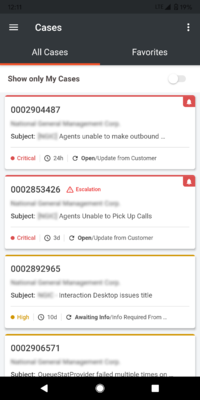
From the Cases screen, Designated Contacts should select “Show Only My Cases” toggle to view cases they have opened. By default, the list shows all the non-closed company cases. On toggle of "Show only My Cases", a popup will be shown to set the My Cases as default landing screen in All Cases tab. If needed, user can opt for this and they can revert it via Settings screen. You can select any case to view the case details including the case severity level, case number, Case Status, Account Name, Product Support Group, Last Modified Date and Sub-Status. The case list is populated in priority categories as Critical, High, Medium and Low. The cases that are in Awaiting Info and Solution Proposed status that exceeded 24 hours without response will be highlighted in order to denote that user needs to take some action on those cases.
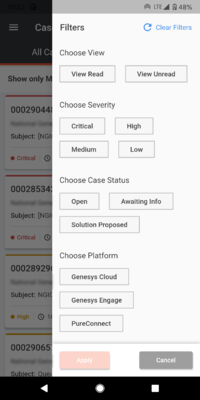
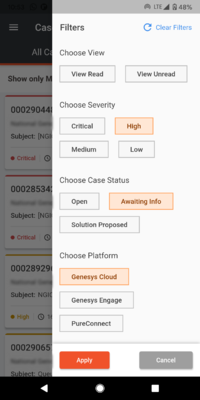
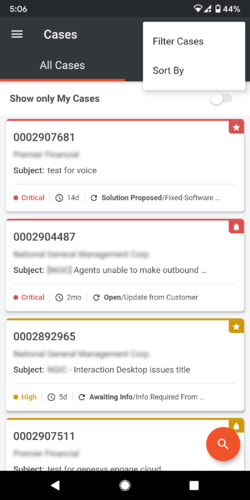
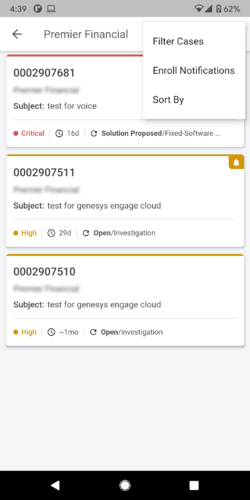
The Case List screen comes with a very handy filter option to choose specific cases from the list. To access the filters, click on the triple dot icon on the top right corner of the cases screen and then click Filter Cases option in the menu. The various options and the descriptions are provided below.
- Read/Unread – To view the cases those are updated and not updated
- Priority: Critical/High/Medium/Low – To view the cases based on specific priorities
- Status: Open/Awaiting Info/Solution Proposed – To view the cases based on the case status
- Platform: Genesys Cloud/Genesys Engage/PureConnect - To view the cases based on the case platforms
Once you click on apply, the filters to view specific set of cases of your interest. If you want to reset the filters back to default, you can just click on the “Clear Filters” on the top right corner of the Filters screen.
If you are a Genesys partner who is a Designated Contact, the case list view can include all non-closed cases that your company has opened for all the end users your firm represents.
Case List Screen and Filters
The Case List also comes with Sort option that sorts the cases based on Priority and Last Modified. To access the sort option, click on the triple dot icon on the top right corner of the cases screen and then click Sort By option in the menu, then select the required sorting option in the next menu.
Favorites
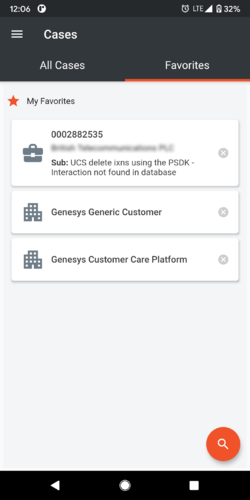
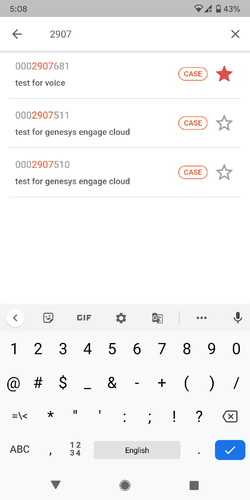
If you want to access some cases frequently to stay on top of them, you can use the “Favorites” tab to add the cases that you want as favorites. Initially when you land on the Favorites tab by clicking on it, you will see a notification that No Favorites are found. Click on the global search button and input the case number or the account you would like to favorite.
If you are the end user of the Genesys platform, then you can search for your company cases for which you have access to. If you are a partner user, then you can search for an account or company cases for those you have access to.
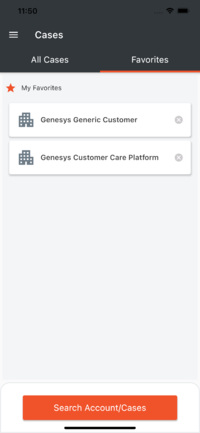
Favorites Screen
When the case or Account Name is searched in the search bar, you can favorite the case/account by clicking on the start button present on the right-hand side against the case/account name. When a Case is added to Favorites, the case notifications subscription will be enabled.
Once an account or case is marked as favorite, it will be displayed in the My Favorites section of Account/Cases tab. You can view the case list of Favorited account or case details of Favorited case by clicking on these cards. You can add as many as 20 favorites which includes both Accounts and Cases. If you want to add a new favorite and it has reached a limit of 20, then you must remove one of the existing favorites and then add the new one. The case subject will not be shown for the cases that are GDPR restricted for the user who logs in.
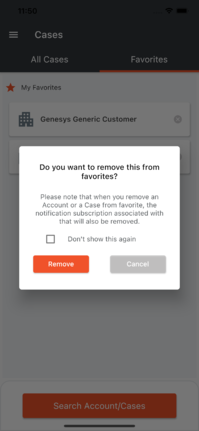
When a Case or an account is removed from Favorites, the case or account notifications subscribed will also be removed. A confirmation popup will be displayed to get the user input, as displayed below.
Case Details
You can view the details of a case by clicking on the case from the case list. The case list page contains details about the case along with the updates posted on the case. If you need more details on the case, you can click on the Expand (Downward arrow) icon to expand the details section. The bottom of the case details screen has an expandable menu indicated by a downward arrow. It has the below functionalities.
- Post updates - Post updates to a case
- Chat – Chat with the owner of the case or any available analyst if the owner is unavailable.
- Escalation – Request to escalate a case for critical attention
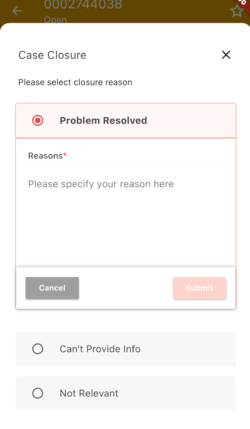
- Case Closure – Request to close a case.
- Call - Redirects to the Genesys Contact Us page to choose the appropriate Toll Free numbers.
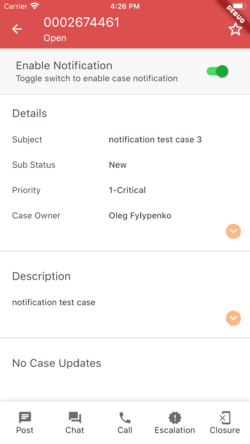
You can also opt to receive notification specifically on a case by Enabling Notification on the case details screen. Whenever there is an update happening, a notification will be sent to the app.
The email updates on the case updates section will be displayed only with the subject. For viewing the entire email updates, you need to select on More Info option. This will show the entire update in separate modal window.
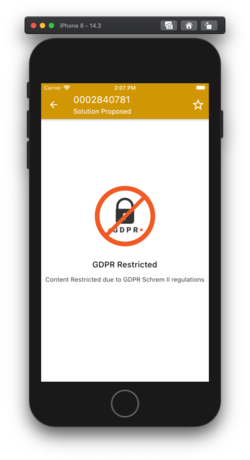
As a part of General Data Protection Regulation (GPDR), the PII data of the EU/EEA customers will not be accessible by Genesys US personnel. When the Genesys US personnel access the Case details screen of EU/EEA customer, the below screen will be displayed to restrict the information. The case related functionalities like Post Update, Chat, Call, Escalation and Closure will not be available for access.
Post Case Updates
You must be a Designated Contact to post updates to an open case.
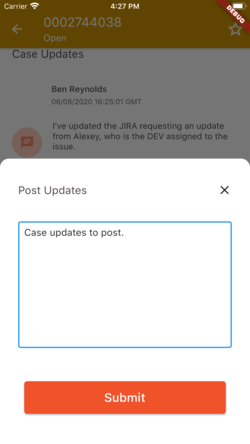
To post an update to a case, tap on the Post Update icon on the expandable menu on the bottom of the Case details screen. On the Case Updates screen, type your update in the message text box and then press Submit.
Post Case Update Screen
Chat (Genesys Engage on-premises and Genesys Cloud Only)
You must be a Designated Contact to use the Chat feature.
What is Chat?
Chat is a feature that gives Designated Contacts an additional option of engagement with the assigned Case Owner (or an available agent, if the case owner is unavailable) regarding the status of their Genesys Engage on-premises & Pure Engage Cloud Support Cases. A Chat session is requested by clicking the Chat icon within any non-closed Case. The Using Chat section explains how to use Chat via the Genesys Care Mobile App only. As a reminder, Chat is for Case facilitation (quick questions or status updates) and not for live troubleshooting.
Please read the Support Processes for On-Premises Licenses for additional tips on Chat via Computer.
Using Chat
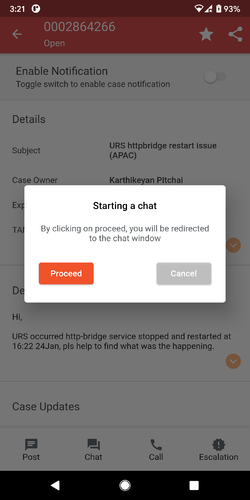
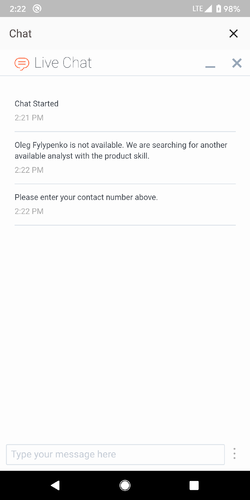
Select and open any non-closed Case. Navigate to the expand icon at the bottom of the screen and click the Chat icon to begin.A popup window with title 'Starting a chat' will appear. Click on proceed to start the chat. The Chat window will automatically start loading. If the case owner is available, you can directly begin the chat session. If the case owner is not available, then the chat will be routed to an available agent. If both the Case Owner and the other agents are unavailable, you can leave a contact phone number so that we can get back to you. Once you have finished chatting, you can end your session by clicking the "End Chat" button above your chat dialogue.
Chat Option Screen
After the Chat Session
After you end the Chat, a transcript of the Chat session will be emailed to you.
Case Closure and Escalation
You must be a Designated Contact to request a case be closed or escalated.
Case Closure:
To request that Customer Care close a case, select the case closure option from the expanded menu on the bottom of the case details screen. In the Case Closure window, select the appropriate reason for the closure and click submit.
Case Escalation:
To request that Customer Care escalate a case, select the Escalation Icon from the expanded menu on the bottom of the case details screen.
In the Request Case Closure window, select the Escalation Request option. The Escalation Request window will appear. Select an appropriate reason from the Escalation Reason drop-down list and provide a short description for your reason in the Comments section. Click Submit which will send your escalation request to Customer Care.
Case Escalation Request Screen
Notifications
You must be a Designated Contact to subscribe to this feature.
Push Notification
This feature allows you to subscribe for the following notifications,
- Case Update Notification for an Individual Case
- Case Update Notification for all Personal Cases
- Case Update Notification for all the cases of a particular Account (Account Notification)
- Cloud Incident Notification
Case Update Notification - for an Individual Case:
Users can subscribe to receive update notifications of an individual case from the Case Details screen. Once subscribed they will receive notifications whenever there is an update to that case.
Steps to Subscribe/Unsubscribe
- To subscribe for updates of a case, open the Case Details screen of that case.
- Click the “Enable Notification” toggle to switch on the notification.
- To unsubscribe from the case update, set the toggle off again.
Case Details Screen having Case Update Notification option
Sharing Case Info via Mobile App:
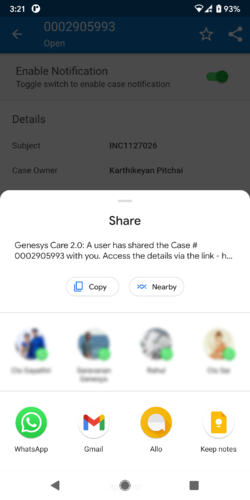
Users can share the case info by clicking on the case share icon in the top right of the case details screen - app bar. On clicking this user will be provided to select the option to select the application via which they are interested to share the case info with their peers.
Once shared on clicking the link, it opens the application and redirects user to the particular case details screen of the shared case. In case if the user doesn't have application installed in their device, this redirects to the Genesys Care 2.0 app page in the Play Store or App Store based on the device type.
Case Update Notification - for all Personal Cases:
Users can subscribe to receive update notifications of all their personal cases from the App Settings Screen. Once subscribed they will receive notifications whenever there is an update to any of their personal case.
Steps to Subscribe/Unsubscribe
- Navigate to the Application Menu > Settings screen in your mobile.
- Enable the Personal Case Notifications toggle button.
- To unsubscribe from all the Case notifications, disable the same toggle button.
Personal Case Update Notification option
Account Notification
Users can subscribe to receive update notifications for all the company cases of an account through the Accounts screen.
Case Filter and Sort Option
User can use the filter and sort option to filter and sort the cases as similar to the All Case screen.
Steps to Subscribe/Unsubscribe
- Search for an account and mark it as favorite (optional). On the top right corner of the account screen, click the settings icon > Enroll Notification.
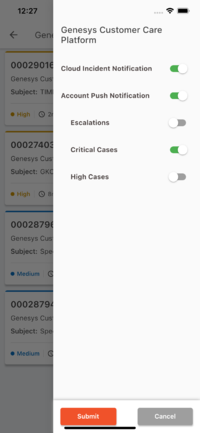
- Click the toggle “Account Push Notifications” to ON state.
- Select the categories for which you would like to receive notifications. The categories currently supported are,
- New Escalations - By enabling this option, you will receive notifications if there are any escalation to the existing cases
- New Critical Cases - By enabling this option, you will receive notifications if there are new critical cases created for this account
- New High Cases - By enabling this option, you will receive notifications if there are new high cases created for this account
- Click on Apply. You will start receiving notifications from the app if any of the above conditions are met.
- By Default, the Account Push Notifications toggle option will be set to OFF including the sub- categories.
- To unsubscribe from the account's case updates, click the same settings icon and disable the New Escalations, New Critical Cases, and New High Cases toggle options as per your need. Disabling all three will in turn disable the Account Push Notifications toggle
Account Notification option
Cloud Incident Notification
You can subscribe to receive update notifications for Cloud Incidents for the cloud accounts that you have.
Steps to Subscribe/Unsubscribe
- Search for an account and mark it as favorite (optional). On the top right corner of the account screen, click the settings icon.
- Click the toggle “Cloud Incident Notifications” to ON state.
- On enabling account notification users will be able to receive the notification When cloud incident is created in Service Now for that account.
- By Default, the Cloud Incident Notifications toggle option will be set to OFF.
- To Unsubscribe, follow the same steps as above and toggle OFF the Cloud Incident Notifications. Once done, the users will not be able to receive the Cloud Incident Notifications anymore.
Cloud Incident Notification option

