Contents
Using the Warm Standby Application Block
The Warm Standby Application Block is a reusable production-quality component that enables developers to switch to a backup server in case their primary server fails, without needing to guarantee the integrity of existing interactions. It has been designed using industry best practices and provided with source code so it can be used "as is," extended, or tailored if you need to. Please see the License Agreement for details.
This article examines the architecture and design of the Warm Standby Application Block, as well as giving details about how to setup the QuickStart application that ships with this application block.
Architecture and Design
Many contact center environments require redundant backup servers that are able to take over quickly if a primary server fails. In this situation, the primary server operates in active mode, accepting connections and exchanging messages with clients. The backup server, on the other hand, is in standby mode. If the primary server fails, the backup server switches to active mode, assuming the role and behavior of the primary server.
There are two standby modes: warm standby and hot standby. The main difference between them is that warm standby mode does not ensure the continuation of interactions in progress when a failure occurs, while hot standby mode does.
The Client Channel Architecture
Since the Warm Standby Application Block is designed to be used in the context of a Client Channel architecture, it is important to understand that architecture before talking about the application block itself.
To start with, this architecture consists of three functional components:
- A connection
- A client channel
- A protocol channel
These components are shown in the following figure.
The connection controls all necessary TCP/IP connection activities, while the client channel contains the protocol- and server-independent channel functionality that is common for a protocol channel. Finally, the protocol channel controls all of the client channel activities that are dependent on the protocol and the server.
Client Channel State
The state of a client channel is based on the state of the corresponding connection. There are four major states:
- Opening (Registration)
- Opened
- Closing
- Closed
The figure below shows a detailed client channel state diagram.
In addition to establishing a TCP/IP connection, several activities may take place when a client channel opens. These activities can include things like:
- A preliminary exchange of messages with the server, which is known as registration
- Reading the client channel’s locally stored configuration information
You can often determine the cause of a client channel failure by checking the state of the client channel just before it closed. There are exceptions to this rule, however, such as a registration failure, which is protocol-specific.
Client Channel Failure Scenarios
There are several common client channel failure scenarios:
| Scenario | Description | Source States | Condition | Target State | Protocol-Dependent |
|---|---|---|---|---|---|
| Opening Timed Out | Channel tries to open connection to non-existing URI | Opening | Connection opening timeout | Closed | No |
| Wrong URI | Channel tries to open connection to non-existing URI | Opening | Incorrect URI exception | Closed | No |
| Connection Problem | Channel connection detects a connection problem | Opened Opening | Server disconnected | Closed | No |
| Network Problem (ADDP) | Channel connection detects a network problem (ADDP) | Opened Opening | Network problem (ADDP) | Closed | No |
| Wrong Server or Protocol | Channel tries to open connection with an incorrect server or protocol | Opening | Registration Failed/ProtocolException | Closing | Yes |
| Registration Failure | One of the channel registration steps failed | Opening | Registration Failed/ProtocolException | Closing | Yes |
Note that the first four scenarios, Opening timed-out, Wrong URI, Connection Problem, and Network Problem happen with the connection (TCP/IP) component. They do not involve protocol- or server-specific elements, whether in terms of failure-specific data or in terms of channel recovery actions and data.
The Wrong Server or Protocol and Registration Failure scenarios are protocol- or server-dependent and can be different for each type of protocol channel.
Application Block Architecture
The Warm Standby Application Block’s functionality is based on intercepting the channel's transition from a non-closed state to the Closed state. As you can see in the following figure, the application block is able to pick up this information because it sits between the client and protocol channels.
Upon receiving the channel’s Closed event, the application block uses diagnostic information to determine why the channel has closed. This diagnostic information is necessary to determine what actions, if any, the application block should take to restore the channel’s connectivity to the server.
The Warm Standby Application Block can take several different steps to recover channel connectivity. These steps are:
- Do nothing (close the channel by request of the user application)
- Attempt to open the channel without switching over its connectivity configuration from primary to backup
- Attempt to open the channel, switching its connectivity configuration from primary to backup
- Deactivate, in case of a fatal failure
Any application block activity will be followed by a corresponding event generated by the application block. These events will provide user applications with the opportunity to monitor and react to all of the application block’s activities and failures
To control channel connectivity with a warm standby mechanism, the user application should activate the Warm Standby Application Block instance that is responsible for handling the particular channel's connectivity failure and recovery.
Warm Standby Application Block Algorithm
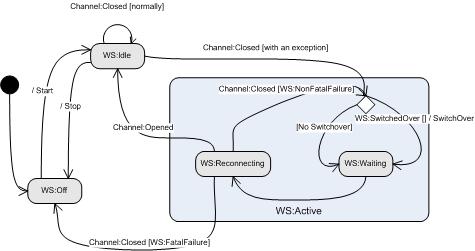
The Warm Standby Application Block has 4 states, as shown below.
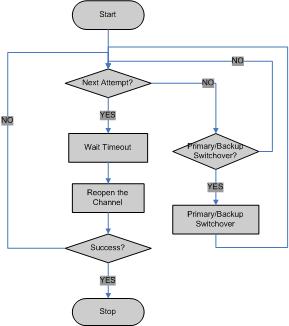
As soon as a channel’s Warm Standby Application Block is activated, it goes into the idle state, waiting for the channel’s Closed event. When the channel issues a Closed event, the application block checks to see if the channel was closed due to a connectivity failure. If so, the application block instance starts the channel connectivity recovery procedure, as shown below.
Here is the procedure for the Warm Standby Application Block:
- The user should activate the Warm Standby Application Block for every channel he or she intends to work with.
- In the active state, the application block waits for the channel’s Closed event.
- On receiving the channel’s Closed event, the application block activates the channel connectivity recovery procedure.
Application Block Components
The Warm Standby Application Block distribution consists of two main components:
- The application block itself, which provides an interface that you can use to integrate it into different GUI applications.
- A sample application, the WarmStandbyQuickStart application, which is built on the Warm Standby Application Block
As shown below, the application block itself runs on top of the Platform SDK, while the QuickStart application runs on top of the application block.
The Warm Standby Application Block Interface
The Warm Standby Application Block consists of the following classes:
- WarmStandbyService
- WarmStandbyConfiguration
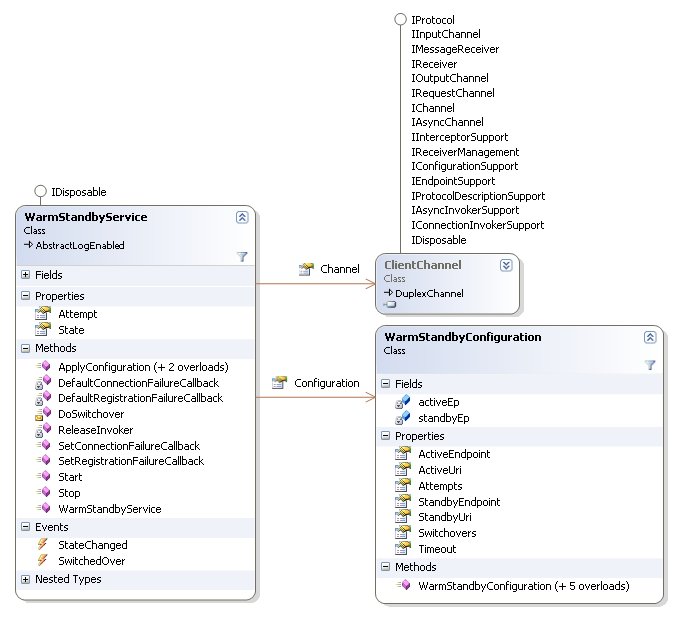
These classes are shown in greater detail below.
The WarmStandbyService class monitors and controls the connectivity of the channel it is responsible for, while the WarmStandbyConfiguration class handles all the parameters that are needed for the proper functioning of the warm standby process.
Starting with release 8.1.1, default behavior for the WarmStandbyService connection restoration includes the following improvements to provide improved performance:
- Following a switchover or the first reconnection attempt, WarmStandbyService no longer waits for a timeout to occur.
- Check backup server availability by performing a fast first switchover.
User applications can subscribe to the controlled channel’s Closed and Opened events in order to monitor and handle channel connectivity.
WarmStandbyService's StateChanged event is fired on any change of state in WarmStandby, providing the means for a user application to monitor state changes and to control the application block's activities.
Using the Application Block for .NET
Installing the Warm Standby Application Block
Before you install the Warm Standby Application Block, it is important to review the software requirements and the structure of the software distribution.
Software Requirements
To work with the Warm Standby Application Block, you must ensure that your system meets the software requirements established in the Genesys Supported Operating Environment Reference Manual.
Configuring the Warm Standby Application Block
In order to use the QuickStart application, you need to set up the XML configuration file that comes with the application block. This file is located at Quickstart\app.config. This is what the contents look like:
<?xml version="1.0" encoding="utf-8" ?>
<configuration>
	<configSections>

	</configSections>
	<WarmStandbyQuickStart>
		<Channel
			ClientType="19"
			ProtocolName="ConfigurationServer"
			ClientName="default"
		/>
		<WarmStandby
			PrimaryServer="tcp://hostname:9999"
			BackupServer="tcp://hostname:9999"
			Attempts="3"
			Timeout="10"
			Switchovers="3"
		/>
		<ConfServer
			UserName="default"
			UserPassword="password"
		/>
	</WarmStandbyQuickStart>

</configuration>
Follow the instructions in the comments and save the file.
Building the Warm Standby Application Block
The Platform SDK distribution includes a Genesyslab.Platform.ApplicationBlocks.WarmStandby.dll file that you can use as is. This file is located in the bin directory at the root level of the Platform SDK directory. To build your own copy of this application block, follow the instructions below:
To build the Warm Standby Application Block:
- Open the <Platform SDK Folder>\ApplicationBlocks\WarmStandby folder.
- Double-click WarmStandby.sln.
- Build the solution.
Using the QuickStart Application
The easiest way to start using the Warm Standby Application Block is to use the bundled QuickStart application. This application ships in the same folder as the application block.
To run the QuickStart application:
- Open the <Platform SDK Folder>\ApplicationBlocks\WarmStandby folder.
- Double-click WarmStandbyQuickStart.sln.
- Build the solution.
- Find the executable for the QuickStart application, which will be at <Platform SDK Folder>\ApplicationBlocks\WarmStandby\QuickStart\bin\Debug\WarmStandbyQuickStart.exe.
- Double-click WarmStandbyQuickStart.exe.
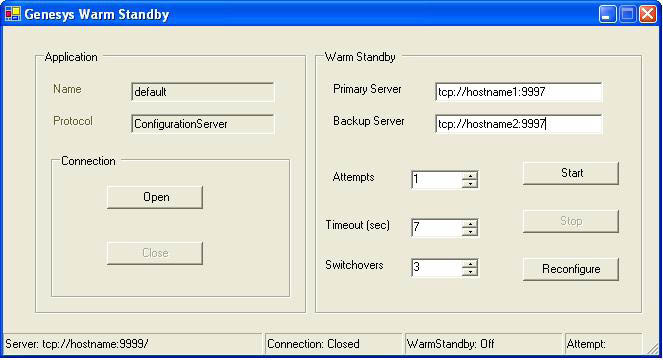
After you start the application, you will see the user interface shown below.
This form has two main sections. The left side enables you to set up a connection for the application indicated in the Name field, using the protocol specified in the Protocol field. To open the connection, press the Open button. Press the Close button to close it.
The right side of the form lets you specify primary and backup servers. It also lets you specify the number of times the warm standby mechanism will try to contact the primary server, and what the timeout value should be for each attempt. On startup, these values are picked up from the configuration file, but you can change them in the user interface.
Once you have the desired values, you can press the Start button to turn on the warm standby feature. If you would like to change the configuration after warm standby is turned on, simply modify the configuration information and press the Reconfigure button. The warm standby configuration will be changed dynamically.
Using the Application Block for Java
Installing the Warm Standby Application Block
Before you install the Warm Standby Application Block, it is important to review the software requirements and the structure of the software distribution.
Software Requirements
To work with the Warm Standby Application Block, you must ensure that your system meets the software requirements established in the Genesys Supported Operating Environment Reference Manual, as well as meeting the following minimum software requirements:
- JDK 1.6 or higher
Building the Warm Standby Application Block
To build the Warm Standby Application Block:
- Open the <Platform SDK Folder>\applicationblocks\warmstandby folder.
- Run either build.bat or build.sh, depending on your platform.
You may need to edit the path specified in the quickstart file by adding quotation marks if your ANT_HOME environment variable contains spaces.
This build file will create the warmstandbyappblock.jar file, located within the <Platform SDK Folder>\applicationblocks\warmstandby\dist\lib directory.
Now you are ready to add the appropriate import statements to your source code and start using the Warm Standby Application Block:
[Java]
import com.genesyslab.platform.applicationblocks.warmstandby.*;
Using the QuickStart Application
The easiest way to start using the Warm Standby Application Block is to use the bundled QuickStart application. This application ships in the same folder as the application block.
To run the QuickStart application:
- Open the \ApplicationBlocks\WarmStandby\quickstart folder.
- Run either quickstart.bat or quickstart.sh, depending on your platform.
You may need to edit the path specified in the quickstart file by adding quotation marks if your ANT_HOME environment variable contains spaces.
After you start the application, you will see the user interface shown below.
On startup, the QuickStart application uses values specified by the quickstart.properties configuration file. You can change these values either by editing that file or by overwriting them after running the user interface.
This form has two main sections. The left side enables you to set up a connection for the application indicated in the Name field, using the protocol specified in the Protocol field. To open the connection, press the Open button. Press the Close button to close it.
The right side of the form lets you specify primary and backup servers. It also lets you specify the number of times the warm standby mechanism will try to contact the primary server, and what the timeout value should be for each attempt.
Once you have the desired values, you can press the Start button to turn on the warm standby feature. If you would like to change the configuration after warm standby is turned on, simply modify the configuration information and press the Reconfigure button. The warm standby configuration will be changed dynamically.


