Contents
Bonus Example
Now it's time to apply all of the knowledge you have learned so far. This example uses Menu, Segmentation, and Shared Module blocks to demonstrate how you can use Genesys Designer to create an application for a pizzeria.
Play Greeting
First, let's play a greeting for the caller. Click and drag the Play Message block from the Palette to the Application Flow and drop it in the Self Service phase.
Next, let's configure the block to play a greeting. Ensure the Play Message block is selected and go to the block properties section to the right of the Application Flow. Click Add Prompt and configure a TTS prompt that will say "Welcome to Pizza Palace!"
As we might add several Play Message blocks to our application, it is a good practice to rename the block to describe what it does. In this case, let's rename the block to Play Greeting.
Pizza Size Menu
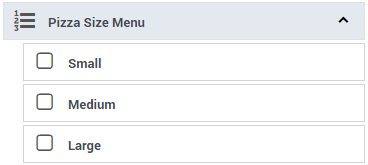
Now let's ask the caller to specify a pizza size. Add a Menu block below the Play Greeting block. Rename the block to Pizza Size Menu. Ensure the Pizza Size Menu block is selected and go to the block properties to configure the block to provide the following functions:
- Play a prompt that asks the caller to choose a size.
- Use DTMF Options to input a size:
- 1 - Small
- 2 - Medium
- 3 - Large
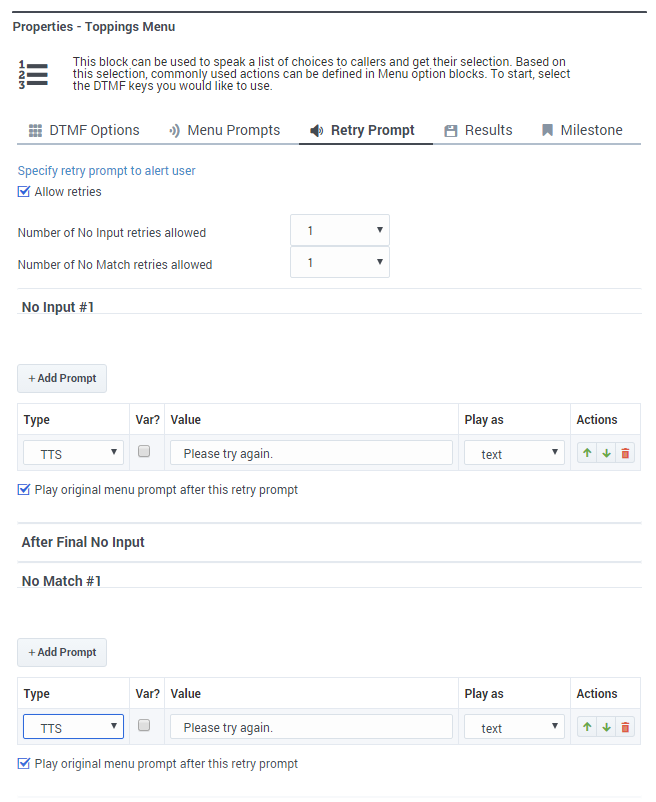
- Use Retry Prompt to allow two No Match events and one No Input event. After each event, the caller is asked to "Please try again" and the menu options are repeated.
- Store the outcome of the interaction in two variables: pizza_size and menu_result.
Save and Validate
It is a good idea to save often (although Designer will periodically save a temporary version of your application automatically). Click Save Flow.
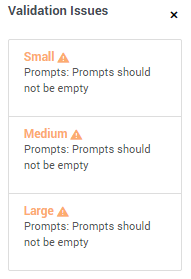
Designer saves your application, but it also displays a warning icon beside Validation Status to indicate that it has found warnings or errors with your application. This is expected, as the application is not yet complete.
Click the warning icon to view the warnings.
The warnings indicate that each of our menu options do not provide a prompt. Let's take a closer look and investigate these warnings. You can click the warning to open the block to which the warning refers. For now, let's look at these blocks in the Application Flow.
Click the Small block and view its properties. Click the Play Audio tab and add a TTS prompt with the value You chose small. Add similar prompts to the Medium and Large blocks.
Next, click Save Flow. You have fixed the warnings, and a green check mark is displayed by Validation Status.
Testing
Like saving, it's a good idea to regularly test your application to ensure it is working as you intend. Click Publish.
In the navigation bar, click Applications to return to the applications list. In the Phone Number(s) column, click Manage and assign a phone number to your application. Finally, click the Status slider to enable your application.
That's it—give your application a call and test it to ensure it is working.
Time to Segment
We now have a simple application to determine the pizza size that the customer wants, but what happens next? Let's add an option to let the customer choose toppings for the pizza. Also, just in case the caller was not successful in making a size selection, let's add an option to transfer to a live operator.
So, after the Pizza Size Menu blocks, we need to branch into two different paths, depending on whether or not the caller gave a valid response at the menu.
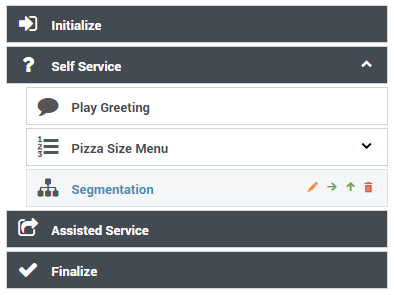
Add a Segmentation block after the Pizza Size Menu blocks. When done, check to see if the Segmentation is indented to the right of Pizza Size Menu parent block. What happened? Now is a good time to review layers. Click [+] Show Tip below to see how to fix this problem. Or, if you know how to resolve this problem, skip ahead to continue with this example.
Change the name of the Segmentation block to Size result. Next, go to the block properties. In the Conditions tab, click Add Condition to create a branch under this Segmentation block. Change the name of the condition from Segment to Size Error. For Condition Expression, enter menu_result.success == false.
This expression refers to the menu_result variable that we used to store the outcome in the Pizza Size Menu block. If its success element is false, it means the customer exited the menu due to a no-input or no-match error, and the application did not receive a valid response from the customer. In this case, the expression evaluates to true, and the application executes the Size Error block. If the application did receive a valid response from the customer, the application executes the next block after the Size Result block and its child blocks (we are adding more blocks to the Size Result block a little later).
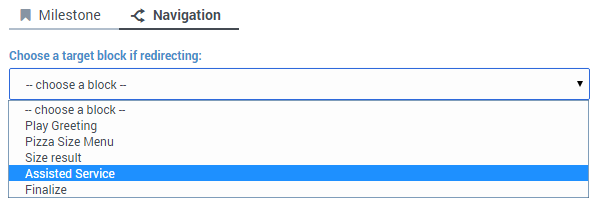
Click the Size Error block in the Application Flow to select it and display its properties. Click the Navigation tab near the bottom. In the drop-down menu, choose the Assisted Service phase. The application now skips directly to the Assisted Service phase whenever there is an error result from the Pizza Size Menu block.
Did you notice that when you set the Navigation property, Designer applied a blue bar to the right edge of the Size Error block in the Application Flow? This indicates that the block contains a Go To command, which means it jumps to a specific location after executing, rather than continuing with the normal top-down execution flow.
Click Save Flow to save your work. Designer displays the following validation warning: Expression may have undefined reference: "success".
Designer tracks that you have created variables, but it does not track which types of objects are stored in them. As a precaution, it warns you if it detects expressions that reference elements of variables.
It is always important to pay attention to validation warnings. However, some of them (such as this example) can be safely ignored once you have verified that your logic is correct.
Routing to an Agent
If the Self Service phase cannot handle the call, the application proceeds to the Assisted Service phase and it can transfer the call to an agent.
Drag and drop a Route Call block under the Assisted Service phase.
The Route Call block can provide several types of routing, such as skills-based routing, Agent Group routing, routing by priority ranking, and more. For this example, select Direct number routing. You could enter a phone number in the Number field, but for this example we will create a User Variable, routing_number, to hold the number. The default value of this variable must be a number that you can use to test the routing function.
Ensure you have selected the routing_number variable for the Direct number routing option in the Route Call block. Next, go to the Routing Priority tab and disable the Use Priority during Routing check box, as we are not using this feature for this example.
We are almost done. However, before we route the call, we should play a message to the caller to let them know that we are transferring the call. We do not use the options in the Play Audio tab of the Route Call block for this function, because those options are used for audio that loops while the caller is being transferred (hold music).
Add a Play Message block at the beginning of the Assisted Service phase, before the Route Call block. Change the block name to Announce Transfer and have it play this TTS prompt: "Please hold while we transfer your call."
Click Save Flow to save your work. Designer displays the following new validation warning: "Prompts should not be empty."
In this case, the warning refers to the Play Audio tab of the Route Call block. It is not always necessary to enter a prompt for every audio property slot. If you determine that it is best for your application design to leave some of these slots empty, you can safely ignore the resulting warnings.
Let's add a shared module to offer the caller a menu of specialty pizzas. As you might recall, shared modules are small pieces of applications that you can use in one or more applications.
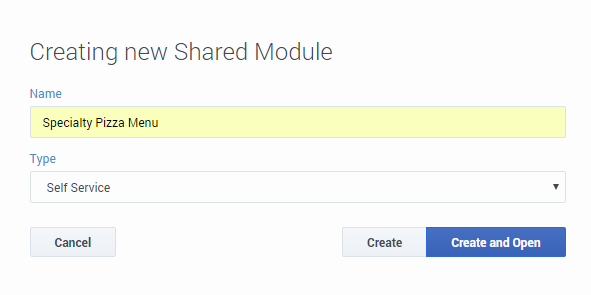
Click Shared Modules in the navigation bar to open the list of shared modules. Next, click Add Module and create a module named Specialty Pizza Menu and set its type to Self Service, since it will use Self Service functionality that we will include in the Self Service phase of our application. Click Create and Open to create the shared module and open it for editing.
The edit window for shared modules looks similar to the application editing window, except that the Application Flow contains only two phases: Initialize and Self Service. This is because we chose Self Service as the type for this shared module; if we selected Assisted Service, the Application Flow would contain only Initialize and Assisted Service phases.
You build a shared module in a manner similar to how you build an application:
- Drag blocks from the Palette and drop them into the Application Flow.
- Edit block properties.
- Rearrange blocks to suit the execution order in the Application Flow, which is usually from top to bottom.
Usually, when you call a shared module from within an application, your application passes some input parameters to the shared module. After the shared module finishes executing, the application receives some output parameters. You define these input and output parameters in the Initialize phase of your shared module.
For our Specialty Pizza Menu shared module, the application will pass in the size of pizza that the caller selected. Then the module will present a menu of choices (for example: plain cheese, meat lovers, and so on) and will return the selection back to the application. It will also return a flag to indicate whether the caller made a valid choice in the shared module.
Input/Output Parameters
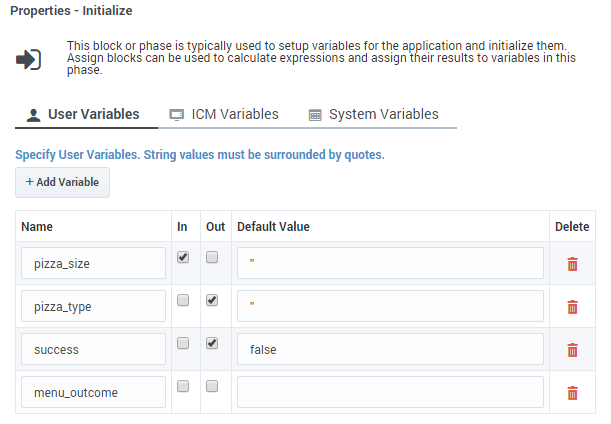
First, let's define our input/output parameters. Select the Initialize phase and view its properties. Let's create one input and two output parameters, and one more parameter to store the result of the interaction. In the User Variables tab, click Add Variable four times to create four variables.
Each variable has two check boxes, In and Out. This specifies whether the variable is used for input or output.
Configure the four variables as shown below:
Next, let's create a menu for the shared module to present to the caller.
Toppings Menu
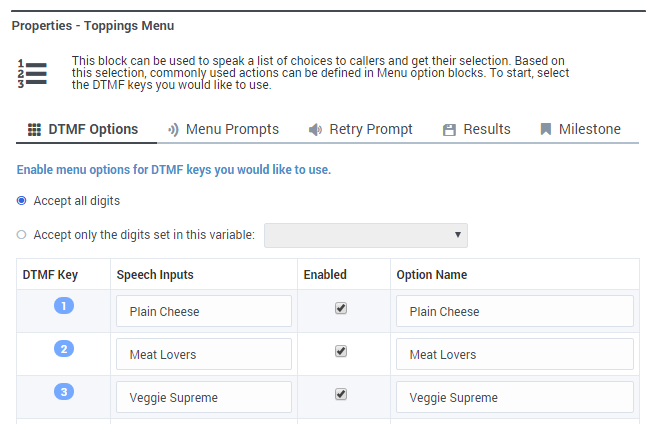
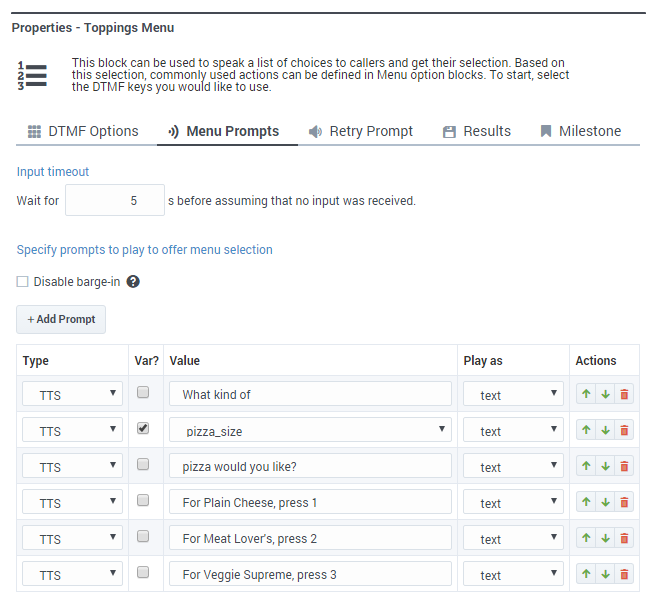
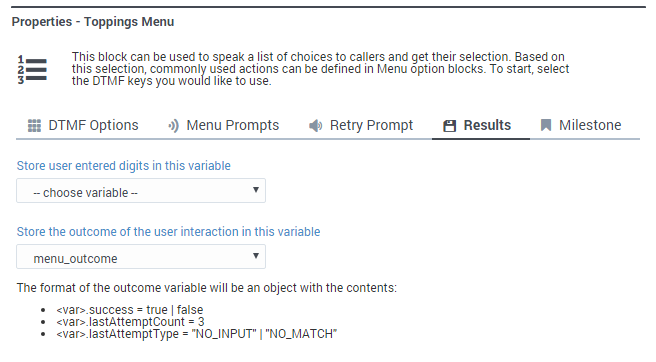
Add a Menu block to the Self Service phase and rename it to Toppings Menu. Configure it as shown below:
You might have noticed that we did not assign a variable to the Store user entered digits in this variable menu, as we do not need to store which key the caller pressed. Instead, we will store a readable string in the pizza_type variable that can be passed back to the application.
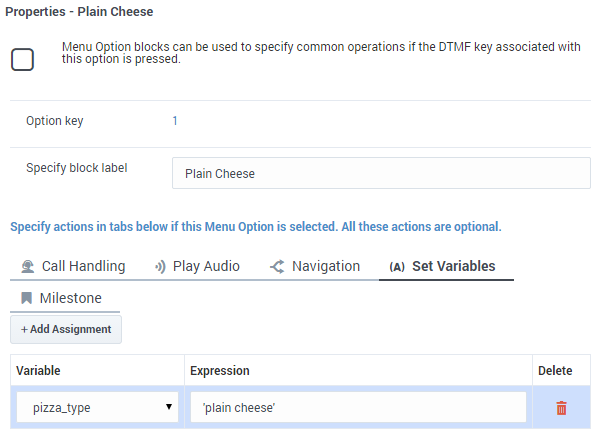
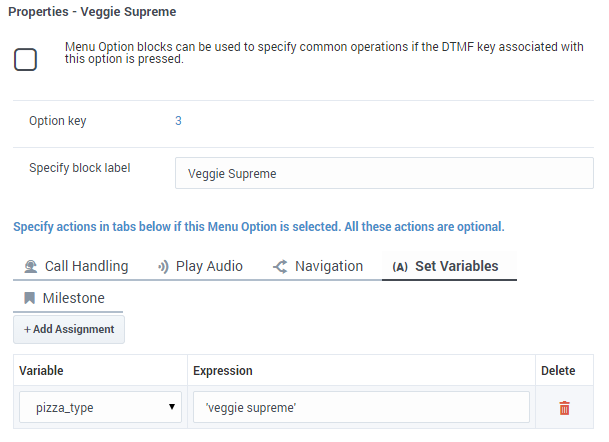
Click the Plain Cheese block and view its properties. Click the Set Variables tab, and then click Add Assignment. Select the pizza_type variable and enter 'plain cheese' in the Expression field. This sets the pizza_type variable to the string 'plain cheese' whenever the caller selects option 1 at this menu.
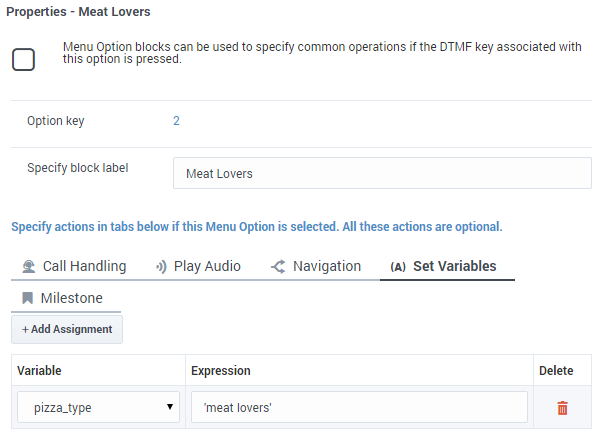
Repeat the above steps for the Meat Lovers and Veggie Supreme blocks and and use the strings 'meat lovers' and 'veggie supreme', respectively. If you need help, click [+] Show Tip below.
Return Block
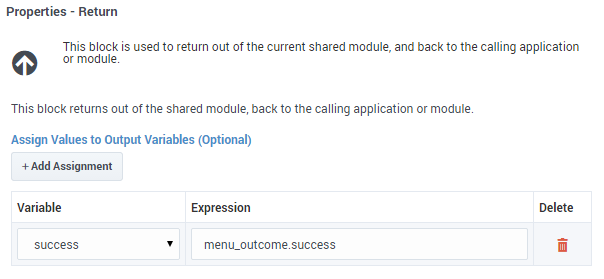
Next, we need a Return block to tell the shared module to exit and return to the application. We can also use the Return block to assign values to any output variables that have not been updated.
Place a Return block at the bottom of the Application Flow.
In the Return block’s properties, click Add Assignment and choose the output variable success. Assign it the following expression value: menu_outcome.success.
Saving and Versioning
Click Save Flow to save your work. Designer will identify validation errors, but you can ignore those for now.
You might also notice another button named Create Version. You click Create Version when you want to publish the final version of your shared module. If necessary, you can develop and publish several different versions of a shared module, and your various applications could each use different versions, or the same version, as appropriate.
Now that you have a shared module, let's put it in your application.
Click Applications in the navigation bar and click the name of your application to open it for editing.
Drag the Shared Module block onto the Application Flow and drop it beneath the Size Result block. If it ends up indented under the Size Error block, click its left-arrow icon to move it to the left, so it is in line with the Size Result block.
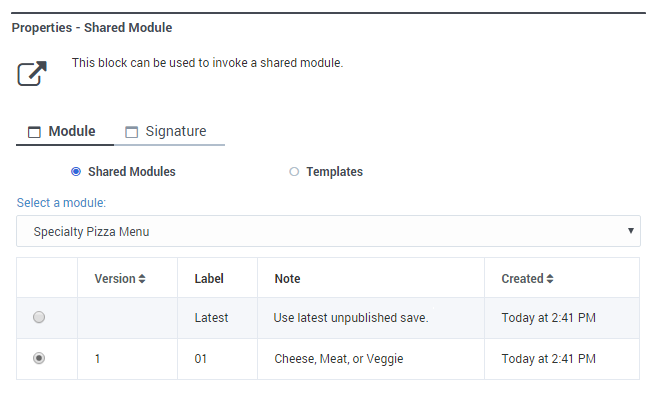
Next, view the properties of the Shared Module block and use the drop-down menu to select the Specialty pizza menu shared module. When you select a shared module, a list of its published versions appears below. Select the version that we created in the previous step (Cheese, meat, or veggie).
The Signature tabs let you set up the parameters of the shared module. As you recall, we designed the shared module to do the following:
- Input
- pizza_size - Holds a string value for pizza size.
- Output
- success- Holds a Boolean value to indicate whether a valid selection was made.
- pizza_type - Holds a string value to describe which type of pizza was selected (if any).
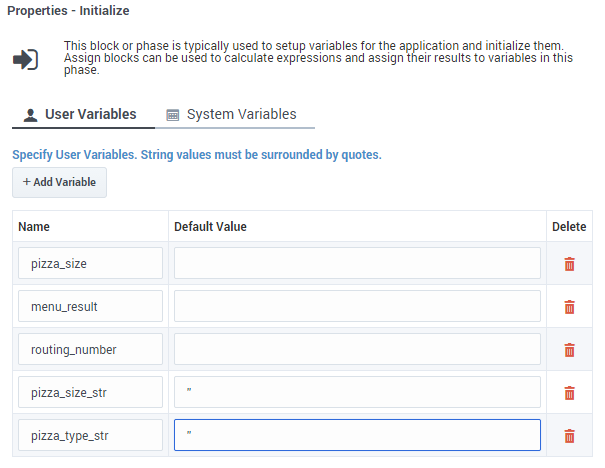
We need to create new variables to hold these values. In the Application Flow, click the Initialize phase and view its properties. Add two new User Variables: pizza_size_str, and pizza_type_str. Set both default values to empty strings (''). To hold the Boolean return value, we can reuse the menu_result variable.
Select the Shared Module' and click its Signature tab. Select Input Parameters and set the default value of the pizza_size input parameter to the variable pizza_size_str.
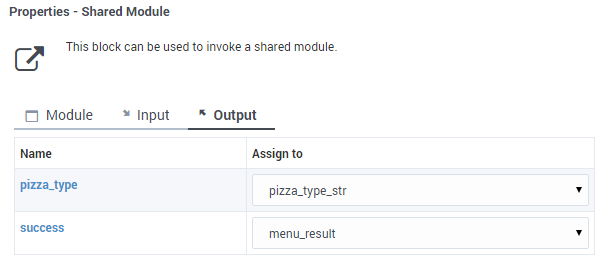
Next, select Output Parameters and assign the pizza_type output to the pizza_type_str variable, and assign the success output to the menu_result variable.
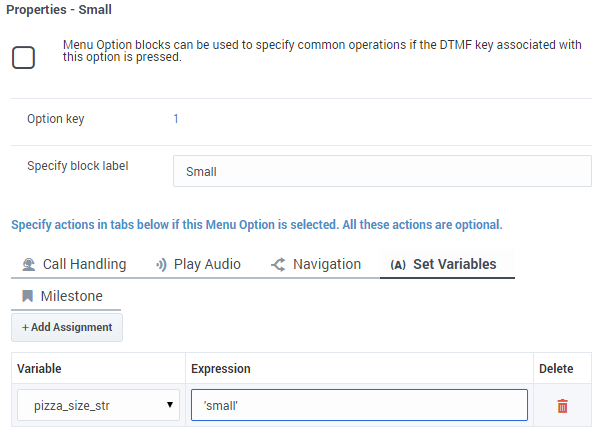
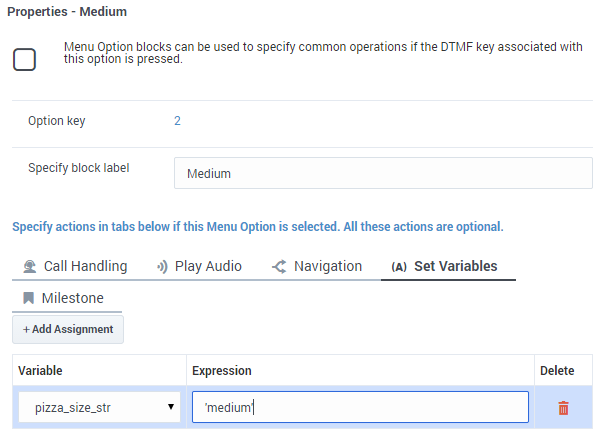
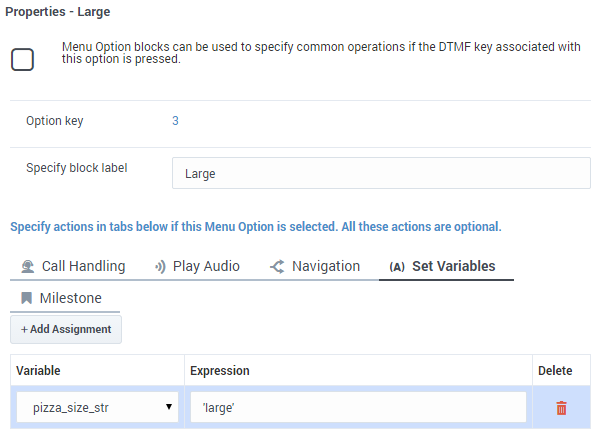
Next, we need to assign the proper string values to the pizza_size_str variable. For each Small, Medium, and Large block, click the Set Variables tab and assign the pizza_size_str variable to the value small, medium, or large, respectively.
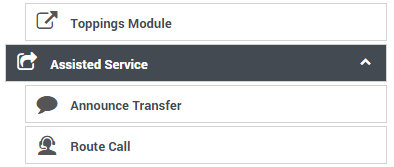
Finally, change the Shared Module block name to something more descriptive, such as Toppings Module.
Handling the Result
Our application is taking shape. Next, we need to consider what happens when the caller returns from the Toppings Module.
Let's look at the Application Flow. After the caller exits the Toppings Module block, he will enter the Assisted Service phase and be unnecessarily transferred to an agent, even if he made a successful order selection in the Self Service phase.
We need to add the following functions:
- If the Toppings Module returns an error, the caller is directed to the Assisted Service phase so they can speak to an agent.
- If the Toppings Module returns a valid result, the order is considered complete and we play a wrap-up message to the caller and end the call.
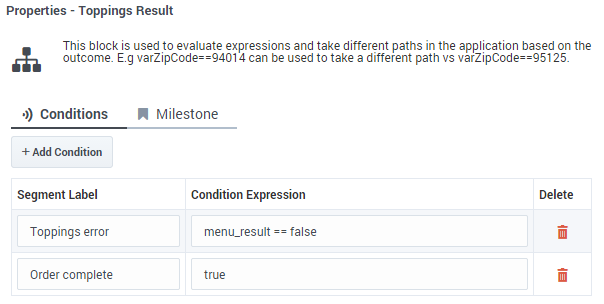
To accomplish this, add a Segmentation block below the Toppings Module block. Change the name of this Segmentation block to Toppings Result.
In the Toppings Result block properties, add two conditions:
- Toppings error - menu_result == false (This condition executes if the caller did not give a valid response in the shared module.)
- Order complete - true
When a Segmentation block is executed, its conditions are evaluated in order from the top. The first condition that is satisfied is executed, and no further conditions are evaluated. In our Toppings Result block, if the first condition evaluates to true, Toppings error is executed. Otherwise, the next condition is evaluated. In our case, we want the last condition to execute whenever it is reached, so we set the expression to true.
In the Toppings Error block, click the Navigation tab and set the target block to Assisted Service. This transfers the call to an agent.
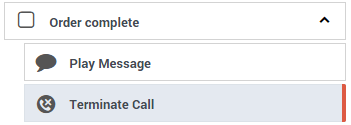
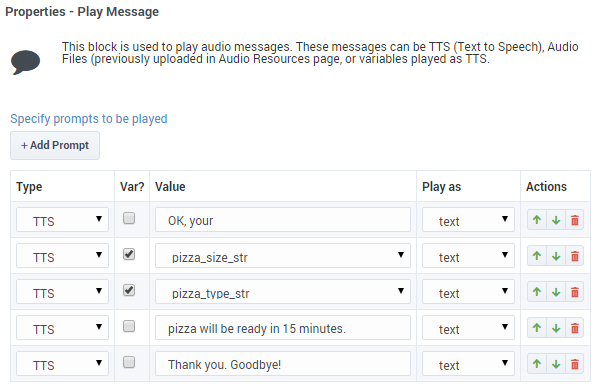
In the Order complete block, we want to play a message and then end the call. Place a Play Message block under the Order complete block so that it is indented inside that block. Next, place a Terminate Call block under the Play Message block so that it is lined up at the same indentation level as the Play Message block. Since these two blocks are indented blocks (child blocks) underneath the Order complete block (parent block), they execute in top-down order only if the Order complete block executes.
Configure the Play Message block as shown below:
The Terminate Call block has no property settings - it signals the application to jump to the Finalize phase. You might notice that the Terminate Call block has a red bar on its right edge, to indicate that it causes the call to end, bypassing any blocks that might be below it.
Click Publish and call your application to test it.
Applying What You Have Learned
You now have a solid foundation for understanding how to use Genesys Designer to build and deploy voice applications.
Refer to the Designer Help to learn more about blocks, Shared Modules, Audio Resources, and more.

