Using the CTI Application
<multistep> CTI Application (Dialpad) Overview=
From the Dialpad, users change their phone number, make calls, change their online status, and sign out.
- Logging in.
- Changing your phone number.
- Changing your status.
- Collapsing or expanding your dialpad.
- Receiving calls.
- Managing active calls.
- Managing transferred calls.
- Searching results.
- Managing wrapup calls.
- Managing ClickToDial.
- Monitoring agents.
- Signing out.
|-| Logging In=
- Enter your username (email address) and password and click Log In.
- The dialpad is displayed and you can make an outbound call, change your online status, or log out.
|-| Changing Your Phone Number= To change your phone number, click on the top left icon beside the online status bar.
|-| Changing Your Status= To change your online status, click on the top online status bar to select an available status.
|-| Collapsing or Expanding Your Dialpad= To collapse or expand the dialpad, press ctrl+shift+/ or double-click the side border of the dialpad.
|-| Receiving Calls= For inbound calls, the panel displays call details and an Incoming Call dialog box. Accept or reject the call from your phone.
|-| Managing Active Calls= For active inbound calls, the following options are displayed near the top of the dialpad.
- Go to Call Transfer
- Mute or unmute the call
- Disconnect the call
- Use the ACD page in CX Builder to customize which case data to display.
- Agents can edit the Subject and add notes.
|-| Managing Transferred Calls=
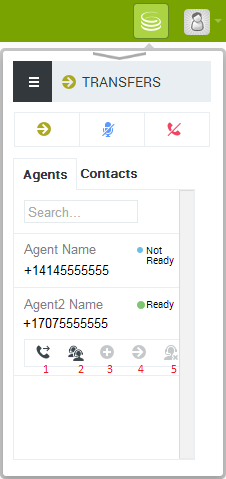
To consult, conference, or blind transfer active calls, click on the name of another agent in the Ready state, and a dialog box appears with the following options:
- Blind transfer the call to the other agent and disconnect.
- Consult with the other agent, put the customer on hold, and enable the remaining three options.
- Adds the customer to the conference along with the other agent.
- Transfer the call to the other agent.
- Disconnect the other agent and add the customer back to the call.
|-| Searching Results=
Click a link to load the record in the main Zendesk window. Hide the panel by clicking the up arrow.|-| Managing Wrapup Calls= When the call finishes, the wrap-up screen appears.
- Click Add More Time to extend your wrap-up time.
- Select from the list of After Call Work (ACW) reason codes (configured in VCC Dashboard). You stay in the ACW state until you change your status to Ready.
- Enable Mark Me Away After Call, so you will not receive another call.
- Click Done when finished with the call. If the dial pad is viewed from the customer or transaction record, then a phone call with the wrap up information is created for customer or transaction's entity record (discussed in Phone Logs section).
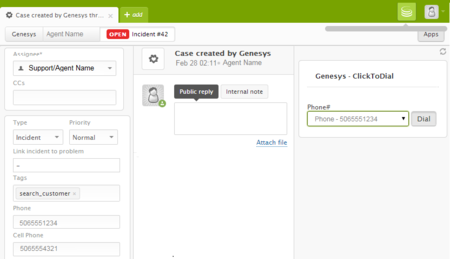
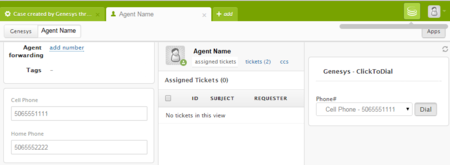
|-| Managing ClickToDial= For any ticket or customer record, the CTI Adapter displays the ClickToDial panel, which provides all available phone numbers associated with the ticket or customer record. Click the [Dial] button to expand the dialpad and make the outbound call.
The following are the ticket and customer records:
|-| Monitoring Agents = Access the VCC Dashboard and VCC Agent Desktop applications from the left-side navigation bar.
|-| Signing Out= To sign out, click the top-left corner and select Sign Out.
|-| </multistep>


