Contents
Installing and Configuring
<multistep> Installation Overview= Use this overview to serve as a quick reference to install or modify the CTI Adapter for Zendesk. Select a link for more information or click Next Step > to view details of each step. The browser back button is not supported on this page.
- Installing CTI Adapter for Zendesk.
- Managing Permissions.
- Managing Application Settings.
- Enabling Click to Dial.
- Enabling Multiple Adapters.
- Configuring Screen Popups.
|-| Installing CTI Adapter for Zendesk=
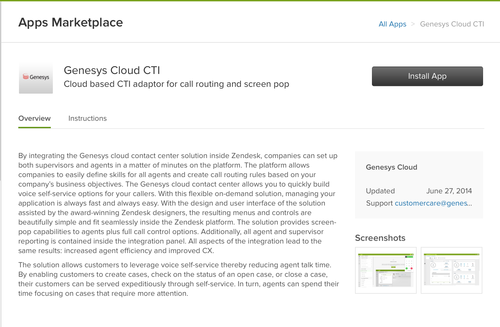
- Click Admin Home > Apps > Marketplace to open the Apps Marketplace view, as shown below:
- Enter Genesys Engage cloud CTI into the search field. The Genesys Engage cloud CTI app icon appears under the Results section of the Apps Marketplace view.
- Click on the Genesys Engage cloud CTI app icon to open the instructions and installation information.
- Familiarize yourself with the overview and instructions.
- Click Install App to open the Installation window, as shown below:
-
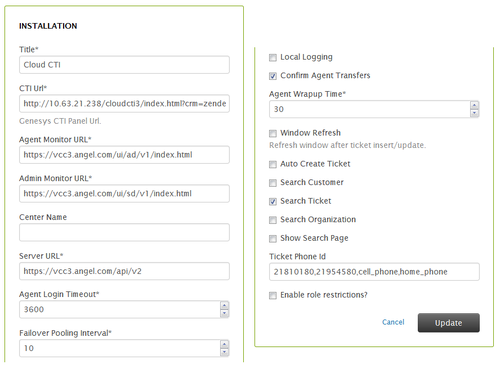
Enter the following details on the Installation window, as shown in the graphic below and as described in the Installation Window Settings table below (fields marked with an asterisk (*) are required):
Installation Window Settings
Field or Checkbox Name Definition Title
Enter the app name.
CTI URL
Enter the CTI Adapter URL, which must be
https://vcc3.angel.com/ui/cti/index.html?crm=zendesk
Server URL
Enter the server URL, which must be
https://vcc3.angel.com/api/v2
Agent Monitor URL
Enter the Agent Monitor URL, which must be
https://vcc3.angel.com/ui/ad/v1/index.html
Admin Monitor URL
Enter the Admin Monitor URL, which must be
https://vcc3.angel.com/ui/sd/v1/index.html
Local Logging
Click to enable a popup dialog box to display the system messages.
Confirm Agent Transfers
Click to enable call transfers.
Agent Wrapup Time
Enter the number of seconds allowed for a agent to enter call notes.
Window Refresh
Click to enable the reloading of the main window after a user updates a ticket following the Agent Wrap-up time period.
Auto Create Ticket
Click to enable the automatic creation of a new ticket, if the main window does not already contain an existing ticket.
Search Customer
Click to enable the search result panel to display the Search Customer type of records.
Search Ticket
Click to enable the search result panel to display the Search Ticket type of records.
Search Organization
Click to enable the search result panel to display the Search Organization type of records.
Show Search Page
Click to enable the loading of the Zendesk default search page in the main window containing the parameters from the CTI Adapter.
Ticket Phone Id
Enter the comma-separated IDs of custom phone fields for user and ticket records.
After the successful installation, the installed App is then displayed.
ImportantAdministrators control the access of the CTI panel and Monitors. See the topic, Managing Permissions.|-| Managing Permissions=
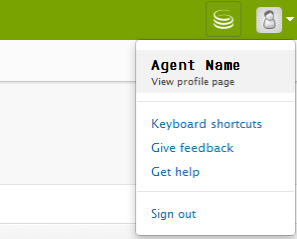
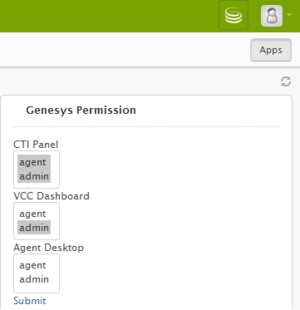
- If you have an Administrator role, view the permissions panel by selecting the top-right icon on the screen and clicking View profile page for your own profile record.
The permission panel opens, as shown below:
- For every feature, select multiple roles to provide access to users.
- Click Submit and provide your credentials to save the changes.
-
Select Settings > Manage > User Fields to open up the User Fields dialog box, as shown below, and create the following fields:
- Cell Phone — [type: text, key: cell_phone]
- Home Phone — [type: text, key: home_phone]
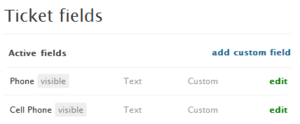
- Select Settings > Manage > Ticket Fields, and create the Phone and Cell Phone fields, shown below:
- Click on edit to open the Ticket Field dialog box to get the Custom Field ID, as shown below:
-
You can then update the following fields to the Genesys settings:
- cell_phone
- homephone
- customfieldid
- customfieldid
- On the Advanced Options tab of the ACD Page in CX Builder, select the appropriate variable.
- Assign the name to be displayed in the CTI Adapter.
- Assign the data as Toast, Ticket , or Both (Toast and Ticket data).
thumb|center|500px|ACD Page — Configuring Toast and Ticket Data
|-| Managing Application Settings=
Click the gear icon to open the Manage App view, which lists the various options to uninstall the App, or to change the settings and variable values.
|-| Enabling Click to Dial=
Click to dial functionality helps you to incorporate your web browser with your phone system.
Predefined Custom Phone Fields
If your Zendesk account already has custom phone fields defined for user and ticket records to store home, mobile, and work phone numbers separately, then just copy the comma-delimited key-names of the user phone fields and IDs of the ticket phone fields into the Genesys App Settings [Ticket Phone Id].
Undefined Custom Phone Fields
If your Zendesk account does not have any custom phone fields defined:
|-| Enabling Multiple Adapters=
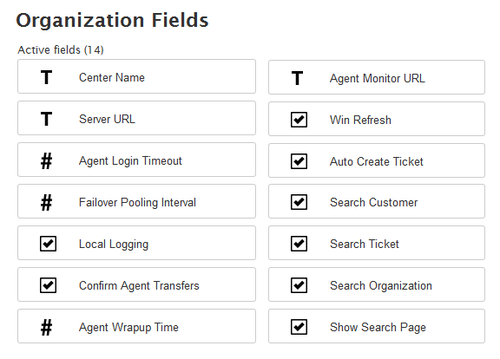
With a Zendesk account, you have the option to create fields in an organizational type. Once this account is created, your organization can have multiple profiles of the Genesys CTI Adapter. Two agents belonging to different organizations can use different profiles.
When an agent logs into Zendesk, this organizational setting (if defined) overrides the settings that were previously added to the App Marketplace view to connect to the Genesys Engage cloud:
To enable multiple profiles:
Manage the following configuration fields, as shown in the graphic below and as described in the Organization Fields Settings table below:
Organization Fields Settings
Field Name Information to Enter Center Name
[type: text, key: center_name]
Server URL
[type: text, key: server_url]
Agent Login Timeout
[type: numeric, key: agent_login_timeout]
Failover Pooling Interval
[type: numeric, key: failover_pooling_interval]
Local Logging
[type: checkbox, key: local_logging, tag: local_logging]
Confirm Agent Transfers
[type: checkbox, key: confirm_agent_transfers, tag: confirm_agent_transfers]
Agent Wrapup Time
[type: numeric, key: agent_wrapup_time]
Agent Monitor URL
[type: text, key: agent_monitor_url]
Win Refresh
[type: checkbox, key: win_refresh, tag: win_refresh]
Auto Create Text
[type: checkbox, key: auto_create_text, tag: auto_create_text]
Search Customer
[type: checkbox, key: search_customer, tag: search_customer]
Search Ticket
[type: checkbox, key: search_ticket, tag: search_ticket]
Search Organization
[type: checkbox, key: search_organization, tag: search_organization]
Show Search Page
[type: checkbox, key: show_search_page, tag: show_search_page]
|-| Configuring Screen Popups=
When an inbound call is presented to an agent, a screen pop is displayed containing information based on selected variables. These variables can be information collected from callers, information pulled from the call web services of other systems. Once the information is available in the form of variables, it can be passed to systems agents by the screen pop.
Toast and Ticket Data
Toast Data
When a call is ringing, an agent receives a notification on their desktop (a toast or screen pop) that contains data about the call. The notification is displayed in the bottom-right corner of the desktop. The notification contains data about the current call and caller. The data contained in the notification is configurable by an administrator by using CX Builder.
Example
An agent handles calls for multiple companies or products. The toast data provides the agent with the company or product name to which the caller wants information. This toast data might also provide the caller's name, or what action within the IVR the caller performed.
Ticket Data
When an agent answers or makes a call, the call controls display at the top of the main view, and the Ticket Information view is displayed below the call controls. the Ticket Information view contains Ticket data and provides whatever information the agent might need to handle the call. This information might include an account number that the caller entered, or any data a back-end database might contain regarding this contact. This data is meant to provide the agent with all of the information that they need to handle the call without asking the caller to repeat the information that the caller has already entered while navigating through the IVR.
Ticket data, like the data in the call notification, is configured by an administrator by using CX Builder.
Example
After the call is answered, the agent can specify the call disposition by using pre-defined disposition codes. The administrator configures the system so that either disposition codes are mandatory for all agents, or that these codes are not mandatory. This configuration is done by using VCC Dashboard. Disposition codes can also be displayed as nested drop-down lists. This feature is configured by an administrator by using CX Builder.
When a call rings on the agent desktop, but the agent does not answer the call, this is considered a missed call. A missed call is reported in the historical reporting. Missed calls are returned to the routing engine and sent to the next available agent. The agent state can be set automatically to Not Ready or Logged Out upon a missed call. This feature is configured by an administrator using CX Builder.
Agents can also use the Reject button (if enabled for your contact center), to reject an incoming call and return it to the queue. This feature is configured by an administrator by using CX Builder.
Call Notes enable agents to enter information about the current call and store the notes as part of the ticket information in CX Analytics. To add a call note, click the Note tab in the call window.
Configuring Toast and Ticket Data
To configure Toast and Ticket data:
Disposition and Not Ready Codes
Not Ready reason codes, Disposition codes, After Call Work (ACW) codes, and the Address Book are provisioned using the VCC Dashboard.
For more information about configuring these codes, see the VCC Solution Guide and the VCC Dashboard Help.
|-| </multistep>
- If you have an Administrator role, view the permissions panel by selecting the top-right icon on the screen and clicking View profile page for your own profile record.


