Using the CTI Application
<multistep>
CTI Application (Dialpad) Overview=
From the Dialpad, users change their phone number, make calls, change their online status, and sign out.
- Configuring Dialpad.
- Logging in.
- Changing your phone number.
- Changing your status.
- Collapsing or expanding your dialpad.
- Receiving calls.
- Managing active calls.
- Managing transferred calls.
- Managing active calls.
- Searching results.
- Managing wrapup calls.
- Managing Phone Logs.
- Managing ClickToDial Phone Fields.
- Monitoring agents.
- Signing out.
|-| Configuring Your Dialpad =
Use the Dashboard to set up the Dialpad.
- Navigate to Home > Dashboard.
- Click Personalize Dashboard on the top-right corner.
- Click on any available Custom Portlet option.
- Hover your cursor over the Custom Content and click Setup.
-
In the popup screen, select Genesys CTI Panel and then click Save.
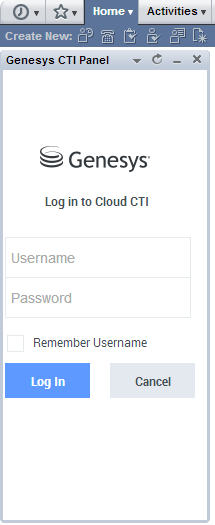
The dashboard login panel opens.
|-| Logging in=
- Enter your username (email address) and password and click Log In.
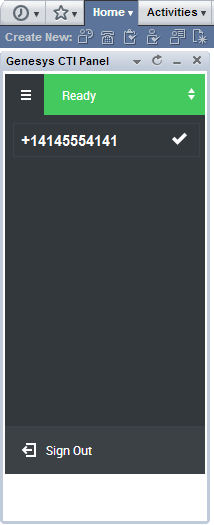
- The dialpad is displayed and you can make an outbound call, change your online status, or log out.
|-| Changing Your Phone Number= To change your phone number, click on the top left icon beside the online status bar.
|-| Changing Your Status=
To change your online status, click on the top online status bar to select one of the following available statuses:
- AfterCallWork
- AuxWork
- Offline
- Ready
- Break
- custom-acw
- Lunch
|-| Receiving Calls=
For inbound calls, the panel displays the call details and an Incoming Call dialog box. Accept or reject the call from your phone.
|-| Managing Active Calls=
For active inbound calls, the following options, as numbered below, are displayed near the top of the dialpad:
- Go to Call Transfer
- Mute or unmute the call
- Disconnect the call
- Use the ACD Page in CX Builder to customize which case data to display.
- Agents can edit the subject and add notes.
|-| Searching Results=
Upon receiving a call, the cti variable parameter is passed to NetSuite and appears in the Search Results page. See the Searching Parameters topic.
|-| Managing Transferred Calls=
To consult, conference, or blind transfer active calls, click on the name of another agent in Ready state and a dialog box appears with the following options:
- Blind transfer the call to the other agent and disconnect.
- Consult with the other agent, put the customer on hold, and enable the remaining three options.
- Add the customer to the conference along with the other agent.
- Transfer the call to the other agent.
- Disconnect the other agent and add the customer back to the call.
|-| Managing Wrapup Calls=
When the call finishes, the following wrap-up screen appears.
- Click Add More Time to extend your wrap-up time.
- Select from the list of after-call work reason codes (configured in VCC Dashboard). You stay in the ACW state until you change your status to Ready.
- Enable Mark Me Away After Call, so you do not receive another call.
- Click Done when finished with the call. If the dial pad is viewed from the customer or transaction record, then a phone call with the wrap-up information is created for the customer or the transaction's entity record. For more information, see Managing Phone Logs
|-| Managing Phone Logs= For any inbound or outbound calls, the added wrap-up comments are stored in their respective entity activities as phone call records:
- Select the Message tab to display the comment.
- Select the Genesys Call tab to display call details.
|-| Managing ClickToDial Phone Fields=
Click the number to initiate an outbound call. You can click-to-dial the phone fields in the Entity, Transaction, and Activity type records in View mode.
|-| Signing Out=
To sign out, click the top-left corner and select Sign Out.
|-|
</multistep>


