Data Tables
Contents
Learn about data tables and how you can use them in your applications.
Go to Business Controls > Data Tables to view and manage your data tables.

What is a data table?
A data table contains values that can be read by a Designer application. It has rows and columns and looks similar to a spreadsheet (in fact, you can even export a data table and edit it in a program such as Microsoft Excel), but operates more like a database. Each data table has at least one primary key column, which Designer uses to lookup and retrieve (or store) a value from the table.
When should I use a data table?
Data tables are useful when you want an application to refer to values that are stored outside of the application, or if you want Designer to update values without actually changing them in the application.
For example, you might want customers from a specific region to receive a different welcome message than other customers. Or you might want to specify additional routing handling based on a particular condition being met, such as the business hours for that day or a customer's ID.
Also, certain Business Controls (such as Business Hours and Special Days) have corresponding data types, which means you can add them to a data table and then create and edit their values directly from within the data table.
How do I add a data table to my application?
When you want Designer to reference a data table, just add a Data Table block to the application flow and select the data table you want from the list. To learn more about using this block, see the Data Table block page.
Search bar
The Data Tables page has a standard Search bar:
As you start to type in the Search box, Designer filters the list of data tables to display any matches.
Designer does allow you to search certain columns of a data table and filter for a match when it is open for editing. For more information, see Searching the data table.
Creating a new data table
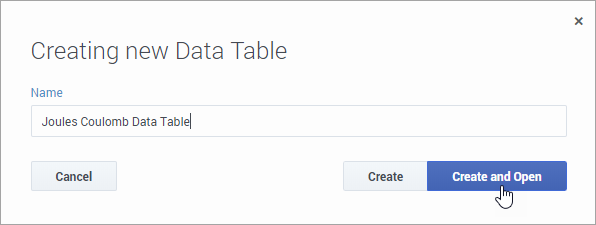
To create a new data table, click Add Data Table and enter a unique name for it.
You can then click Create to save the new data table and return to the main Data Tables page, or Create and Open to save it and start configuring the data table properties.
Some things to keep in mind when planning or creating a data table:
- Limit the number of rows to 1000 and the total size of the data table to no more than 10,000 cells. If the number of rows is less than 1000, you can increase the number of columns until the 10,000 cell limit is reached. For example, a 200 row table can have up to 50 columns, and a 1000 row table can have a maximum of 10 columns.
- A data table is not intended to be used as a full-scale database—there is a limit as to how much data can be stored. Focus on data that is frequently updated or critical to your operations.
As an example, let's create a data table that tells the application to perform some special handling for a voice call based on a dialed number (DNIS). We'll call it Joules Coulomb Data Table:
Click Create and Open to create the table and open it for editing. Our table does not have a schema (structure) yet, so Designer asks us to create one, which we'll do in the next step..
Defining the column settings
When a data table is first opened for editing, Designer asks you to define the structure, or schema.
Click ![]() Manage Schema to define the Column Settings. (If the data table already has a schema defined, you can get to the column settings by clicking Column Settings when the data table is open for editing.)
Manage Schema to define the Column Settings. (If the data table already has a schema defined, you can get to the column settings by clicking Column Settings when the data table is open for editing.)
In this example, we want to use the DNIS as the lookup key. The lookup key is the column that holds the value that Designer will search for when referencing the data table. We'll create a column called Dialed Number and select it as a Key column. We can then define the additional properties for this column, as follows:
Key?
Indicates if this column is a key column used to look up a row of values. In the example above, we want our column to be a key, so we've selected this option. Note: You can only select this option after you have entered values for the other column properties.
Clearly define the lookup keys, as these are important for searching for (and locating) the target data.
Column
The name of a column to add to your data table. In the above example, we've entered DNIS.
Clearly categorize the data that you want to store. For example, if you are storing customer profiles, some various categories could be Name, Address, and Phone. Then you could set up Name and Address as a string data type and Phone as a numeric data type.
Display Name
Lets you customize how the column name is to be shown in the data table (this does not overwrite the actual Column value). In the above example, we've entered Dialed Number (DNIS).
Data Type
Specifies the type of value(s) that will be used by this column. Supported data types include string, numeric, boolean, announcement, integer, datetime, datetimerange, skillexpression, timezone, businesshours, and specialdays. For this example, we've selected string.
Description
An optional description of the column.
Optional Restrictions
For certain data types, you might want to specify any special restrictions. For example, you could limit a string value to a certain number of characters.
Finishing up
Add and define any additional columns that are needed. When done, click Save. You now have a data table with a key column of Dialed Number. You can go to Editing data tables for information about how to make changes to the data table, such as modifying its settings and adding rows and values.
Here is our example table with some additional columns added:
When you are ready to use the data table in an application, click Publish Table and use a Data Table block to add it to your application.
Editing a data table
To open a data table for viewing or editing, go to Business Controls > Data Tables and click the link for the data table you want to edit. (If another user has the data table open for editing, you will only be able to view it in read-only mode.)
From the editing mode, you can
- add or remove rows
- change column settings
- update values
- locate a specific value or row
- save and/or publish the data table
Don't forget! You can save your changes, but they won't take effect until the data table is published.
Adding or removing rows
To add a row, click Add Row. To remove a row, select it and click Mark For Deletion. Any rows that you mark for deletion are removed the next time you save the table.
Changing column settings
Click ![]() Column Settings to add new columns or update the properties of existing columns.
Column Settings to add new columns or update the properties of existing columns.
For example, you can update the Display Name of a column, indicate if it is Mandatory, or specify any Optional Restrictions for that particular data type, such as a maximum string length for string types or whether to enable Enforce non-overlapping dates for datetimerange types.
Use the options under Actions to change a column's position in the grid or delete it.
Changing data table values
You can change the value of a table cell by clicking on it. As soon as you start editing a cell, the row is automatically selected and the updated text is displayed in blue:
Updating Business Hours and Special Days
You can change these directly in the data table. If you click on a Business Hours or Special Days value, you can select a different item or create and add a new one.
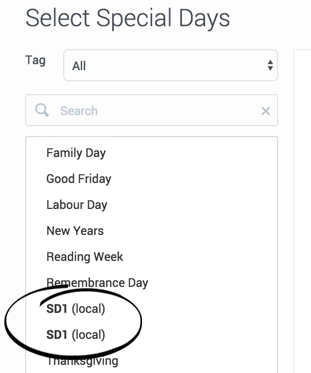
One thing to keep in mind — if you add new Business Hours or Special Days to a data table, the new business object is local to that data table. In other words, it can only be used by the data table it was created in. It won't appear in the global Special Days list and it won't be available to select in other data tables.
Local business objects appear in bold with a (local) label:
Searching the data table
There are a couple of ways you can quickly locate a specific value or row:
- Each column header has a search box. As soon as you start typing, Designer shows only those rows that contain a match to what you have entered.
- The Row Count box at the bottom of the page lets you jump directly to the specified row number.
Reviewing your changes
At the bottom of the data table, a tracker displays how many rows you have added, modified, or marked for deletion.
To view only the rows that were added, changed, or marked for deletion, check the Show Modified Rows Only box. Uncheck it to go back to editing mode.
You can also review changes to local business objects by clicking Display Business Object Diffs and selecting Business Hours or Special Days. You can then select an item from the list to view the original version side-by-side with the revised version. On the original version, edited properties are highlighted in red to indicate edits and deletions. On the revised version, edited properties are highlighted in green to indicate edits and additions.
Saving the data table
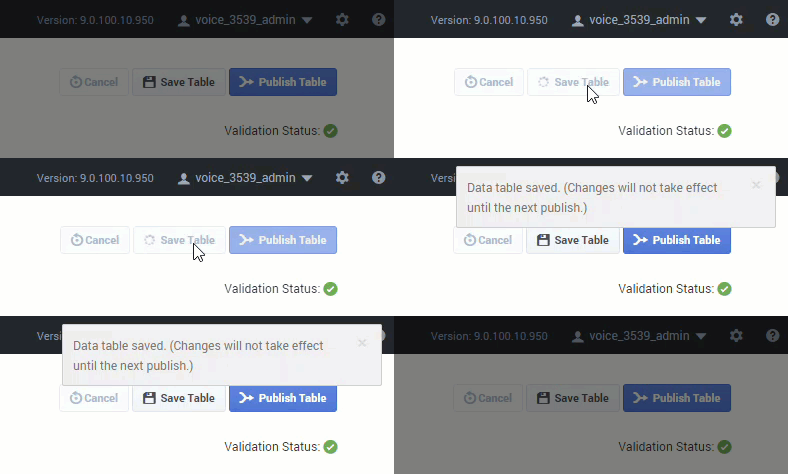
When you are ready to commit your changes, click Save Table. Make sure to review your changes! After you click Save Table, the changes can't be undone.
Designer validates your changes and lets you know if there are any errors.
During the save operation, you might see some values (particularly for Business Hours or Special Days) suddenly change to N/A. This is just temporary, and the correct values will re-appear after the save completes.
Don't forget! Saving a data table only preserves the changes you have made. To activate the changes, you must publish the data table.
Publishing the data table
Click Publish Table to publish (i.e. activate) the data table in the live production environment. Click Confirm Publish to start the publishing process.
If you are publishing changes to an existing data table, Designer also lists the differences between the previously published version of the data table and the one you are publishing now. You can review these changes before clicking Confirm Publish.
After you publish the data table, the applications that reference it have access to the latest changes.
Viewing the history
Click View History in the Actions toolbar (![]() ) to open the history view (i.e. audit log) for a data table.
) to open the history view (i.e. audit log) for a data table.
The history view shows you a list of each time the data table was viewed, edited, or published, the user who made the change, and the new and previous value of any properties that were changed.
You can use the buttons on the page to view the results for a specific time period (for example, last 1W to see the results for previous week), or use the date fields to specify a custom date range. Results can be sorted or searched and you can use the Export button to export the results as a CSV file.
You can drill-down further into each results item by double-clicking it. This opens an audit window opens that displays additional details for that particular event.
Exporting and importing data tables
You might prefer to use another program, such as Microsoft Excel, to edit data table values. If so, you can export a data table from Designer into a CSV file that can be edited in Excel. When you are done, you can import the edited CSV file into Designer.
- DO NOT open an exported data table in Excel before reading the information contained in Editing exported data files in Excel. This will help you to avoid any unexpected data changes in your file.
- When importing the edited CSV file, do not change the column headers in Designer. The headers of the data table columns must remain unchanged between the export and the subsequent import. Otherwise, the import will fail.
Export
Click Export in the Actions column to export a Data Table from Designer into a CSV file.
Below is a sample Data Table, its generated CSV file, and the CSV file in Microsoft Excel.
Data Table
CSV File
Here is how the row that is highlighted above would appear in the exported CSV file:
Note that some of the items are represented by their resource ID and not their actual name. For example, the audio resource AZ_IN_Open Greeting appears as "dbc63d70-37d6-11e6-a888-e53edc8cf09b". This ensures that the correct resource is being referenced (names of resources can be changed, but their assigned resource IDs always remain the same).
Data Table in Microsoft Excel
Here is how the CSV file appears when viewed in a program like Microsoft Excel:
After you have edited the CSV file, you can import it into Designer.
Import
To import a CSV file into a data table, locate it in the Data Tables list and click Import in the Actions column.
- Import is disabled for data tables that contain menu data types. If you do not see the Import icon in the Actions column for a data table, it indicates that the data table is using the menu data type.
- If you are importing a CSV file into a populated data table, make sure that the CSV file and the data table use the same table headers. If the headers do not match, Designer displays an error.
Editing exported data tables in Excel
If you use Microsoft Excel to edit a CSV file, the program might re-format some of the data without any indication that these changes are being made. This can cause unexpected issues when the file is later imported back into Designer.
You can use the following guidelines to safely open a CSV file in Excel for editing. (The steps as described might differ slightly from your version of Excel. If you get stuck, you can use the help tool in Excel to find more information about how to perform that step in your version.)
- In Excel, open a new blank workbook. Go to the Data tab and select Get Data > From Text.
- TipIf you only have an option for combined Text/CSV, you can enable the legacy wizard for importing a text file by going to File > Options > Data and enabling the From Text (Legacy) import wizard. Once enabled, you can then select Get Data > Legacy Wizards > From Text (Legacy) to open your file.
- Browse to the CSV file for the data table you want to open and select Import.
- In the Import Wizard, choose Delimited as the original data type and click Next.
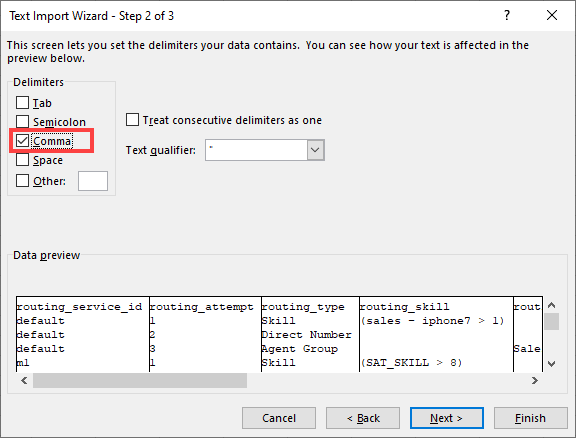
- Select Comma as the Delimiter. Make sure to deselect any other checkboxes that are selected. Click Next.
- In the Data preview, the first column should now be highlighted. Hold down the Shift key and click on the last column to select and highlight all columns. You might need to scroll to the right, depending on how many columns your data table has.
- With all columns selected, select Text as the Column data format. Click Finish.
- If prompted, in the Import Data dialog, select New worksheet for the data destination and click OK.
The file is now opened safely for editing. When you are ready to save the file and import it back into Designer, make sure to save it as a CSV (comma-delimited) type of file. This is the only type of file that Designer allows for data table imports.


