Genesys Web Engagement Components
You should be familiar with the following Genesys Web Engagement components before you dive into the Playground application:
DSL File
The DSL file is used to manage and customize business events. When you create an application, a set of Domain Specific Language (DSL) files that are used by your application is also created. These files are defined in the apps\Your application name\_composer-project\WebEngagement_EngagementWidgets\dsl\ directory. You can use the DSL to define Business events (read about the structure of these events here) that are specific to your solution needs.
Default domain-model.xml
The domain-model.xml is the main default DSL file for your application:
<?xml version="1.0" encoding="utf-8" ?>
<properties>
    <events>
        <!-- Add your code here
        <event id="" name="">
        </event>
        -->

        <!-- This is template for your search event -->
        <!--
        <event id="SearchEvent" name="Search">
            <trigger name="SearchTrigger" element="" action="click" url="" count="1" />
            <val name="searchString"       value="" />
        </event>
        -->
        <event id="TimeoutEvent10" name="Timeout-10" condition="" postcondition="document.hasFocus() === true">
            <trigger name="TimeoutTrigger" element="" action="timer:10000" type="timeout" url="" count="1" />
        </event>
        <event id="TimeoutEvent30" name="Timeout-30" condition="" postcondition="document.hasFocus() === true">
            <trigger name="TimeoutTrigger" element="" action="timer:30000" type="timeout" url="" count="1" />
        </event>

    </events>

</properties>
By using the <event> element, you can create as many business events as you need. These events can be tied to the HTML components of your page and can have the same name, as long as they have different identifiers (these identifiers must be unique across the DSL file, to make a distinction between the events sent by the browser). It can be useful to associate several HTML components with the same event if these HTML components have the same function. For instance, you can define several events associated with a search feature and give all these events the same name: "Search".
For each event, you can define triggers which describe the condition to match in order to submit the event:
- Triggers can implement timeouts.
- Triggers can be associated with DOM events.
- You can define several triggers for the same event (see <trigger> for further details).
Each trigger should have an element attribute that specifies the document's DOM element to attach the trigger to, and the action attribute, which species the DOM event to track.
You can specify standard DOM events for the action:
- Browser Events
- Document Loading
- Keyboard Events
- Mouse Events
- Form Events
In addition to the standard DOM events, the DSL supports the following two values: timer and enterpress.
The following example generates a "Search" event if the visitor does a site search. The "searchString" value is the string entered in the "INPUT.search-submit" form.
<event id="SearchEventClick" name="Search">
          <trigger name="SearchTrigger" element="INPUT.search-submit" action="click" url="" count="1" />
          <val name="searchString" value="INPUT.search-submit" />
</event>
If the DSL uses the optional condition attribute, the event's triggers are installed on the page if the condition evaluates to true. The following example creates a Business event with a time that can be triggered only if the text inside the <h1> tag is "Compare":
<event id="InactivityTimeout4CompareProductsEvent" name="InactivityTimeout4CompareProducts" condition="$('h1').text() == 'Compare'">
           <trigger name="InactivityTimeout4CompareProductsTrigger" element="" action="timer:10000" type="timeout"  url="http://www.MySite.com/site/olspage.jsp" count="1"/>
</event>
If the DSL uses an optional postcondition attribute, this can manage how an event is generated by checking a condition after the actions are completed. The following example creates a Business event timeout by timer if a page is in focus. In this case, the event does not generate if the page is opened in the background:
<event id="TimeoutEvent10" name="Timeout-10" condition="" postcondition="document.hasFocus() === true">
         <trigger name="TimeoutTrigger" element="" action="timer:10000" type="timeout" url="" count="1" />
</event>
A DSL trigger can use the type attribute. This can have a value of either timeout or nomove, which specifies how the timer action works. If the type is timeout, then the timer interval begins after the page is loaded. If the type is nomove, then the timer resets each time the user moves the mouse.
You can also apply the optional url attribute. This attribute defines the URL of the specific page that raises the Business event. The Business event is not submitted if the current document's URL does not match the URL parameter.
Finally, you can apply the optional count attribute. This attribute specifies how many times the trigger needs to be matched before the event is generated and sent to the Frontend Server.
For more information about the DSL elements, see the Business Events DSL.
Categories
You can use the GWE Plug-in for Genesys Administrator Extension to define, in a few clicks, Web Engagement categories that contain business information related to URL or web page titles. These categories are used in the CEP rule templates, which provide rules that define when to submit actionable events to Web Engagement — this is what starts the engagement process.
For example, lets look at Solutions on the Genesys website. In this scenario, you can define a Solution category associated with the http://www.genesys.com/solutions page and several or all solution sub-pages, such as http://www.genesys.com/solutions/cloud or http://www.genesys.com/solutions/enterprise-workload-management.
- To associate the category with all the pages containing the "solutions" string in the URL, you can create the "solutions" tag. This tag defines the "solutions" string as a plain text expression to search in the events triggered by the visitor browsers.
- To set up a specific list of sub-pages for the Solutions category, you can create a tag for each sub-page:
- The "cloud" tag, which defines the "cloud" string as the plain text expression to search in the events triggered by the visitor browsers.
- The "enterprise-workload" tag, which defines the "enterprise-workload-management" string as the plain text expression to search in the events triggered by the visitor browsers.
Now your rules can use this category to match solution-related pages.
Instrumentation Script
The Tracker Application instrumentation script is a small piece of JavaScript code that you paste into your website to enable Web Engagement functionality. You create this script by using the Script Generator in the Genesys Web Engagement Plug-in for Genesys Administrator Extension.
Rules Files
Genesys Rules System (GRS) provides the ability to develop, author, and evaluate business rules. A business rule is a piece of logic defined by a business analyst. These rules are evaluated in a Rules Engine based upon requests received from client applications such as Genesys Web Engagement. GRS implements the CEP (Complex Event Processing) template for GPE. This template type enables rule developers to build templates that rule authors then use to create rules and packages. These rules use customized event types and rule conditions and actions. Each rule condition and action includes the plain-language label that the business rules author will see, as well as the rule language mapping that defines how the underlying data will be retrieved or updated.
The Playground application has a pre-built rule file, called rule.com.playground.drl, located at GWE_installation_directory\servers\frontend\storage. The rules included in this file demonstrate the basic concepts of how Genesys rule files are used.
| Singleton
|
| "Rule-101 singleton"
|
The rule receives each single event as a formal parameter. If the event's value matches the right category, then the actionable event is sent to the Web Engagement Backend Server.
|
| Expression Example
|
When
- page transition event occurs that belongs to category $category
Then
- generate actionable event
|
| Sequence
|
| "Rule-108 sequence"
|
This rule analyses the event stream received from the categorization engine and builds the sequence of events by category values. As soon as the event sequence is completed, the actionable event is submitted. Note that the event sequence must follow a specific order.
|
| Expression Example
|
When
- page transition event occurs that belongs to category $category1 save as $event1
and
- event following $event1 with category $category2 save as $event2
(...)
and
- event following $eventn-1 with category $categoryn save as $eventn
Then
- generate actionable event based on $eventn
|
| Set
|
| "Rule-136 Set"
|
This rule analyses the event stream received from the categorization engine and collects the events by category values. As soon as the event set is completed, the actionable event is submitted. If you use this rule, the event order is not taken into account.
|
| Expressions
|
When
- page transition event occurs that belongs to category $category1
or
- page transition event occurs that belongs to category $category1
(...)
or
- page transition event occurs that belongs to category $categoryn
Then
- generate actionable event
|
| Counter
|
| "Rule-122 counter"
|
This rule analyses the event stream received from the categorization engine and counts events which occur for a given category. As soon as the counter is reached, the actionable actionable event is submitted.
|
| Expressions
|
When
- Category $category counts $count times
Then
- generate actionable event
|
Strategies
When you create your application, Genesys Web Engagement also creates default chat routing and engagement logic strategies in the \apps\application_name\_composer-project\ folder. Orchestration Server (ORS) uses these strategies to decide whether and when to make a proactive offer and which channels to offer (chat or web callback). You can modify these strategies by importing them into Composer.
The following shows the Chat Routing workflow, where interactions are routed to agents with "Customer Service" or "Customer Care" skills:
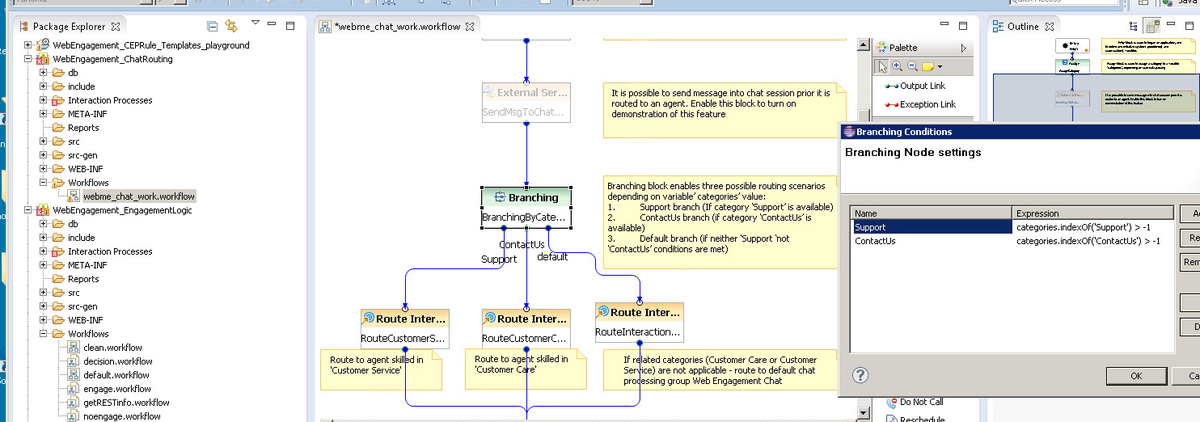
A Chat Routing workflow example.
When you alter the strategies, you must save your changes, generate the code, redeploy, and restart your Genesys Web Engagement application to apply those changes.
Widgets
Genesys Web Engagement includes three pre-integrated Browser Tier widgets:
- Invitation Widget
- Chat Widget
- Callback Widget
These widgets are based on HTML, CSS, and Javascript, and can be customized to suit the look and feel of your website. When you create an application, Genesys Web Engagement creates a Composer project that has a directory dedicated to the widgets: apps\<application_name>\_composer-project\WebEngagement_EngagementWidgets.

The Browser Tier Widgets.
You can customize the widgets using the HTML files in this directory, CSS, or the Notification Service API. You can also build your own version of a particular widget with the help of the Web Engagement APIs.}}
Configuration Options
For a full list of configuration options for the Frontend and Backend servers, see Configuration Options.
Monitoring Agent API
The Monitoring Agent API is available through the JavaScript libraries provided by the Web Engagement Frontend Server at runtime. By using this API in your web pages, you can submit events to the Genesys Web Engagement Frontend Server, independently from the set of events and conditions defined in the DSL files loaded by the browser's Monitoring Agents. For more information, see the Monitoring Agent API documentation.


 Click Engage!
 Click Chat in the chat pop-up.
 Click Start Chat after filling out the registration form.

