Configure Cassandra Security
Security configuration for Cassandra enables a secure JMX connection between Feature Server (FS) and its embedded Cassandra.
Embedded Cassandra JMX Authentication
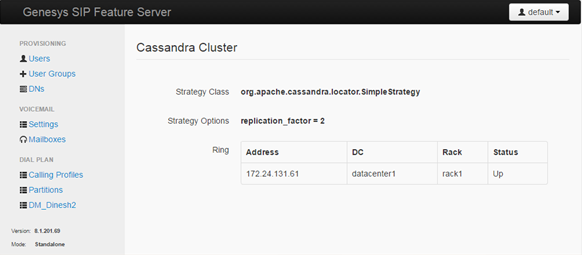
You can follow this procedure to activate the JMX anonymous authentication and view your FS Cassandra nodes status in the FS UI.
Important
This feature is not available for versions prior to 8.1.201.82.
- Edit the launcher.xml file and set the following parameters to true:
-Dcom.sun.management.jmxremote.authenticate=true - Edit the parameter as follows:
-Dcom.sun.management.jmxremote.password.file=./etc/jmxremote.password - Copy: jmxremote.password.template
from: /jdk_install_location/jre/lib/management/
to: <FS Installation directory>/etc/
then rename it: jmxremote.password
For OpenJDK 11,
Copy: jmxremote.password.template
from: /jdk_install_location/jre/conf/management/
to: <FS Installation directory>/etc/
then rename it: jmxremote.password
- Edit the <FS Installation directory>/etc/jmxremote.password file to add the following username:
fsadmin yourpassword
For OpenJDK 11,
Edit the <FS Installation directory>/etc/jmxremote.password file to add the following username:
monitorRole yourpassword
controlRole yourpassword
fsadmin yourpassword
- Change the ownership of jmxremote.password to the user you run FS with and change permission to read only.
For Linux,
chown fsadmin:fsadmin <FS Installation directory>/etc/jmxremote.password
chmod 400 <FS Installation directory>/etc/jmxremote.password
For Windows, see the Oracle documentation.
- Enable read and write permission to the FS user in:
/jdk_install_location/lib/management/jmxremote.access file by adding the following:
fsadmin readwrite
For OpenJDK 11:
Edit /jdk_install_location/conf/management/jmxremote.access file by adding the following:
fsadmin readwrite
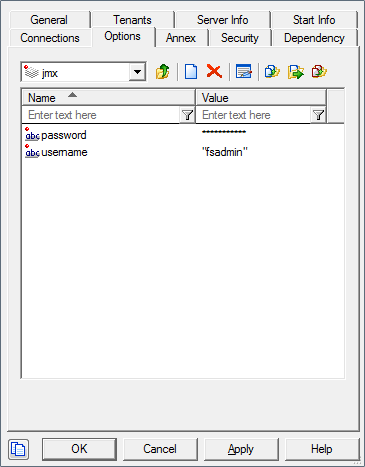
- Edit your FS configuration and create the following options in the Options tab:
Section jmx
username=fsadmin
password=yourpassword

- Start FS. You can see the status of the Cassandra nodes in:
http://<FS_HOST>:<PORT>/fs/admin#system/cassandra

Cassandra JMX TLS
A Java Management Extensions (JMX) tool manages and monitors Cassandra. The JMX access must be protected to avoid any remote managing on the FS embedded Cassandra.
- To protect JMX access, edit the launcher.xml file and modify the parameters as follows:
-
-Dcom.sun.management.jmxremote.ssl.enabled.protocols=TLSv1.3
-Dcom.sun.management.jmxremote.port=9192
-Dcom.sun.management.jmxremote.ssl=true
-Dcom.sun.management.jmxremote.authenticate=true
-Dcom.sun.management.jmxremote.registry.ssl=true - Set up Transport Layer Security (TLS). For information on how to create a server certificate, see the Genesys Security Deployment Guide.
- Create a keystore in <FS Installation directory>/etc/ and upload the custom-generated server certificates to the keystore. See the
Oracle documentation.
Note: If FS HTTPS is already enabled with a server certificate, the same keystore and certificate can also be used to secure the embedded Cassandra JMX port.
- Edit and configure the following JVM options in launcher.xml.
- javax.net.ssl.trustStore = ./etc/keystore [path of the trust store file]
- javax.net.ssl.trustStorePassword = <trust store password>
- javax.net.ssl.keyStore =./etc/keystore [path of the keystore file]
- javax.net.ssl.keyStorePassword = <keystore password>
- javax.net.ssl.trustStore = ./etc/keystore [path of the trust store file]
- Restart the FS to enable a secure JMX connection with the embedded Cassandra.
- To protect JMX access, edit the launcher.xml file and modify the parameters as follows:
This page was last edited on June 27, 2022, at 12:09.
Comments or questions about this documentation? Contact us for support!
