Migrating from 8.1 to 8.5
|
Describes how you can migrate your application from former 8.1 versions to 8.5 versions. |
Contents
Introduction
In release 8.5, services data are no longer stored in Universal Contact Server (UCS) database; they moved to Genesys Moblie Services (GMS) Cassandra database.
- If you are upgrading from 8.1 to 8.5, you must first migrate your Context Services data using the Context Services migration tool.
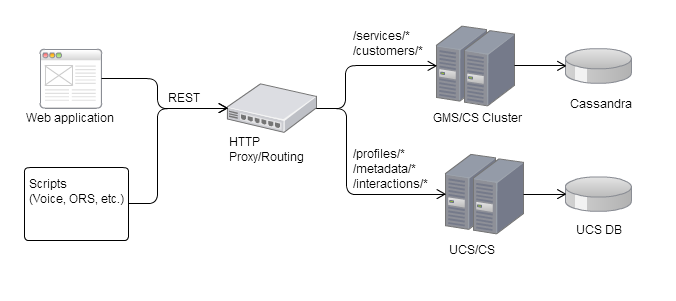
- If your application needs profiles, you can keep using data stored in UCS. You do not need to modify the 8.1.3 Context Services queries for profiles and interactions. In this scenario, you must also set up your proxy to correctly handle URLs, as shown in the architecture diagram below.
As detailed in the Context Services Developer's Guide, profiles, interactions, and additional metadata resources are no longer available in 8.5. If your application requirements include these resources, you can still use the UCS APIs to manage customer data. You must update the UCS configuration to point to the same base URL than GMS. You should therefore edit your proxy configuration; see below for detailed instructions.
Database Migration Process
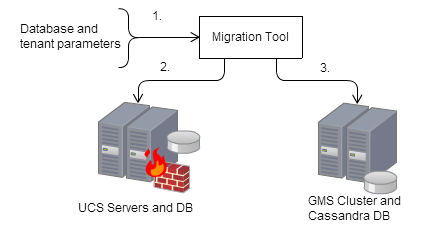
The migration tool is a command line tool installed with the Context Services. This tool exports the services stored in UCS and then imports them in the Cassandra Database of the GMS Cluster:
- All service data, including state, tasks, and extensions are migrated.
- All the start/complete events are re-created.
- Launching the tool with all required parameters.
- Extracting Context Service data from UCS DB.
- Importing Context Service data in GMS DB.
Database Migration Results
The migration tool creates the following files after the migration:
- <Migration Tool Directory>/failure.log;
- <Migration Tool Directory>/success.log.
If no error occurs during the migration, the Context Services is then available in the Genesys Mobiles Services cluster.
Interruption during the Database Migration
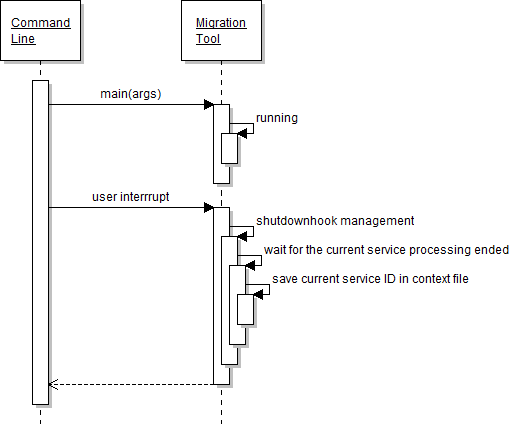
You can abort the migration during the import stage by entering CTRL-C command at the console.. The migration process may need a few seconds to stop. Then, you will be able to restart the migration tool by specifying the last imported service ID with the -continue-from option.
Here is an interruption sequence diagram.
Migrating the Context Services from UCS to GMS Database
You must complete the following steps to perform the service data migration:
Checking the Business Attributes Mapping Options
Procedure: Checking the Business Attributes Mapping Options
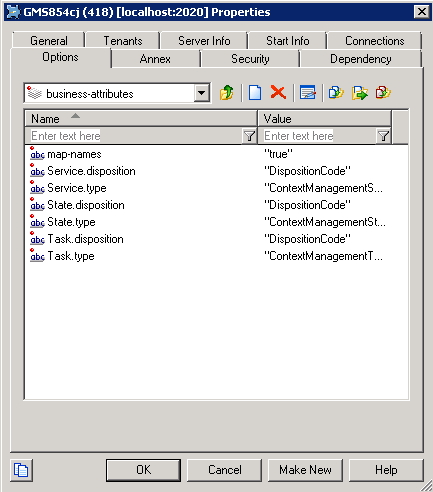
Purpose: To make sure that your UCS/CS and GMS/CS applications have the same business attribute mapping. The mapping may be disabled during the migration process.
Steps
Enabling the Custom IDs
Procedure: Enabling the Custom IDs
Purpose: To configure the allow-custom-ids option which allows the migration tool to replicate the UCS service IDs in the GMS Cassandra database. This option allows to keep identical IDs in the new storage location. Note that further services will be created with distinct UUID-type IDs.
Steps
- Open the Configuration Manager and edit your GMS application.
- Select the Options tab, and select the cview section.
- Click Add to create Add the option allow-custom-ids and set its value to true.
- Click OK to apply changes.
Running the Migration Tool
Procedure: Running the Migration Tool
Purpose: To migrate services from UCS database to Cassandra.
Before you run the tool, make sure that:
- You installed the Context Services.
- The Migration Tool is available in the <GMS installation directory>/tools/cs_migration_tool folder.
- You already set the cview/allow-custom-ids option to true and your business-attributes options are set correctly for both UCS and GMS.
The command line tool includes two migration modes:
- The DB mode, which migrates all the services from the UCS database to the GMS database;
- The FILE mode, which migrates a restricted list of service IDs from the UCS database to the GMS database.
Steps
- Open a console.
- Enter the migration command line:
$ startClient.bat [DB_OPTIONS] -tenantid <tenantID> -ucsurl <UCS_URL> -gmsurl <GMS_URL> [ADDITIONAL_OPTIONS]
or
$ startClient.bat  -file <PATH_TO_FILE> -tenantid <tenantID> -ucsurl <UCS_URL> -gmsurl <GMS_URL>  [ADDITIONAL_OPTIONS]
See the tables below for information about the parameters.
The parameters are described in the following table:
| Parameters | Scope | Mandatory | Description |
|---|---|---|---|
|
-dbtype |
DB only | Y | Sets the type of Database used for UCS/CS ('oracle' or 'mssql')
-dbtype mssql |
|
-dbhost |
DB only | Yes | Sets the host for the UCS/CS Database
-dbhost demo_srv |
|
-dbport |
DB only | Yes | Sets the port of the UCS/CS Database.
-dbport 1433 |
|
-dbname |
DB only | Y | Sets the name of the UCS/CS Database to migrate. In this case, all the services are migrated to the GMS database.
-dbname UCS |
|
-dbuser |
DB only | Yes | Sets the user name of the UCS/CS Database.
-dbuser sa |
| -dbpassword | DB import only | Yes | Sets the password of the UCS/CS Database.
-dbpassword mypass |
|
-file |
FILE only | Yes | Sets the migration file which contains the list of ServiceIds to migrate.
This text file (.txt) must contain one service_id per line; for example, you can create a file named listOfIds.txt containing the following list of IDs: 10001
10002
10003 |
|
-ucsurl |
ALL modes | Yes | Sets the UCS/CS URL.
-ucsurl http://<host>:<port>/genesys/1/c |
|
-gmsurl |
ALL modes | Yes | Sets the GMS URL.
-gmsurl http://<host>:<port>/genesys/1/cs |
|
-tenantid |
ALL modes | Yes | Sets the GMS/CS tenant DBID.
-tenantid 102 |
|
-continue_from |
ALL modes | No | In case of restart, specifies from which service_id to continue the migration.
-continue_from 10003 |
In addition, the migration tool supports a set of additional options which help you to fine-tune your migration. Each option matches the following syntax:
-D<option>="<value>"where <value> can either be a number or a string.
| Option | Scope | Mandatory | Description |
|---|---|---|---|
| EXTRACTOR_SELECT_QUERY | DB import only | No | Sets a specific selection query to migrate data from UCS/CS Database.
The default value is: SELECT ServiceId, StartTime FROM ServiceStarted UNION SELECT ServiceId, StartTime FROM ServiceStartedAnonymous ORDER BY StartTimeThe query must return the service ids in the first column; for example: // selecting a range of services
-DEXTRACTOR_SELECT_QUERY="SELECT ServiceId FROM ServiceStarted WHERE ServiceId >= 822184 AND ServiceId < 922184 ORDER BY StartTime ASC"or // selecting all the associated services which are not completed
-DEXTRACTOR_SELECT_QUERY="SELECT ServiceId FROM ServiceStarted WHERE (ServiceId NOT IN (SELECT ServiceId FROM ServiceCompleted)) ORDER BY StartTime ASC" |
| THREAD_POOL_SIZE | Any | No | Sets the number of services to process in parallel.
Default is 30. The default value should be fine in most cases. If you modify this value, you change the number of requests that will be in process in case of user termination on demand (Ctrl-C). -DTHREAD_POOL_SIZE=50 |
Additional Configuration for UCS Backward Compatibility
Configuring the new Context Services URL for UCS
Procedure: Configuring the new Context Services URL for UCS
Purpose: To enable your UCS/CS application to run concurrently with your GMS/CS application.
Steps
- Open the Configuration Manager or the Genesys Administrator, and edit your UCS application.
- Set the following option values for the cview section:
- Set base-url to /genesys/1/cs
- Set data-validation to false
- Set enabled to true
- Set metadata-cache to true
- Set start-mode to production
- Set tenant-id to the same tenant ID than your GMS application.
- Set the following option values for the ports section:
- Set ucsapi to 7520
- Set the following option values for the unsupported section:
- Set disable-schema-version-check to true
Setting the Proxy for UCS Profiles
The following configuration examples should help you to manage URLs and redirections.
<tabber> NGINX Example=
NGINX Example
If your application uses NGINX, edit the NGINX configuration file, available in the <NGINX INSTALLATION DIR>/conf directory and add the /genesys/1/cs as the new base URL.
worker_processes  1;

events {
    worker_connections  1024;
}

http {
    include       mime.types;
    default_type  application/octet-stream;
    sendfile      on;
    keepalive_timeout  65;

    server {
        listen       3080;
        server_name  localhost;

		######################################
		# If base_url (default) -> goto GMS
		# /services
		# /metadata/business-attributes
		# /customers/${customer id}/services
		######################################
		location /genesys {
			proxy_pass  http://localhost:8080;
		}

		######################################
        	# If profiles, interactions or /server -> goto UCS/CS
		#
		# /profiles
		# /metadata/profiles
		# /metadata/identification-keys
		# /server
		# /interactions/${interaction id}
		# /customers/${customer id}/interactions
		######################################
		location ~ interactions | profiles | identification-keys | server {
			proxy_pass http://localhost:7580;
		}
    }
}
|-| Apache=
Apache
If your application uses Apache, edit the httpd.conf file (or alternate file) and implement the new base URL for Context Service, as follows:
LoadModule headers_module modules/mod_headers.so
LoadModule proxy_module modules/mod_proxy.so
LoadModule proxy_http_module modules/mod_proxy_http.so
LoadModule rewrite_module modules/mod_rewrite.so

# CORS headers
Header set Access-Control-Allow-Origin *
Header set Access-Control-Allow-Credentials true
Header set Access-Control-Allow-Headers "Origin, Content-Type, Authorization, Destination"
Header set Access-Control-Allow-Methods "GET, POST, OPTIONS, DELETE"
Header set Access-Control-Request-Headers "Origin, Content-Type"
Header set Access-Control-Max-Age 3600

# proxy to UCS/CS
ProxyPass /genesys/1/cs/profiles http://localhost:7580/genesys/1/cs/profiles
ProxyPass /genesys/1/cs/metadata/profiles http://localhost:7580/genesys/1/cs/metadata/profiles
ProxyPass /genesys/1/cs/metadata/identification-keys http://localhost:7580/genesys/1/cs/metadata/identification-keys
ProxyPass /genesys/1/cs/server http://localhost:7580/genesys/1/cs/server
ProxyPass /genesys/1/cs/interactions http://localhost:7580/genesys/1/cs/interactions

# proxy to GMS/CS
ProxyPass /genesys http://localhost:8080/genesys
ProxyPassReverse /genesys http://localhost:8080/genesys

